
ELEC-230 · Lesson 5 of 12 · 26 min
Advanced bending: segmented, parallel and PVC bends
Hand benders handle branch circuit conduit up to about 1¼ inches. Feeders, service conduits and large raceway banks need larger conduit, bent with mechanical, hydraulic or electric benders, and they often run in groups whose bends must nest neatly together. PVC, widely used underground and in corrosive areas, is not bent with a shoe at all but with heat. This lesson covers the equipment for large conduit, segmented (large-radius) bends, concentric and parallel bending of conduit banks, and the heat bending of PVC, with the calculations that make each one come out right.
Benders for large conduit
Several types of machine extend bending to larger sizes:
- Mechanical (ratchet or lever) benders: hand-operated, with a ratchet or long lever multiplying force, for EMT and rigid up to about 1¼ inches.
- Hydraulic benders: a hand or electric hydraulic pump drives a ram that pushes the conduit into a shoe, for rigid and EMT from 1¼ up to 4 inches. They may bend in one shot or in segments.
- Electric benders: motor-driven shoes that make one-shot bends quickly and repeatably, with a protractor or digital readout, for EMT, IMC and rigid up to 2 inches or more. They are standard on large jobs and in prefabrication shops.
Each bender and shoe set has its own take-up, gain and minimum stub length, given in tables supplied by the manufacturer. Large benders also have a minimum distance from the end of the conduit for a bend (because the conduit must be gripped), which affects how short a stub can be. Always use the shoe that matches the conduit type and size: a rigid shoe on EMT, or an EMT shoe on rigid, will flatten or kink it.
Segmented bends
Some bends need a larger radius than any shoe provides, for example sweeps in large feeders that must accept cables with large minimum bending radii, or a gentle curve following a curved wall. A segmented bend builds a large-radius curve from many small bends ("shots") spaced evenly along the arc. The method:
- Choose the radius R and the total angle (usually 90°).
- Choose the number of shots n; more shots make a smoother curve. Each shot is the total angle divided by n.
- The arc length of the bend is 2πR × (angle/360°). The spacing between shots is the arc length divided by n.
- Mark the shots along the conduit and bend each one to its angle, keeping all bends in the same plane.
Worked problem
A segmented 90°
A 3-inch rigid conduit needs a 90° sweep with a 30-inch centreline radius. Lay it out in 15 shots.
Show solution
- Angle per shot: 90° / 15 = 6°.
- Arc length: 2π × 30 × 90/360 = 47.1 inches.
- Spacing: 47.1 / 15 = 3.14 inches between shot marks.
- Mark 15 points 3⅛ inches apart along the conduit and bend 6° at each, keeping them in one plane.
Answer: Fifteen 6° shots at about 3⅛-inch spacing produce a smooth 90° sweep with a 30-inch radius. Checking the angle after every few shots with an angle finder keeps errors from accumulating.
A handy shortcut uses the fact that 2π/360 ≈ 0.01745: the arc length of a 90° bend is about 1.57 × R. For bends where the radius is set by the bender, the manufacturer's gain table replaces this calculation.
Concentric bends
When several conduits turn a corner together, their 90° bends must nest without crossing or changing spacing. In a concentric bend, each conduit is bent around the same centre point with a radius that increases by the centre-to-centre spacing of the conduits. The inside conduit has the smallest radius (often the bender's standard radius) and each outer conduit has a radius larger by the spacing. Because the radii differ, so do their arc lengths and their marks: for a 90° bend, each step outward adds about 1.57 times the spacing to the arc. Concentric bends look professional and keep conduits evenly spaced through the turn, but each conduit needs its own bending setup, so they are usually made with segmented methods or with sets of shoes made for the purpose.
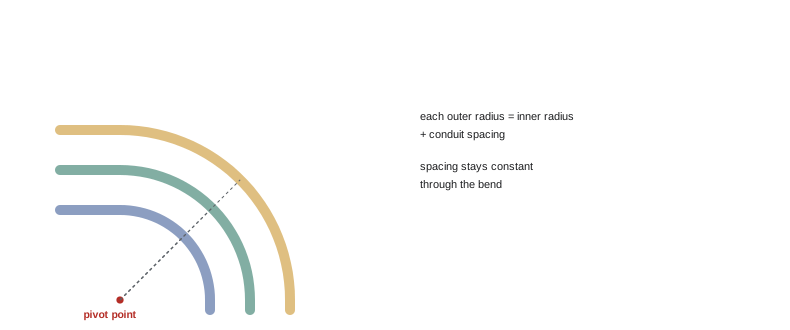
The alternative for parallel 90° bends is to give every conduit the same radius and move the bend points: each outer conduit starts its bend further along by the spacing, so the stubs remain evenly spaced but the curves are not concentric. This is simpler with a hand or electric bender and is common for branch circuit conduits in groups.
Parallel offsets
When a group of parallel conduits makes an offset together, each conduit's marks must be shifted so the offsets line up and the spacing between conduits stays constant through the bends. If all conduits were marked at the same distance from a common start line, the offsets would cross over each other, because each conduit farther from the inside of the first bend must start its bends later. The correction for each successive conduit is the centre-to-centre spacing multiplied by tan(θ/2), the same factor as shrink per inch:
Worked problem
Three conduits offset together
Three ¾-inch EMT conduits spaced 2 inches centre to centre must make a 30° offset of 4 inches around a column. The first (innermost) conduit's first mark is at 50 inches. Where are the first marks on the other two?
Show solution
- Shift per conduit: 2 × tan 15° = 2 × 0.268 ≈ 0.54 inch, about ½ inch.
- Start with the conduit on the inside of the first bend (here the first conduit). Each conduit farther out starts its bends later, so its marks move away from the starting end by the shift.
- Second conduit: first mark at 50½ inches; third conduit: 51 inches, with each second mark 8 inches (4 × 2) beyond its first mark.
Answer: Each conduit's marks shift by about ½ inch relative to the next. Laying out the first conduit, test-fitting it, and then marking the others from a common square line with the shifts applied gives a neat, evenly spaced bank.
Bending PVC
Rigid PVC conduit cannot be bent cold; it is softened with heat and shaped by hand or with forms. Methods include:
- Hot boxes and heaters: an electrically heated box or tube into which the conduit section is placed until it becomes pliable.
- Heat blankets: electric blankets wrapped around the conduit, convenient in the field for larger sizes.
- Hot air or infrared heaters for small adjustments.
Heat the section evenly by rotating it, and avoid scorching, which weakens the conduit. Larger sizes (over about 2 inches) are prone to flattening and are often bent with plugs in the ends (to keep air pressure inside) or a flexible insert. Once shaped, the bend is cooled with a wet cloth or water to set it before it is moved. PVC remembers its original shape somewhat when reheated, so it can be corrected, but repeated heating degrades it. Many installers prefer factory-made elbows for standard 90° and 45° bends in large sizes, especially for underground duct banks, where factory sweeps with large radii are specified for cable pulling.
Because PVC expands with heat far more than steel, long exposed runs need expansion fittings (Lesson 2), and bends made on a hot day in direct sun will shift as the conduit cools.
Bending rigid conduit
Rigid and IMC are bent with the same principles as EMT, but they are stiffer and require more force and appropriately sized shoes. Hand-bending ½- and ¾-inch rigid uses the next larger EMT bender (whose shoe fits rigid of the smaller size), with its own take-up values. Bends near threaded ends can damage the threads, so plan stubs so that threads are cut after bending where possible, or protect them with a coupling during the bend. Galvanizing cracked during bending should be touched up with zinc-rich paint to restore corrosion protection.
Safety with power benders
Hydraulic and electric benders exert large forces. Keep hands and clothing clear of the shoe and the pinch points as the conduit bends; support long conduit lengths so they do not swing as they bend; never stand in the arc of a conduit being bent; check hydraulic hoses and fittings for leaks and damage before use; and follow the manufacturer's procedures for shoe changes and maximum sizes. Electric benders should be on a ground-fault protected supply and their foot or hand controls should stop motion immediately when released.
Using bending tables and apps
Manufacturers publish tables for every shoe: take-up, gain, minimum stub, offset multipliers and segment spacing for common radii. Many electricians now use bending apps or calculators that take the bender model, conduit size and desired dimensions and return the marks, and electric benders with digital controllers store programs for repeated bends. These tools speed the work and reduce arithmetic errors, but they are only as good as the inputs: the right bender model, accurate measurements and a clear understanding of which reference (arrow, star, centreline or outside of the bend) each output refers to. Check the first bend from any new tool or program against a tape measure before trusting it for a whole rack.
Quality checks on large bends
Large conduits are expensive and heavy, so mistakes are costly. Before bending, confirm the conduit type and size match the shoe, check that the conduit is free of dents, and mark the bend plane with a straight line along the conduit so that each shot or bend stays in plane. After each bend, check the angle and the plane; after the final bend, measure the overall dimensions against the layout. Look for flattening on the outside of the bend and wrinkling on the inside; a bend whose internal diameter is reduced must not be installed, because it makes pulling harder and may violate the code's requirement that bends not damage the raceway. Racks of large conduits should be dry-fitted in place before couplings are made up.
Prefabrication shops apply these methods at scale. A shop with an electric bender, a threading machine and a well-organized cutting station can produce racks of identical offsets and concentric bends far more consistently than field crews, and deliver them bundled and labelled by location. The field crew's job then becomes accurate measurement before fabrication and careful installation afterwards. Whichever approach is used, the geometry is the same, and an electrician who understands it can check prefabricated work, adapt it when field conditions differ from the model, and make the occasional bend that no table covers.
Large conduit work also requires attention to handling. Lengths of 3-inch or 4-inch rigid conduit weigh well over 50 kg each after bending, so racks of them are moved with lifts or carts, and installation at height uses mechanical lifting aids and more than one person.
Common mistakes
MistakeUsing an EMT shoe on rigid conduit.
InsteadUse the shoe made for the conduit type and size.
MistakeMaking segmented shots without checking cumulative angle.
InsteadCheck the angle every few shots so errors do not accumulate.
MistakeMarking parallel conduits from the same line without shifting.
InsteadShift each conduit's marks by spacing × tan(θ/2).
MistakeOverheating or unevenly heating PVC.
InsteadHeat evenly while rotating, avoid scorching, and cool to set the bend.
MistakeStanding in the arc of a conduit in a power bender.
InsteadStay clear of the swing and pinch points and support long lengths.
Summary and key terms
- Mechanical, hydraulic and electric benders bend large conduit with their own take-up and gain tables.
- Segmented bends: angle per shot = total ÷ n; spacing = arc length ÷ n; a 90° arc ≈ 1.57R.
- Concentric bends increase radius by the conduit spacing for each outer conduit.
- Parallel offsets shift marks by spacing × tan(θ/2) per conduit.
- PVC is bent with even heat, cooled to set, and often replaced by factory elbows in large sizes.
- Rigid bending protects threads and touches up galvanizing.
- Power benders demand care with pinch points and swinging conduit.
- Hydraulic bender
- A bender driven by a hydraulic ram for large conduit.
- Electric bender
- A motor-driven bender for fast, repeatable bends.
- Segmented bend
- A large-radius bend made of many small shots.
- Shot
- One small bend in a segmented bend.
- Arc length
- The length of conduit along a curved bend.
- Concentric bend
- Bends of several conduits around a common centre.
- Parallel offset
- Offsets in a group of conduits that keep their spacing.
- Hot box
- An electric heater used to soften PVC for bending.
- Factory elbow
- A pre-made bend supplied by the manufacturer.
- Sweep
- A large-radius bend, often factory made.
Practice problems
Work each problem on paper first, then reveal the answer to check.
What is the arc length of a 90° bend with a 24-inch radius?
Show answer
1.57 × 24 ≈ 37.7 inches.
For a segmented 90° in 10 shots, what is each shot?
Show answer
9°.
With a 24-inch radius and 10 shots, what is the spacing?
Show answer
37.7 / 10 ≈ 3.8 inches.
In a concentric bend with 3-inch spacing, how much larger is each outer radius?
Show answer
3 inches.
How much longer is each outer conduit's 90° arc for 3-inch spacing?
Show answer
About 1.57 × 3 ≈ 4.7 inches.
What is the mark shift per conduit for 45° offsets with 3-inch spacing?
Show answer
3 × tan 22.5° ≈ 1.24 inches.
Why do large PVC sizes need plugs or inserts when bending?
Show answer
To prevent flattening.
How is a PVC bend set after shaping?
Show answer
By cooling it with a wet cloth or water.
Which bender is used to hand-bend ½-inch rigid?
Show answer
The ¾-inch EMT bender.
Name two safety precautions with power benders.
Show answer
Keep clear of pinch points, support long lengths, do not stand in the arc, check hoses.
Lesson quiz · 5 questions
Score 60% or more to complete this lesson.
Create a free account to save your progress, take quizzes and earn a certificate.