
ELEC-230 · Lesson 3 of 12 · 26 min
Conduit bending basics: stubs, back-to-backs and gain
Bending conduit is the signature skill of the commercial electrician. Good bending produces runs that are neat, parallel, true to the building lines and easy to pull; poor bending wastes material, produces kinked or "dog-legged" conduit, and makes pulling hard or impossible. Bending is also a matter of simple geometry: once you understand what happens to a length of conduit as it goes around a bender shoe, you can calculate where to put every mark. This lesson covers the hand bender and its marks, the 90° stub-up, back-to-back bends, the gain of a bend, and the habits that produce accurate results. Offsets, kicks and saddles follow in Lesson 4.
The hand bender
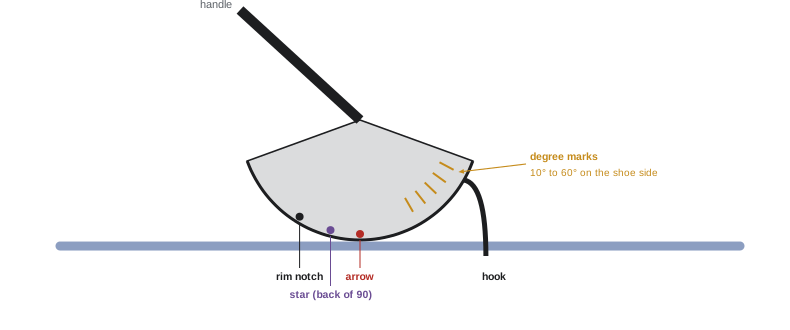
A hand bender is a curved shoe on a long handle, sized for a particular conduit: one bender bends ½-inch EMT and, usually, ⅜-inch rigid; another bends ¾-inch EMT and ½-inch rigid; a third bends 1-inch EMT and ¾-inch rigid. The shoe has a groove that supports the conduit wall, a hook that grips the conduit, and a set of marks:
- The arrow, used for stub-ups and as the reference for most bends.
- The star (or back-of-90 mark, sometimes a teardrop), used when the measurement is to the back of a 90° bend.
- The rim notch or centre mark, used for the middle bend of a three-point saddle (Lesson 4).
- Degree marks on the side of the shoe (10°, 22½°, 30°, 45°, 60°), showing the angle when the conduit lines up with them.
Benders differ slightly between manufacturers, so the first step with any new bender is to make test bends and confirm its take-up and gain against what is printed on it.
Take-up and the 90° stub
The most common bend is the stub-up: a 90° bend that brings a conduit up out of a floor or off a wall to a box or panel. The stub length is measured from the end of the conduit to the back (the outside) of the bend. Because the conduit curves around the shoe, the mark is not placed at the stub length; it is placed at the stub length minus the take-up (also called the deduct), a fixed amount for each bender that accounts for the curve.
| Conduit | Typical take-up |
|---|---|
| ½-inch EMT (16) | 5 in (about 127 mm) |
| ¾-inch EMT (21) | 6 in (about 152 mm) |
| 1-inch EMT (27) | 8 in (about 203 mm) |
| 1¼-inch EMT (35) | 11 in (about 279 mm) |
To bend a 12-inch stub in ½-inch EMT: measure 12 − 5 = 7 inches from the end and mark the conduit. Place the conduit in the bender with the end you measured from pointing away from the hook side, toward where the stub will stand, and line up the arrow with the mark. Hold the conduit firmly on the floor with your foot on the bender's heel, and pull the handle smoothly until the conduit reaches 90°, checked with a torpedo level on the stub. The stub, measured from the floor (the back of the bend) to the end, should be 12 inches.
Worked problem
A stub to a panel
A ¾-inch EMT conduit runs along the floor and must turn up into the bottom of a panel. The panel knockout is 34 inches above the floor, and the conduit must enter the panel 1 inch to reach the connector. Where should the mark be?
Show solution
- Required stub length: 34 + 1 = 35 inches from the floor to the end of the conduit.
- Take-up for ¾-inch EMT: 6 inches.
- Mark: 35 − 6 = 29 inches from the end.
Answer: Mark at 29 inches, line up the arrow and bend to 90°. If the stub is too long, it is cut to length, but it is better practice to bend accurately so that the factory end, which is square and needs no reaming, enters the fitting.
Back-to-back bends
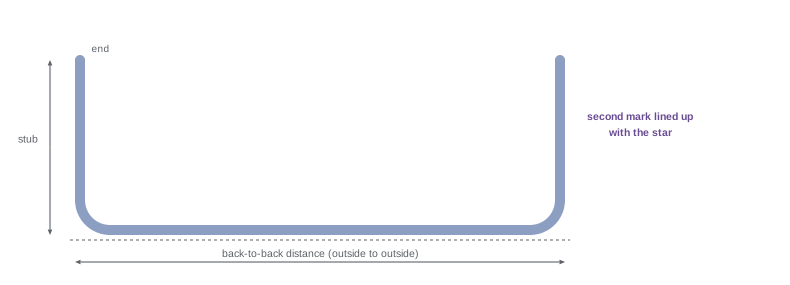
A back-to-back bend is a second 90° bend in the same length, in the same plane, producing a U shape, such as a conduit that comes up out of the floor, runs along a wall and goes back down, or that runs across a ceiling between two walls. The measurement that matters is the distance between the outside (backs) of the two bends. After making the first 90°, measure from the back of the first bend to the required back-to-back distance and mark the conduit. Then reverse the bender on the conduit so that it faces the opposite way from the first bend (the hook toward the first stub), keep both bends in the same plane, and line up the mark with the star (back-of-90 mark), not the arrow. The star accounts for the fact that you are now measuring to the back of the bend from the other side.
A related bend is the 90° that must land at a specific distance from an obstruction, such as a conduit that runs along a ceiling and must turn down exactly 6 feet from a wall. The same principle applies: decide whether the measurement is to the back of the bend (use the star) or to the end (use the arrow with take-up), and be consistent.
Gain
When conduit bends around a curve, it takes a shortcut. If you measure the two straight legs of a 90° bend to the point where they would meet (the intersection of their centrelines), their sum is longer than the actual length of conduit in the bend. The difference is the gain. Gain matters when you need to cut a length of conduit before bending so that both ends land where they should, as in a pre-cut back-to-back or a conduit with fixed end points.
For a bend with centreline radius R, the arc length of a 90° bend is πR/2, while the two legs to the intersection add 2R. The gain is therefore:
For example, a bend with a 4-inch centreline radius has an arc of 6.28 inches and legs of 8 inches to the intersection, a gain of about 1.7 inches. Manufacturers print the gain for each bender, measured to their own reference points; in practice, you use the printed value. Larger benders have larger radii and larger gains: power benders for 2-inch to 4-inch conduit (Lesson 5) have gains of many inches.
Worked problem
Cutting before bending
A ½-inch EMT conduit must make a U between two boxes: up 10 inches from the first box, across 40 inches between backs, and down 10 inches into the second box. The bender's take-up is 5 inches and its gain is 2 inches per 90° bend, measured to the outside of the bends. How long a piece is needed?
Show solution
- Sum of the outside dimensions: 10 + 40 + 10 = 60 inches.
- Each 90° bend gains 2 inches, and there are two bends: subtract 4 inches.
- Required length: 60 − 4 = 56 inches. First mark at 10 − 5 = 5 inches from one end (arrow); second mark 40 inches from the back of the first bend (star).
Answer: Cut a 56-inch piece. After both bends, each leg should measure 10 inches and the backs should be 40 inches apart. Checking the result against the calculation is the best way to learn the gain of your bender.
Bending technique
Accurate bends depend on technique as much as arithmetic:
- Keep the conduit and bender on a firm, flat floor, and keep constant heavy foot pressure on the bender's heel so the conduit stays in the shoe groove. Insufficient foot pressure causes kinks and flattened bends.
- Pull the handle with a smooth, steady motion, not in jerks. For larger sizes, use your body weight rather than arm strength.
- Keep the conduit in one plane. A bend that twists out of plane produces a dog-leg, where the two legs do not lie flat on the floor together. Check by laying the bent conduit on the floor: both legs should touch.
- Check angles with a torpedo level or angle finder, not by eye. Bends spring back slightly, so you may need to bend a few degrees past the mark.
- Correct small overbends by placing the conduit in the bender upside down and bending back gently, or by using the bender's handle (a hollow pipe) over the stub. Excessive correction weakens the conduit; start again if necessary.
- Make bends in the order that keeps the work manageable: generally from one end to the other, so measurements are always taken from a known reference.
- Mark clearly with a pencil or marker line around the conduit, so that the mark is visible from any side.
Bending rules in the code
Codes limit how tightly conduit may be bent (minimum radius tables by trade size, so that conductors are not damaged and pulling is possible) and the total degrees of bend between pull points, the equivalent of four quarter bends or 360° (ELEC-220, Lesson 2). Hand and power benders made for each conduit size produce radii that meet the code, but improvised bends (over a knee, around a post) do not, and kinked or flattened conduit must be cut out and replaced. Count your bends as you plan a run: every stub, offset and kick adds to the 360° total.
In the Canadian Electrical Code, Section 12 sets the minimum bending radius for each conduit size and the maximum total of bends between pull points, and requires that conduit not be damaged or its internal diameter reduced by bending.
Measuring and planning a run
Before bending, plan the run on paper or in your head from start to finish: where it starts and ends, every obstruction, every change in direction, and where boxes or conduit bodies will provide pull points. Measure from fixed references (the floor, a finished wall, the centreline of a column), not from other conduits that may move. On jobs with many parallel conduits, bend one, check it in place, then use it as a template for the rest. Prefabrication shops (Lesson 1) apply the same principles with bending tables and machines, but on site the electrician with a tape, a pencil and a bender remains the norm for branch circuit work.
With practice, experienced electricians can bend most branch circuit work without writing down calculations, but they still measure carefully and check each bend. Speed comes from accuracy, not from skipping steps.
Common mistakes
MistakeMarking a stub at the stub length.
InsteadSubtract the take-up and line up the arrow with the mark.
MistakeUsing the arrow for the second bend of a back-to-back.
InsteadUse the star (back-of-90) mark when measuring to the back of the bend.
MistakeLight foot pressure on the bender.
InsteadKeep heavy, constant pressure on the heel to avoid kinks.
MistakeLetting the conduit twist during the bend.
InsteadKeep both legs in one plane and check for dog-legs on the floor.
MistakeForgetting gain when cutting conduit before bending.
InsteadSubtract the gain of each bend from the sum of the outside dimensions.
Summary and key terms
- Hand benders are sized for each conduit and carry arrow, star, rim notch and degree marks.
- Stub mark = stub length − take-up; typical take-ups are 5, 6, 8 and 11 inches for ½ to 1¼ in EMT.
- Back-to-back bends are measured between the backs of the bends and use the star mark.
- Gain is the length saved by a bend; for a 90° bend it is about 0.43 times the centreline radius.
- Cut length = sum of outside dimensions − gain per bend.
- Technique: firm footing, smooth pull, one plane, check with a level, correct carefully.
- Codes limit bend radius and total bends between pull points to 360°.
- Stub-up
- A 90° bend bringing conduit up from a floor or out from a wall.
- Take-up
- The amount subtracted from a stub length to find the bend mark.
- Back-to-back
- Two 90° bends in one length forming a U.
- Star mark
- The bender mark for measuring to the back of a 90° bend.
- Gain
- The difference between leg lengths to the intersection and the actual conduit length in a bend.
- Centreline radius
- The radius of a bend measured to the conduit's centre.
- Dog-leg
- A bend twisted out of plane.
- Springback
- The slight return of a bend after the force is released.
- Torpedo level
- A short level used to check bend angles.
- Pull point
- A box, conduit body or fitting where conductors can be pulled.
Practice problems
Work each problem on paper first, then reveal the answer to check.
Where is the mark for a 15-inch stub in ½-inch EMT?
Show answer
15 − 5 = 10 inches from the end.
Where is the mark for a 20-inch stub in 1-inch EMT?
Show answer
20 − 8 = 12 inches from the end.
Which bender mark is used for the second bend of a back-to-back?
Show answer
The star (back-of-90) mark.
What is the gain of a 90° bend with a 6-inch centreline radius?
Show answer
2 × 6 − π × 6/2 ≈ 12 − 9.42 = 2.58 inches.
A U has legs of 8 in, 30 in between backs and 8 in, with 2 in of gain per bend. What length is cut?
Show answer
46 − 4 = 42 inches.
What causes kinks during bending?
Show answer
Insufficient foot pressure on the bender heel, letting the conduit leave the groove.
How do you check for a dog-leg?
Show answer
Lay the conduit on the floor; both legs should touch.
Why might you bend slightly past 90°?
Show answer
To allow for springback.
What is the maximum total of bends between pull points?
Show answer
360°, the equivalent of four quarter bends.
Why measure from fixed references rather than other conduits?
Show answer
Other conduits may move or be inaccurate.
Lesson quiz · 5 questions
Score 60% or more to complete this lesson.
Create a free account to save your progress, take quizzes and earn a certificate.