
ROOF-310 · Lesson 12 of 12 · 32 min
Case study: designing a tapered roof
▶ Video coming soon A video version of this lesson is on the way.
On Saturday morning, November 14, Glen Pelham unrolled Martin Oyelaran's draft drawings for the Northgate Medical Building re-roof across the boardroom table at Ridgecap. The owner had accepted the spring recommendation to re-roof the whole building in the summer of 2028 and had asked Martin to design it now, so the cost could go into next year's budget and the mechanical work could be planned around the clinics. Martin wanted a roofing contractor's review before he finished: could it be built, what would it cost, and what had he missed? Glen had asked Rory to come in for the morning. "You carried the rod on this roof in October," Glen said. "Now you get to see what the numbers turned into."
This case study follows the Northgate design from the problems found in the spring to the finished draft, using every lesson in this course: the assembly (lesson 1), boards (2), taper (3), attachment (4), air and vapour control (5 and 6), drainage (8 to 10) and the energy code (11). The numbers are worked so that each can be checked. The design is a draft in November 2026; the work itself is planned for 2028.
The building and what went wrong
The Northgate Medical Building is a two-storey medical office built in 2014, with a family practice, a dental suite, a small laboratory and offices. The roof is about 50 m by 28 m, 1,400 m², on a steel deck, with edge metal around the perimeter rather than parapets, three rooftop units and four drains. The 2014 roof was a mechanically attached TPO membrane over a single 90 mm layer of polyiso, with no air or vapour barrier.
The spring investigation (ROOF-120) found five problems: corners fastened like the field, untested edge metal, about 180 m² of insulation soaked from inside by air leakage over the dental suite and laboratory, rusted fasteners in the wet area holding less than half their dry pull-out, and a sagging bay beside the third rooftop unit, added in 2019, that ponded about 30 mm of water. Martin's October survey (lesson 3) added two more: the deck varied by about 45 mm across the roof, and the drain nearest the sag sat above the bottom of it.
Martin's design goals, written at the top of his first drawing sheet, followed from those findings:
- Drain every part of the roof within 48 hours, with slope everywhere and drains at the low points.
- Stop indoor air from reaching the insulation, with a continuous air and vapour barrier sealed to the walls.
- Meet the energy code for a new building, using conservative cold-weather values.
- Use a tested wind-uplift assembly with proper perimeter and corner zones, and a tested edge system.
- Protect the roof against blocked drains with secondary drainage.
- Keep the work buildable over occupied clinics, with as little work inside the building as possible.
Step 1: the structure
Before designing anything above the deck, Martin had a structural engineer look at the sagging bay and the weight the new roof would add. The engineer found that the 2019 rooftop unit had been set on the deck with only light framing, and its weight had bent the joists of that bay. The design calls for new support steel under that unit, carried to the columns, installed by the mechanical contractor's steel subcontractor before the re-roof. The deck itself was sound except for corrosion in the wet area, where sections are to be replaced once they are exposed.
Worked problem
How much weight does the new roof add?
Typical weights: polyiso about 32 kg/m³, a 13 mm glass-mat gypsum cover board about 10.7 kg/m², a 60 mil TPO about 1.5 kg/m² and the self-adhered barrier about 1.5 kg/m². The new roof averages 183 mm of polyiso. The old roof had 90 mm of polyiso and a 45 mil TPO at about 1.2 kg/m². What is the added load?
Show solution
- New: 0.183 × 32 + 10.7 + 1.5 + 1.5 = 5.9 + 13.7 = 19.6 kg/m².
- Old: 0.090 × 32 + 1.2 = 2.9 + 1.2 = 4.1 kg/m².
- Added = 19.6 − 4.1 = 15.5 kg/m², which is 15.5 × 9.81 = 152 N/m², about 0.15 kPa.
Answer: About 0.15 kPa, mostly from the cover board. The engineer confirmed the roof can carry it once the bay under the rooftop unit is reinforced.
Step 2: the drains
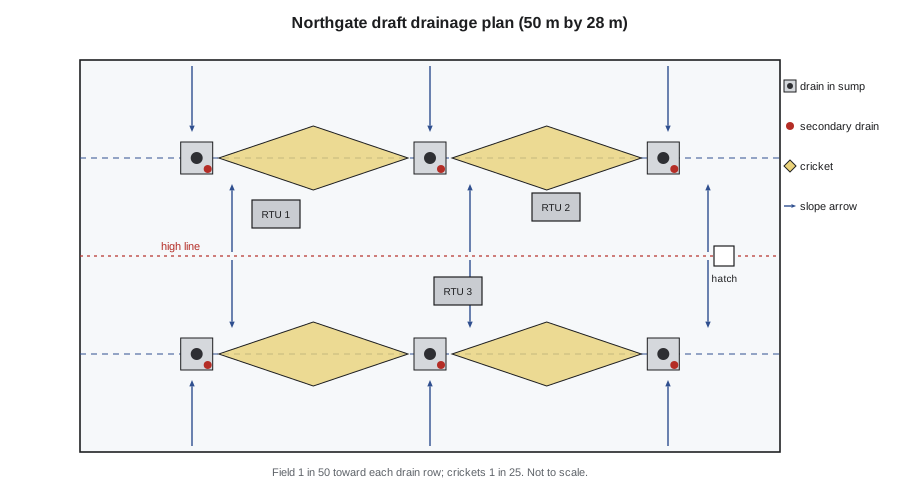
Four drains for 1,400 m² meant long flow paths and thick taper, and one of them was in the wrong place. Martin's draft has six primary drains in two rows running east to west, about 7 m in from the north and south edges, with three drains in each row about 16.7 m apart. Two of the existing drains are kept and reset in new sumps, two are moved a short way to the new rows, and two new drains are added, one of them at the bottom of the sagging bay. The mechanical engineer routed the two new leaders down beside columns, clear of the laboratory.
Worked problem
Flow per drain
At the sample design intensity of 100 mm/h, what flow does each of the six drains carry, and how does that compare with the old four-drain layout?
Show solution
- Total = 100 × 1,400 ÷ 3,600 = 38.9 L/s.
- Six drains: 38.9 ÷ 6 = 6.5 L/s each. Four drains: 38.9 ÷ 4 = 9.7 L/s each.
Answer: Each drain carries a third less water, and no point on the roof is more than about 8.3 m from a drain in plan.
Step 3: the slope
With the drain rows set, the field slope runs north and south from the edges and from the centre line of the roof down to each row at 1 in 50. Between the drains in each row, diamond-shaped crickets sloped at 1 in 25, twice the field slope, carry water along the drain line to the drains. Martin made them about 4.5 m wide, close to a third of their length, as the rule of thumb in lesson 3 suggests. Near the east and west edges, the taper turns so those strips slope toward the end drains. The maker's design service drew the panel layout from Martin's sketch and the survey.
Worked problem
Taper thickness along the longest path
The longest field path, from the north edge to the north row of drains, is 7 m. With taper starting at 13 mm at the drain line and rising at 1 in 50, how thick is the taper at the edge?
Show solution
- Rise = 7,000 ÷ 50 = 140 mm.
- Taper at the edge = 13 + 140 = 153 mm.
Answer: 153 mm of taper along the north and south edges. At the four corners, where the slope also turns toward the end drains, the taper reaches about 180 mm.
Step 4: the assembly
Martin's roof type for Northgate, from the bottom up:
| Layer | Product | Attachment |
|---|---|---|
| Steel deck | Existing; corroded sections replaced | — |
| Air and vapour barrier | Self-adhered, on primed deck, product rated to span the flutes | Self-adhered; sealed to wall air barrier at edges |
| Base insulation | Two layers of 50 mm polyiso, joints staggered | Fastened together with screws and plates, 127 mm fasteners |
| Tapered insulation | Polyiso panels, 1 in 50 field, 1 in 25 crickets, sumps at drains | Low-rise foam adhesive |
| Cover board | 13 mm glass-mat gypsum, primed | Low-rise foam adhesive |
| Membrane | 60 mil TPO, white | Fully adhered |
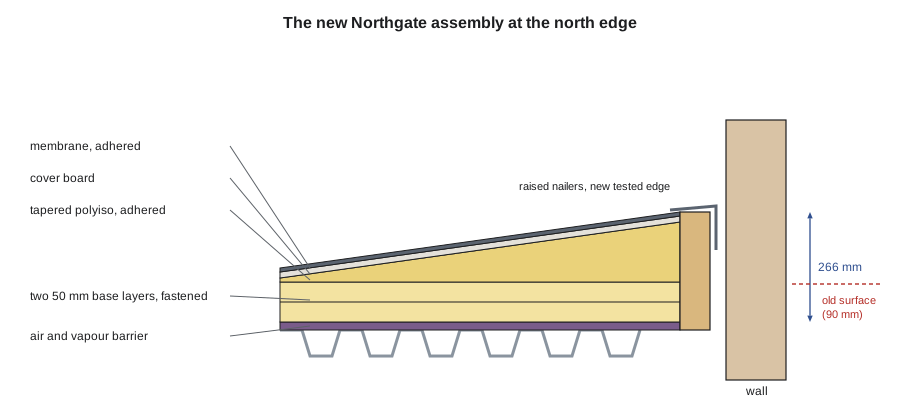
Every layer answers one of the spring findings. The barrier and the staggered layers stop the air that soaked the old insulation (lessons 5 and 6). Fastening only the base layers and adhering everything above keeps the fasteners buried and the membrane unpierced (lesson 4). The cover board protects the polyiso on the routes to the rooftop units. And the whole stack is one of the membrane maker's assemblies tested to CSA A123.21 for the uplift the building needs, with heavier attachment in the perimeter and corners.
Step 5: checking the numbers
Worked problem
Energy and condensation checks
Average polyiso = 100 + (13 + 153) ÷ 2 = 183 mm in the field (the maker's calculation, which includes the crickets and corners, came out slightly higher). At Martin's design value of RSI 0.9 per 25 mm, does the roof meet SB-10's RSI 6.2? Treating the field as a uniform slope from 113 mm to 253 mm of polyiso and averaging the U-values properly gives an assembly U of about 0.154 W/m²·K. Does that meet U-0.164? And is the barrier at the thinnest point warm enough?
Show solution
- Average RSI = 183 ÷ 25 × 0.9 = 6.59, which is more than 6.2.
- Assembly U = 0.154, which is less than 0.164.
- Barrier at the thinnest point: 20.0 °C on a −17 °C night (lesson 6), far above the 7 °C dew point.
Answer: The roof passes on average insulation, on assembly U-value calculated the correct way, and on condensation at the barrier. Using a cold-weather design value for the polyiso gives a margin for January.
Step 6: the heights
Rory had been waiting for this part, because Dana had told him it was where designs fall apart. Every curb, hatch, drain and edge on the roof had to be checked against the new surface. Martin's rule, following the membrane maker, was at least 200 mm of flashing height above the finished roof at curbs and walls.
Worked problem
The north edge and the curbs
Along the north edge, the new build-up is 100 mm of base, 153 mm of taper and 13 mm of cover board. The old build-up was 90 mm. How much higher is the new surface at the edge? Rooftop unit 3's curb stands 350 mm above the old surface, at a spot where the new surface rises 150 mm. How much curb is left?
Show solution
- New build-up = 100 + 153 + 13 = 266 mm. Rise = 266 − 90 = 176 mm.
- Curb left = 350 − 150 = 200 mm, exactly the minimum.
Answer: The edge rises 176 mm, so new wood nailers are built up to the new height under a new tested edge system with a continuous cleat, fixing the spring's finding 2. Rooftop unit 3's curb would be at the bare minimum, and the other two are lower, so Martin specified curb extensions for all three units and for the roof hatch.
Glen added a note for the estimate: curb extensions mean the mechanical contractor must disconnect and lift each unit, so the roof work around each curb has to be scheduled with them, on a weekend if possible so the clinics keep their heating and cooling during the week.
Step 7: secondary drainage
With the edges raised 176 mm above the drain lines, the roof can now hold water like a shallow tray if the drains block. Northgate has no parapets, but its raised perimeter traps water in the same way. Martin added a secondary overflow drain beside each primary drain, with its inlet 50 mm above the primary, piped separately and discharging through nozzles on the north and south walls where clinic staff will see any flow (lesson 8). The structural engineer checked the roof for the deepest water that could build up at the drains before the overflows ran, about 90 mm including the head.
Worked problem
The water load at the drains
What load does 90 mm of water put on the roof at the drains?
Show solution
- 90 × 0.0098 = 0.88 kPa.
Answer: About 0.88 kPa near the drains, falling to nothing up the slope. The engineer accepted it once the rooftop unit bay was reinforced.
Step 8: quantities for the budget
Rory's job for the last hour was a first takeoff for Glen's budget, using the plan, the roof type and the fastener pattern from lesson 4:
| Item | Quantity before waste | How it was found |
|---|---|---|
| Air and vapour barrier | 1,400 m² plus edge turn-ups | Roof area plus about 0.6 m at each edge |
| Base polyiso, 2 layers of 50 mm | 2,800 m², about 972 boards of 1.2 × 2.4 m | 2 × 1,400 ÷ 2.88 |
| Base fasteners and plates | about 4,400 | Lesson 4 pattern by zone |
| Tapered polyiso | about 116 m³ in the field, plus crickets and sumps | 1,400 × 0.083 m average taper |
| Cover board, 13 mm | 1,400 m², about 486 boards | 1,400 ÷ 2.88 |
| Drains | 6 primary, 6 secondary | Martin's plan |
Glen checked each line, added waste factors, and replaced Rory's tapered estimate with the quantities from the maker's layout once it arrived. "Your number was close," he said. "Close is what a budget needs. A bid needs the panel count."
Step 9: what the review changed
Ridgecap's review sent Martin four comments:
- Show the air barrier connection to the wall at every edge in a detail, because the 2014 walls have their air barrier behind the brick and the transition will be hard to reach; consider a sheet-metal and membrane transition from the top of the wall.
- Add crickets on the uphill side of all three rooftop units and the roof hatch, not just unit 3.
- Specify the cold-weather grade of adhesive and an allowance for heating the containers, in case the work runs into October.
- Phase the tear-off over the dental suite and laboratory for weekends and keep a temporary roof ready, because the barrier there must go down the same day the old roof comes off.
Martin accepted all four. The drawings are to be issued for the owner's budget in December, and for tender in early 2028; the work is planned for the summer of 2028.
What the case shows
At the end of the morning, Glen asked Rory to say in one sentence what Northgate had taught him. Rory took a while. "That a roof is designed from the bottom up and the outside in," he said. "The deck and the drains decide the slope, the air barrier decides whether the insulation stays dry, the code decides how thick it is, and the thickness decides every curb and edge on the roof." Glen wrote it on the top of Martin's drawing sheet in pencil. "Put that on your trade school exam," he said.
Common mistakes
MistakeDesigning taper without surveying the real deck.
InsteadSurvey elevations and drains first, as at Northgate.
MistakeAdding insulation without checking curbs, hatches and edges.
InsteadCheck every height against the minimum flashing height before ordering.
MistakeRaising a roof's perimeter without secondary drainage.
InsteadProvide overflow drains or scuppers and have the structure checked for the trapped water.
MistakeAveraging R-values to show energy compliance on a tapered roof.
InsteadAverage U-values and check the thinnest point.
MistakeLeaving the air barrier connection at the walls to be worked out on site.
InsteadDetail it on the drawings and build it as drawn.
Summary and key terms
- Northgate's re-roof design follows from its failures: missing air barrier, single insulation layer, poor corners and edges, and ponding.
- The structure is checked first; the sagging bay is reinforced and the added weight confirmed.
- Six drains in two rows, a 1 in 50 field and crickets at twice that slope shorten every flow path.
- The assembly uses a sealed barrier on the deck, fastened base layers, adhered taper and cover board and an adhered membrane.
- Energy, assembly U-value and condensation checks all pass with conservative values.
- Raising the roof raises every curb and edge and calls for secondary drainage; the contractor's review improves buildability.
- Design goal
- A plain statement of what a design must achieve, used to judge each decision.
- Constructability review
- A contractor's review of a design to find what will be hard or costly to build.
- Curb extension
- A section added to the top of an existing curb to raise it above a thicker new roof.
- Takeoff
- A list of quantities measured from drawings for an estimate or order.
- Phasing
- Dividing work into stages to suit occupants, weather or other trades.
- Secondary overflow drain
- A drain beside a primary drain, with a raised inlet and its own piping.
- Tested edge system
- Edge metal that has passed a wind test for the building's design pressure.
- Budget estimate
- An early cost estimate used by an owner to plan funding.
Practice problems
Work each problem on paper first, then reveal the answer to check.
Why did Martin add two drains rather than just thicker taper?
Show answer
Shorter flow paths mean less taper and lower edges, and the sag needed a drain at its low point.
The field slope is 1 in 50. What slope did Martin give the crickets?
Show answer
1 in 25, twice the field slope.
New build-up at an edge is 266 mm and the old was 90 mm. How much does the edge rise?
Show answer
176 mm.
Why are secondary drains needed at Northgate even without parapets?
Show answer
The raised perimeter can trap water if the drains block.
Name one item Ridgecap's review added.
Show answer
Crickets at all curbs, the air barrier edge detail, cold-weather adhesive, or weekend phasing over the clinics.
Lesson quiz · 5 questions
Score 60% or more to complete this lesson.
Create a free account to save your progress, take quizzes and earn a certificate.