
APP-220 · Lesson 9 of 12 · 24 min
Dryer venting and fire safety
▶ Video coming soon A video version of this lesson is on the way.
Halfway through the November 11 laundry night, Harriet put a length of foil duct on the bench. It had come out of a customer's crawl space the year before: about 6 m (20 ft) of crushed, sagging foil with two sharp bends and a low point where a hand-sized wad of lint, grey and felted, had collected and partly charred. "That dryer had blown two thermal fuses before anyone looked behind it," she said. "The third time, the lint in that dip caught. The owners smelled it, shut the dryer off and called the fire department. Nobody was hurt. Every dryer call you go on, you look at the vent."
This lesson covers dryer venting: why airflow matters, what the duct must be made of, how long it can be, how it must end outside, and how to measure whether a vent is working. It covers the fire statistics that explain why this matters, the safety features built into dryers, and what to tell customers. APP-110 covered the basics of connecting a vent; this lesson goes further. The venting rules for gas dryers in lesson 8 apply in full here.
Why dryer fires happen
Dryers are one of the leading causes of appliance fires in homes. A National Fire Protection Association report covering 2006 to 2010 estimated that U.S. fire departments responded to an average of about 16,950 home structure fires a year involving clothes dryers or washing machines, causing about 34 deaths, 430 injuries and 209 million dollars of direct property damage a year. Dryers accounted for 92 in 100 of those fires. The leading factor contributing to ignition was failure to clean, at 32 in 100 of the fires, and dust, fibre or lint was the item most often first ignited. Canadian fire services report the same pattern: lint, restricted vents and failure to clean.
The mechanism is simple. Lint is fine, dry fibre, and it burns easily. A dryer that cannot move its air freely gets hotter inside, especially around the heater or burner. Lint that has escaped the filter collects in the duct, the blower housing and the cabinet base. When the temperature at a lint deposit gets high enough, from a heater running too hot or a spark from a motor, the lint ignites. A clean dryer with a short, smooth, unobstructed vent rarely gets hot enough for that to happen.
Some items in the load add to the risk: clothes stained with cooking oil, gasoline, solvents or other flammable liquids can ignite in the dryer even after washing, because the oil remains and can heat itself. Use and care guides warn against drying them. Rubber-backed mats and foam items can also overheat.
What the duct must be made of
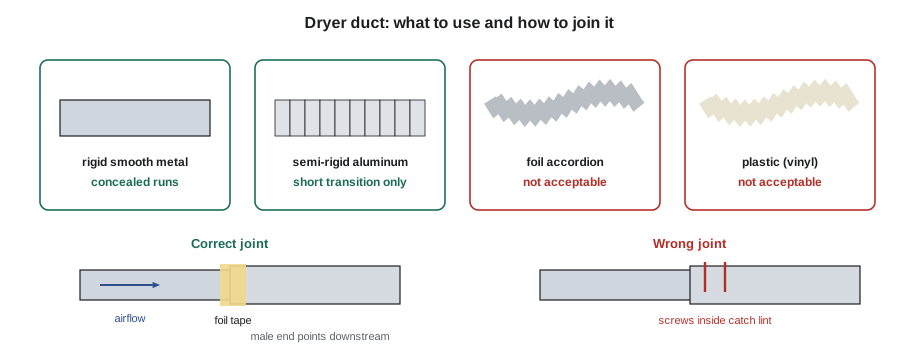
The exhaust duct must be smooth-walled metal, usually galvanized steel or aluminum, of the size the dryer's installation instructions give, which for household dryers is almost always 100 mm (4 in) diameter. The duct must not be reduced in size anywhere along its run. Smooth rigid duct has the least resistance and collects the least lint. Plastic and thin foil accordion duct are not acceptable for the concealed run: they sag, crush, trap lint in their ribs and can melt or burn. Most makers and the codes in both countries prohibit them.
A short flexible transition duct is allowed between the dryer outlet and the rigid duct in the wall, so the dryer can be pulled out for service. It must be a type listed for dryer transition use, usually semi-rigid aluminum or a metal foil duct listed to UL 2158A in the United States, and limited in length. Makers limit its length; the US residential code, for example, limits it to about 2.4 m. It must not be concealed in walls or ceilings and must not be crushed behind the dryer. A periscope duct, a flat rectangular metal duct, can be used where the dryer must sit close to the wall.
Joints in rigid duct are made with the male end pointing in the direction of the airflow, so lint slides over the joints instead of catching on them. Joints are sealed with foil tape or the clamps the duct maker provides. Sheet metal screws or rivets that project into the duct catch lint and are not used. Ontario's Building Code requires dryer exhaust to be vented to the outdoors and the maker's installation instructions give the duct details. Penfold follows the maker's instructions and the duct rules in this lesson on every installation.
How long the vent can be
Every bend and every metre of duct adds resistance, and the blower can only push so much air through it. The maker's installation instructions give the maximum length of each duct type with a given number of elbows, and the dryer must be installed within those limits. Where the code also sets a limit, the shorter of the two applies. In Ontario, the maker's limits govern. For comparison, the US residential code sets a default maximum developed length of 10.7 m for a 100 mm rigid duct, reduced by 1.5 m for each 90° elbow and 0.76 m for each 45° elbow. Many makers give similar figures, and some allow longer runs for their more powerful blowers; others are shorter.
Worked problem
Checking a vent length
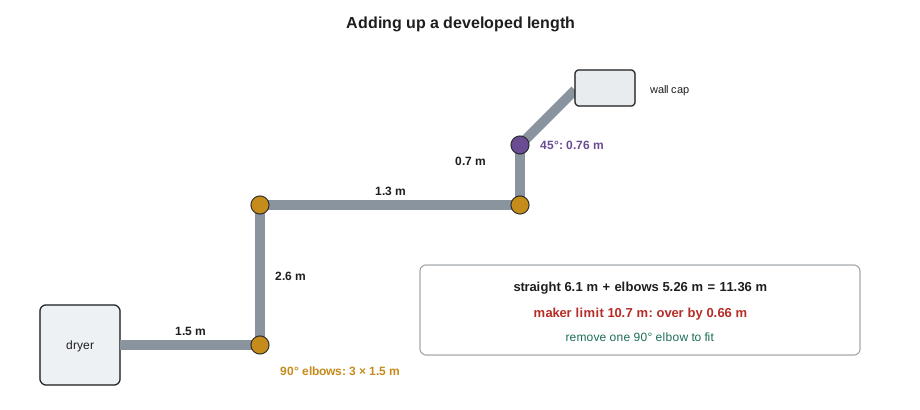
A dryer's installation instructions allow a rigid 100 mm vent with an equivalent length of up to 10.7 m, counting each 90° elbow as 1.5 m and each 45° elbow as 0.76 m. A planned run has 6.1 m of straight duct, three 90° elbows and one 45° elbow, ending at a wall hood the maker counts as part of the length. Is it within the limit?
Show solution
- Straight duct: 6.1 m.
- Elbows: 3 × 1.5 + 1 × 0.76 = 4.5 + 0.76 = 5.26 m.
- Equivalent length: 6.1 + 5.26 = 11.36 m.
- That is over the 10.7 m limit by 0.66 m.
Answer: The run is too long. Removing one 90° elbow, by rerouting or moving the wall hood, brings it within the limit. Otherwise a listed dryer booster fan, where the code and maker allow one, is the remaining option.
When a run cannot be kept within the limit, a dryer exhaust booster fan, listed for the purpose and interlocked so it runs whenever the dryer runs, may be permitted. It is a last resort, not a fix for a poor layout, and it needs its own cleaning access.
Ending the vent outside
The duct must end outside the building, not in an attic, crawl space, garage, chimney or wall cavity, and not under a deck or into a soffit where lint and moisture are trapped. The wall or roof cap must have a backdraft damper, a flap that opens with the airflow and closes by gravity when the dryer stops, to keep out cold air, rain and animals. It must not have a screen: lint clogs screens quickly and blocks the vent completely. Customers often add one to keep birds out, which is exactly what Kiran met on one of the calls in lesson 12. The cap should also be kept clear of other openings such as windows and fresh-air intakes, by the distance the code and the maker give; the International Residential Code, for example, sets 0.9 m (3 ft) from openings into the building.
Many caps have a hinged louvre or a single flap. Check that it opens fully when the dryer runs, is not painted shut, is not packed with lint behind it and is not blocked by snow, plants or a stored object. In winter, frost and ice around the cap can block it. Roof caps need special care because lint collects on them and they are hard to inspect; many makers discourage roof venting for that reason.
Measuring how well a vent works
A vent that looks acceptable can still be badly restricted inside. Three simple measurements tell the technician how well it is working. The first is the airflow at the outside cap with the dryer running on air fluff, measured with a vane anemometer held in the airstream. The second is the static pressure in the duct behind the dryer, measured with a manometer through a small hole that is sealed afterwards; the maker sometimes gives a maximum. The third is the exhaust temperature and the way the heater cycles: on a restricted vent, the cycling thermostat or high limit switches the heater off after short bursts.
Worked problem
Measuring airflow at the cap
At a 100 mm wall cap, Kiran measures an average air velocity of 4.1 m/s with the dryer on air fluff. After the vent is cleaned and a crushed transition duct replaced, it reads 10.2 m/s. What were the airflows before and after?
Show solution
- Duct area: π × (0.1 ÷ 2)² = π × 0.0025 = 0.00785 m².
- Before: 4.1 × 0.00785 = 0.0322 m³/s, or 0.0322 × 60 = 1.93 m³/min.
- After: 10.2 × 0.00785 = 0.0801 m³/s, or 4.81 m³/min.
- The cleaned vent carries 4.81 ÷ 1.93 = 2.5 times as much air.
Answer: The airflow rose from about 1.9 to 4.8 m³/min, or 70 to 175 cfm: two and a half times as much. Two and a half times the air carries away two and a half times the moisture at the same temperature, which is why the customer's drying time drops so sharply.
Many makers and dryer vent specialists suggest that a household dryer should move something around 4 to 6 m³/min (140 to 210 cfm) through a clean vent, but the exact figure depends on the model. The comparison before and after cleaning, or against the maker's figure where one is given, is more useful than any single rule.
Safety features in dryers
The thermostats, high limits, thermal cutoffs and thermal fuses in lesson 7 are the dryer's main protection against overheating. Modern dryers add more. The North American dryer safety standard, UL 2158 in the United States, with CSA C22.2 No. 112 in Canada for electric dryers and ANSI Z21.5.1/CSA 7.1 for gas dryers, includes tests that check a dryer can contain a fire in its drum without the fire escaping the cabinet. Many newer dryers also have a sensor that warns when the airflow is restricted, often shown as a check vent message, based on the exhaust temperature or the heater cycling. A dryer that shows that message is giving useful advice, and the vent should be checked before anything else.
None of these features replace a clean lint filter and a clear vent. A dryer can only protect itself so far; a vent full of lint gives a fire a place to start outside the cabinet, where the dryer's own protection does not reach.
What to tell customers
Most dryer vent problems are prevented by habits, and a technician who explains them is doing more for the customer's safety than any part. Clean the lint filter before or after every load. Wash the filter in warm soapy water every few months if fabric softener sheets are used, because they leave a film on the mesh that can block airflow while the filter looks clean; a filter that holds water instead of letting it run through needs washing. Have the vent cleaned regularly, at least once a year for most homes and more often for large families or long runs. Check the outside cap while the dryer runs: a strong flow of warm air and a flap that opens fully are good signs. Do not run the dryer when nobody is home or overnight. Keep the area around the dryer free of stored clothes, boxes and cleaning products.
| Sign | What it suggests |
|---|---|
| Clothes take more than one cycle to dry | Restricted vent or lint filter, or a heat fault |
| Outside of the dryer or clothes are very hot | Restricted airflow |
| Burning smell | Lint near the heater or burner, or a motor fault; stop using the dryer |
| Flap on the outside cap does not open | Blocked or crushed vent |
| Lint around the outside cap or behind the dryer | Duct leaks or blocked cap |
| Check vent message on the display | The dryer has detected restricted airflow |
Cleaning a vent properly
A vent cleaning is more than pushing a brush through the duct. Unplug the dryer, and for a gas dryer have the gas technician close the supply valve before the dryer is moved. Disconnect the transition duct, vacuum the dryer's outlet and the space behind it, and clean the duct from the dryer end toward the outside with a rotary brush kit, collecting the lint at the cap so that it is not blown back into the house. Check every joint for direction and tape, every elbow for crushing and the cap for a free-moving damper. Inside the dryer, the lint that escapes the filter collects in the filter housing, the blower housing and the cabinet base around the heater or burner, and those areas need cleaning too on a dryer that has been running with a restricted vent.
After cleaning, run the dryer on heat with a damp load, measure the airflow at the cap again and watch the heater cycling, so the record shows the vent is now working. A vent that still gives poor airflow after cleaning has a hidden restriction, such as a crushed section in a wall or ceiling, a long run that exceeds the limit or a bird's nest that the brush pushed past, and the customer should be told what further work is needed.
Common mistakes
MistakeLeaving foil or plastic duct in a concealed run.
InsteadReplace it with smooth rigid metal; use only a short listed transition behind the dryer.
MistakeFastening duct joints with screws.
InsteadPoint the male ends downstream and use foil tape or the maker's clamps.
MistakeAdding a screen to the outside cap.
InsteadUse a cap with a backdraft damper and no screen.
MistakeIgnoring the length limit.
InsteadAdd up the straight runs and elbow allowances against the maker's limit.
MistakeReplacing a thermal fuse without checking the vent.
InsteadMeasure the airflow and fix the restriction first.
MistakeVenting into an attic, crawl space or garage.
InsteadEvery dryer vents to the outdoors.
Summary and key terms
- Dryer fires are mostly linked to lint and failure to clean; restricted airflow makes dryers run hot.
- Use smooth rigid metal duct of the full size, with only a short listed transition behind the dryer.
- Male ends point downstream; seal joints with foil tape, not screws.
- Keep the developed length within the maker's limit and the code's, counting each elbow.
- End the vent outdoors with a backdraft damper and no screen, clear of openings.
- Measure airflow at the cap, static pressure and heater cycling to judge a vent.
- Dryer safety standards include fire containment tests, but a clean filter and vent remain essential.
- Teach customers to clean the filter every load, wash it if softener sheets are used and have the vent cleaned.
- Exhaust duct
- The duct that carries air, moisture and lint from a dryer to the outdoors.
- Transition duct
- The short, listed flexible duct between the dryer and the rigid duct.
- Developed length
- A vent's straight length plus the allowances for its elbows and fittings.
- Backdraft damper
- The flap at the outside cap that opens with airflow and closes by gravity.
- Booster fan
- A listed inline fan that helps move dryer exhaust through a long vent.
- Vane anemometer
- An instrument that measures air velocity with a small spinning vane.
- Static pressure
- The pressure in a duct that resists airflow, measured with a manometer.
- Lint filter
- The screen in the dryer that catches lint before it reaches the blower and vent.
Practice problems
Work each problem on paper first, then reveal the answer to check.
What is the leading factor in dryer fires in the NFPA data?
Show answer
Failure to clean.
Which way should the male end of a rigid duct joint point?
Show answer
In the direction of the airflow.
Why should the outside cap have no screen?
Show answer
Lint clogs screens and blocks the vent.
A run has 6.1 m (20 ft) of duct and three 90° elbows. Using 1.5 m (5 ft) per elbow, what is its developed length?
Show answer
10.6 m (35 ft).
Airflow at the cap rises from 70 to 175 cfm after cleaning. By what factor did it increase?
Show answer
2.5 times.
Lesson quiz · 5 questions
Score 60% or more to complete this lesson.
Create a free account to save your progress, take quizzes and earn a certificate.