
TRD-104 · Lesson 3 of 12 · 22 min
Levels, lasers and layout tools
A measurement tells you how far. Layout tools tell you where: which points are level with each other, which line is plumb, and where a line on the floor sits on the ceiling above it. On Kingsway Tower, every trade lays out its work from the grid lines and benchmarks set by the surveyors, and the tools in this lesson carry those references to where the work happens. Maya uses them to set hanger heights and drain slopes; Sam Torres uses them to line up boxes and conduit runs; the drywall crew uses them to snap wall lines on the slab.
Level, plumb and square
Three words describe the geometry of almost everything on a building:
- Level means horizontal, at right angles to the pull of gravity. A floor, a countertop and a beam are meant to be level.
- Plumb means vertical, in line with gravity. Walls, columns, door jambs and pipe risers are meant to be plumb. The word comes from the Latin for lead, because a plumb bob was a lead weight on a string.
- Square means at 90 degrees to another line, covered in Lesson 2.
Some work is meant to be neither level nor plumb but sloped by a known amount. Drain pipes slope so water flows, ramps slope for access and roofs slope to shed water. The slope is set from level, so a level is still the starting point.
Spirit levels
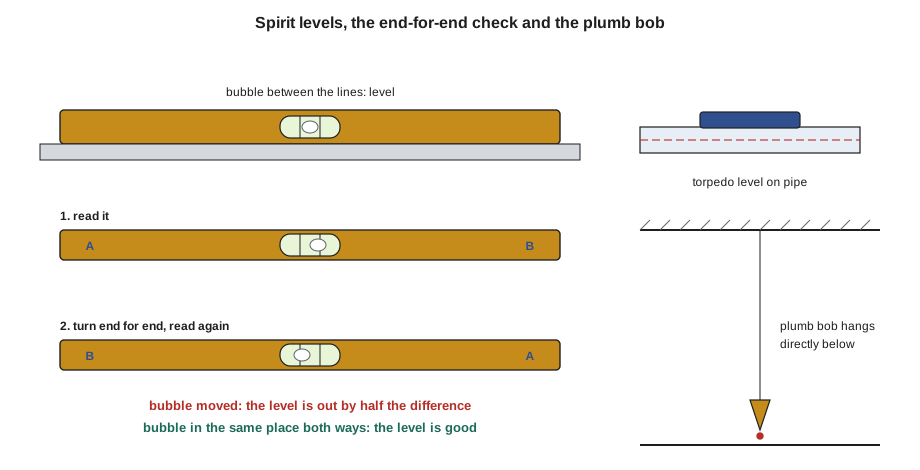
A spirit level, or bubble level, is a straight bar with sealed glass or plastic vials containing liquid and an air bubble. When the bubble sits exactly between the two lines on the vial, that vial is level or plumb. A typical level has three vials: one for level, one for plumb, and sometimes one at 45 degrees. Levels come in many lengths, from a pocket-sized torpedo level for pipe and conduit to 1.8 m or 6 ft levels for door frames and long walls. A longer level averages out bumps in the surface it sits on.
Some levels have vials marked for slope. A plumber's level may have an extra line on the vial showing a drain slope, so that when the bubble touches that line the pipe falls at the required rate. Magnetic levels stick to steel pipe, conduit and studs and leave both hands free.
Checking a level
A level that has been dropped or knocked can be out of calibration, and a level that is out gives a wrong reading every time. Check it on a flat surface: read the bubble, then turn the level end for end in exactly the same spot. If the bubble sits in the same position both ways, the level is accurate, even if the surface is not quite level. If the bubble moves, the level is out. Repeat on a vertical surface for the plumb vial. Luis checks his levels at the start of every job and after any fall.
Plumb bobs and chalk lines
A plumb bob is a pointed weight on a string. Hung from a point, it settles directly below it. It is still one of the simplest ways to transfer a point from the ceiling to the floor or the reverse: where a pipe must pass through a sleeve in the slab above, a plumb bob from the sleeve marks the point on the floor below. Wind, a swinging bob and a kinked string are the usual sources of error; let the bob settle, shield it from drafts and read it at eye level.
A chalk line, or chalk box, is a reel of string in a case filled with powdered chalk. The line is pulled tight between two points, lifted near the middle and released so that it snaps against the surface and leaves a straight line of chalk. Drywall and steel stud crews snap wall layouts on every floor of Kingsway Tower from the grid offsets set by the surveyors. Some practical points:
- Hold the line tight and lift it straight up, perpendicular to the surface. Lifting it sideways bows the line.
- On long snaps, hold the middle down and snap each half.
- Blue chalk wipes off and is used for most layout. Red and other permanent chalks are hard to remove; check what the general contractor allows on finished surfaces.
- Mark both ends with a pencil or marker as well. Chalk lines are easily scuffed by boots and carts.
Laser levels
Laser levels project visible beams that are level, plumb or square. They have largely replaced water levels and long spirit levels for layout because one person can set up a reference across a whole floor. Several types are used on site:
- Dot or point lasers project single points, typically up, down and sideways. A plumb dot from the floor to the ceiling transfers a point vertically with no plumb bob.
- Line lasers project horizontal and vertical lines on walls and ceilings, often crossing. Electricians use them to line up boxes; plumbers use them to set the height of fixtures and carriers.
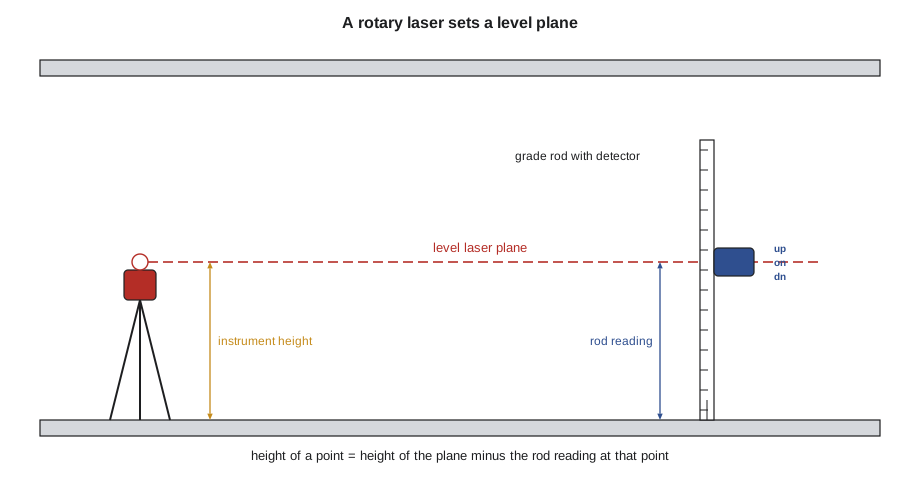
- Rotary lasers spin a beam around a full circle to create a level plane across a room or a whole site. Used with a detector on a grade rod, they set heights for footings, slabs, ceiling grids and long pipe runs.
Most lasers level themselves: a pendulum or motor levels the beam automatically within a small range, typically a few degrees, and the beam flashes or the unit beeps if it is set up too far off level. Some can be set to project a slope, which is useful for drainage. Every laser has a stated accuracy, such as 1 mm at 10 m or 1/8 in at 30 ft; the error grows with distance, so long shots need a more accurate tool or checks from both ends.
Laser safety
Construction lasers are classified by the power of their beam. Most line and rotary lasers on site are Class 2 or Class 3R. A Class 2 laser is low power, and the natural blink reflex protects the eye from a brief exposure, but staring into the beam is harmful. Class 3R lasers are brighter and can injure the eye with direct viewing. The rules on site are simple:
- Never look into the beam or point it at anyone's eyes. Set the beam height above or below eye level where possible.
- Do not look at the beam through binoculars, a transit or other optics.
- Post a laser-in-use sign where required, and turn the laser off or cover the aperture when it is not in use.
- Only trained workers set up higher-class lasers; some jurisdictions have specific rules for them.
Laser-enhancement glasses, often red or green tinted, make the beam easier to see outdoors. They are not laser safety eyewear and do not protect the eyes.
Benchmarks and transferring elevations
As TRD-103 explained, the surveyors set benchmarks, points of known elevation, on each floor, often marked on a column with a line and a written elevation. Every trade sets its heights from those benchmarks rather than from the floor, because floors are rarely perfectly flat and finished floors are added later.
To set a height with a rotary laser, set up the laser, place the rod on the benchmark and move the detector until it reads on grade. Lock the detector to the rod; the rod now measures from the beam. At any other point, set the rod on the surface and read how far the surface is above or below the benchmark. The same idea works with a line laser and a tape.
Elevations from the benchmark
Maya's job this morning is to mark the height of the bottom of a cast-iron drain hanger on the ceiling of the parking level. The benchmark on column C-4 reads 100'-0" (the project datum for the main floor). The drawings give the bottom of the drain at the hanger as 92'-11". The laser beam has been set at 96'-0" using the benchmark, 4 ft below it. How far below the beam is the bottom of the pipe? The difference is 96'-0" - 92'-11" = 3'-1". She measures 3'-1" down from the beam line on the column, or from the laser mark on the hanger rod location, and marks it.
Laser distance meters
A laser distance meter, often called a laser measure, sends a pulse or modulated beam to a surface and measures the reflected light to calculate distance. One person can measure a room in seconds, to within a few millimeters or about 1/16 in over tens of meters or about a hundred feet. Most can also calculate area and volume, measure indirectly using Pythagoras, and store readings. They have limits: they measure to whatever the dot lands on, which may not be the surface you meant, and they struggle in bright sunlight and on dark or shiny surfaces. They are also lasers, and the same eye safety rules apply.
Transits, total stations and digital layout
On large projects the surveyors use total stations, which measure angles and distances electronically, and increasingly robotic total stations and GPS receivers tied to the building model. Some trade contractors now lay out sleeves, hangers and inserts with robotic total stations that point a laser at each location from the model. Apprentices will not operate these on day one, but should know that the marks on the slab come from them, and that the marks are only as good as the model and the setup.
Worked example: drain slope with a laser
Worked problem
Setting hanger heights for a sloped drain
A 4 in sanitary drain on the parking level runs 60 ft from a cleanout to a riser and must slope down toward the riser at 1/8 in per foot. The bottom of the pipe at the cleanout is 3'-1" (37 in) below the laser beam. Hangers are every 4 ft. How far below the beam is the bottom of the pipe at the riser, and at the third hanger from the cleanout?
Show solution
- Fall over the full run: 60 ft x 1/8 in = 7.5 in.
- At the riser the pipe is 37 + 7.5 = 44.5 in (3'-8 1/2") below the beam.
- The third hanger is 3 x 4 = 12 ft from the cleanout: fall 12 x 1/8 = 1.5 in.
- At that hanger the pipe is 37 + 1.5 = 38.5 in (3'-2 1/2") below the beam.
Answer: 3'-8 1/2" below the beam at the riser; 3'-2 1/2" at the third hanger.
Because every height is measured from the same laser plane, errors do not add up from hanger to hanger. The program below makes the whole table of hanger heights.
# hanger heights for a sloped drain, measured down from a level laser beam
start_below = 37      # pipe bottom below beam at the cleanout (in)
run = 60                # length of run (ft)
spacing = 4             # hanger spacing (ft)
slope = 0.125            # fall per unit length (in per ft)
pos = 0
n = 0
while pos <= run + 1e-9:
    below = start_below + pos * slope
    print(f"hanger {n:2d} at {pos:5.1f} ft: {below:7.1f} in below beam")
    pos += spacing
    n += 1
print(f"riser at {run} ft: {start_below + run * slope:.1f} in below beam")hanger 0 at 0.0 ft: 37.0 in below beam hanger 1 at 4.0 ft: 37.5 in below beam hanger 2 at 8.0 ft: 38.0 in below beam hanger 3 at 12.0 ft: 38.5 in below beam hanger 4 at 16.0 ft: 39.0 in below beam hanger 5 at 20.0 ft: 39.5 in below beam hanger 6 at 24.0 ft: 40.0 in below beam hanger 7 at 28.0 ft: 40.5 in below beam hanger 8 at 32.0 ft: 41.0 in below beam hanger 9 at 36.0 ft: 41.5 in below beam hanger 10 at 40.0 ft: 42.0 in below beam hanger 11 at 44.0 ft: 42.5 in below beam hanger 12 at 48.0 ft: 43.0 in below beam hanger 13 at 52.0 ft: 43.5 in below beam hanger 14 at 56.0 ft: 44.0 in below beam hanger 15 at 60.0 ft: 44.5 in below beam riser at 60 ft: 44.5 in below beam
The slope in the code is written as inches of fall per foot of run: 1/8 in per foot.
Common mistakes
MistakeTrusting a level that has been dropped.
InsteadCheck it end for end on a flat surface before use.
MistakeMeasuring heights from the floor instead of the benchmark.
InsteadFloors are not perfectly flat; set every height from the benchmark or the laser plane.
MistakeLooking into a laser beam or at it through optics.
InsteadKeep the beam away from eye level and never view it through binoculars or instruments.
MistakeTreating laser-enhancement glasses as eye protection.
InsteadThey only make the beam easier to see; they do not protect against laser light.
MistakeSnapping a chalk line by pulling it sideways.
InsteadLift the line straight up, perpendicular to the surface, and release.
MistakeIgnoring the stated accuracy of a laser on long shots.
InsteadError grows with distance; check from both ends or use a more accurate instrument.
Summary and key terms
- Level is horizontal, plumb is vertical and square is 90 degrees; slopes are set from level.
- Check spirit levels end for end; a level that is out gives wrong readings every time.
- Plumb bobs and plumb lasers transfer points vertically; chalk lines mark straight lines on surfaces.
- Rotary lasers create a level plane; heights are read with a rod and detector from a benchmark.
- Never look into a laser beam; enhancement glasses are not eye protection.
- Measuring every height from the same reference stops errors adding up.
- Level
- Horizontal, at right angles to gravity.
- Plumb
- Vertical, in line with gravity.
- Spirit level
- A bar with liquid vials and bubbles that show level and plumb.
- Plumb bob
- A pointed weight on a string that hangs directly below its support.
- Chalk line
- A chalk-covered string snapped against a surface to mark a straight line.
- Rotary laser
- A laser that spins a beam to create a level plane.
- Benchmark
- A point of known elevation used to set other heights.
- Auto-level
- A laser feature that levels the beam by itself within a small range.
Practice problems
Work each problem on paper first, then reveal the answer to check.
A level's bubble moves when you turn it end for end in the same spot. What does that mean?
Show answer
The level is out of calibration.
Why are heights set from benchmarks and not from the floor?
Show answer
Floors are not perfectly flat, and finishes are added later.
A drain falls at 1/4 in per foot. How much does it fall over 24 ft?
Show answer
24 x 1/4 = 6 in.
The laser beam is 4 ft below a benchmark of 100'-0". A rod reads 3'-6" at a point. What is the elevation there?
Show answer
100'-0" - 4'-0" - 3'-6" = 92'-6".
What is the difference between laser-enhancement glasses and laser safety eyewear?
Show answer
Enhancement glasses only make the beam visible; they do not protect the eyes.
Why hold the middle of a long chalk line before snapping?
Show answer
To keep it straight and snap each half separately.
Lesson quiz · 5 questions
Score 60% or more to complete this lesson.
Create a free account to save your progress, take quizzes and earn a certificate.