
TRD-104 · Lesson 10 of 12 · 21 min
Anchors in concrete, masonry and drywall
Almost everything that hangs in a building hangs from an anchor: pipes, ducts, cable trays, sprinkler mains, light fixtures, handrails, equipment and signs. On Kingsway Tower, Maya's crew alone will install thousands of anchors into the concrete slabs to support the plumbing, and each one is holding up something heavy over people's heads. An anchor that pulls out can drop a water-filled pipe, a duct or a ceiling onto someone below. This lesson covers the main types of anchors, how they hold, and the installation steps that make the difference between an anchor that holds its rated load and one that holds a fraction of it.
How anchors hold
Anchors transfer load into the base material in three main ways:
- Friction or expansion: the anchor expands against the sides of the drilled hole and holds by friction. Wedge, sleeve and drop-in anchors work this way.
- Keying or mechanical interlock: the anchor locks into the shape of the hole or the material. Screw anchors cut threads into the concrete; undercut anchors flare into a widened hole at the bottom; toggle bolts spread behind a hollow wall.
- Bonding: adhesive, usually epoxy or a hybrid resin, bonds a threaded rod or rebar to the walls of the hole.
How much load an anchor can take depends on the anchor, the strength and condition of the base material, the embedment depth, the distance to edges and other anchors, and above all on how well it was installed. A concrete anchor that fails usually does so in one of a few ways: it pulls out of the hole, a cone of concrete breaks out around it, the edge of the concrete breaks away, or the steel itself breaks.
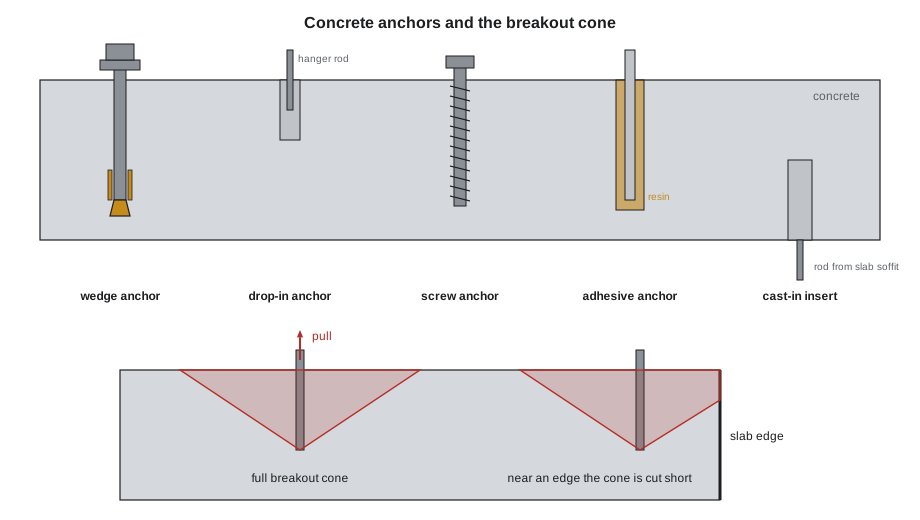
Cast-in anchors and inserts
The best anchor is often one that is placed before the concrete is poured. Cast-in anchor bolts hold columns and equipment; embedded plates provide welding points; and inserts, cast into the underside of slabs, provide threaded sockets for hanger rods. On Kingsway Tower, the sprinkler and plumbing contractors placed thousands of inserts on the formwork before each slab was poured, coordinated with the post-tensioning layout. Inserts avoid drilling, dust and the risk of hitting tendons, and they have well-defined capacities. Their drawback is that they must be in exactly the right place before the pour.
Post-installed mechanical anchors
Anchors installed after the concrete has cured are called post-installed anchors. The main mechanical types:
- Wedge anchors: a threaded stud with an expansion clip at the bottom. Drill the hole, clean it, drive the anchor through the fixture, and tighten the nut; tightening pulls the cone into the clip and expands it. Wedge anchors are strong in solid concrete, but they need full embedment and the specified installation torque.
- Sleeve anchors: a bolt with an expanding sleeve, used in concrete and solid masonry, generally for lighter loads.
- Drop-in anchors: an internally threaded shell set flush with the surface and expanded by driving a plug with a setting tool. They are used overhead for threaded hanger rod. The anchor is fully set only when the setting tool's shoulder reaches the anchor; an under-set drop-in holds very little.
- Screw anchors: hardened screws that thread directly into a drilled hole. They are fast, removable and work close to edges, and many are rated for cracked concrete.
- Undercut anchors: anchors that flare into an undercut at the bottom of a special hole, for very high loads and critical applications.
Adhesive anchors
Adhesive anchors are threaded rods or reinforcing bars bonded into drilled holes with epoxy, acrylic or hybrid resin, dispensed from a cartridge through a mixing nozzle. They develop high loads, work at close spacing and are often used to add rebar dowels into existing concrete. They are also the most sensitive to installation.
- Hole cleaning is critical. Dust left in the hole acts like a release agent and can cut the bond strength drastically. The usual sequence from the manufacturer is blow, brush, blow, repeated as instructed: blow out the hole with oil-free compressed air or a hand pump, brush it with a wire brush of the right diameter, and blow again. Some systems use hollow vacuum drill bits that clean the hole as it is drilled.
- Dispense and discard the first part of each cartridge until the color is uniform, which shows the two parts are mixing properly.
- Fill the hole from the bottom up, about two-thirds full, to avoid air pockets, then insert the rod with a slow twisting motion.
- Respect the gel time, after which the rod must not be moved, and the cure time, before which it must not be loaded. Both depend strongly on temperature; in cold weather cure times can be many hours or days.
- Wet or water-filled holes and cold base material need products and procedures approved for those conditions.
Adhesive anchors carrying sustained tension overhead need special care. In 2006, part of a suspended concrete ceiling in a highway tunnel in Boston fell and killed a motorist; investigators found that the epoxy used to hold the ceiling anchors had slowly crept under the constant load. Since then, building codes and product approvals have required adhesives used for sustained tension to be tested and qualified for it, and many jurisdictions require special inspection or certified installers for overhead adhesive anchors.
Approvals and design
Anchors used for structural and life-safety loads must be selected and designed by an engineer, using the anchoring provisions of ACI 318 (Chapter 17) adopted through the building code, and products with evaluation reports, usually from ICC Evaluation Service, that list the approved uses, capacities, edge distances and installation requirements, including whether the anchor is qualified for cracked concrete and seismic loads. Your job is to install exactly the anchor specified, exactly as the manufacturer's instructions say.
Pipe hangers, seismic bracing and sprinkler supports have their own standards for anchor types and sizes. On Kingsway Tower, the hanger details on the plumbing drawings name the anchor, its diameter and its embedment for each pipe size.
The installation steps that matter
Every manufacturer publishes installation instructions, and the anchor's rated capacity assumes they were followed. For most concrete anchors the critical steps are:
- Check the location: scan or check drawings for rebar, post-tensioned tendons and conduit, and confirm the edge distance and spacing from the manufacturer's table or the drawings.
- Drill the right size of hole with the right bit. Carbide bits wear; a worn bit drills an undersized hole, and a hole that is too large lets mechanical anchors spin and adhesive anchors use more resin with less strength. Many manufacturers specify bits that meet a tolerance standard.
- Drill to the right depth. Too shallow, and the anchor cannot reach its embedment; much too deep wastes time and can reach tendons or the far face.
- Clean the hole as the instructions require.
- Install to the specified embedment depth, shown on many anchors by a mark or by the length of thread left above the surface.
- Set the anchor as specified: torque for wedge anchors with a torque wrench, the setting tool's shoulder for drop-ins, full drive for screw anchors, cure time for adhesives.
- Do not reuse anchors or holes unless the manufacturer allows it, and never use a failed hole for a new anchor without the engineer's approval.
On some projects, a sample of anchors is proof-tested with a hydraulic tester to a set load. Anchors that fail are replaced and investigated, and if many fail, all anchors installed by that crew may need testing.
Anchors in masonry
Concrete block, brick and stone behave differently from solid concrete. Hollow block has thin walls and voids; mortar joints are weaker than the masonry units. Use anchors approved for the masonry type: sleeve anchors and screw anchors in solid units, and adhesive anchors with mesh screen tubes in hollow units, which hold the adhesive in place around the rod. Drill with the hammer action off or reduced in brittle brick to avoid blowing out the back of the unit, and avoid anchoring into mortar joints unless the anchor is approved for it.
Anchors in drywall and hollow walls
Light items attached to gypsum board walls use hollow-wall anchors: plastic expansion plugs for very light loads, self-drilling threaded anchors, toggle bolts and spring or strap toggles that spread behind the board, and sleeve-type hollow-wall anchors that collapse behind it. Gypsum board itself is weak. Anything heavy, such as wall-hung fixtures, grab bars, cabinets and televisions, must be fastened to studs or to wood or steel backing installed in the wall before the board goes on. Grab bars in particular are life-safety items that must resist large loads, and on Kingsway Tower the drawings show backing for every grab bar and wall-hung fixture. Maya's crew installs carrier systems for wall-hung toilets that bolt to the floor and to framing, not to the drywall.
Worked example: adhesive cure time
Worked problem
When can the hangers be loaded?
Maya installs adhesive anchors for a pipe rack on the parking level, where the concrete is at about 41 °F. The manufacturer's table gives cure times of 24 hours at 41 °F, 12 hours at 50 °F, 6 hours at 68 °F and 4 hours at 86 °F. She finishes installing at 3:00 p.m. When can the pipe be hung? What if the concrete warms to 50 °F?
Show solution
- At 41 °F, the cure time is 24 hours: the anchors may be loaded at 3:00 p.m. the next day.
- At 50 °F, 12 hours: 3:00 a.m. the next day, in practice the start of the next shift.
- The air temperature is not what counts; the base material temperature is. A cold slab stays cold long after the air warms up.
- In freezing conditions, many adhesives will not cure at all; use a product rated for low temperature or heat the area as the manufacturer allows.
Answer: Not before 3:00 p.m. tomorrow at 5 °C. Always use the base material temperature and the product's own table.
These cure times are illustrative only. Every product has its own table, and the times vary widely between products. The program below reads a cure table and estimates the cure time for any temperature between the listed points by straight-line interpolation, then works out when loading may start. It refuses to guess below the lowest temperature in the table.
from datetime import datetime, timedelta
# illustrative cure table: (base material temperature F, full cure hours)
table = [(41, 24), (50, 12), (68, 6), (86, 4)]
def cure_hours(t):
    if t < table[0][0]:
        return None                       # below the table: not allowed
    for (t1, h1), (t2, h2) in zip(table, table[1:]):
        if t1 <= t <= t2:
            return h1 + (h2 - h1) * (t - t1) / (t2 - t1)
    return table[-1][1]
done = datetime(2026, 11, 2, 15, 0)       # installation finished
for temp in [32, 41, 46, 59, 77]:
    h = cure_hours(temp)
    if h is None:
        print(f"{temp:4} F: below the table - use a cold-weather product")
    else:
print(f"{temp:4} F: cure {h:4.1f} h, load after {done + timedelta(hours=h):%a %H:%M}")32 F: below the table - use a cold-weather product 41 F: cure 24.0 h, load after Tue 15:00 46 F: cure 17.3 h, load after Tue 08:20 59 F: cure 9.0 h, load after Tue 00:00 77 F: cure 5.0 h, load after Mon 20:00
Interpolating a manufacturer's table is reasonable for planning, but where the instructions say to use the next lower temperature in the table, do that instead; it is the conservative choice.
Common mistakes
MistakeSkipping hole cleaning for adhesive or mechanical anchors.
InsteadClean every hole exactly as the manufacturer specifies.
MistakeUnder-setting a drop-in anchor.
InsteadDrive the setting tool until its shoulder seats on the anchor.
MistakeIgnoring edge distance and spacing.
InsteadFollow the manufacturer's table or the drawings; edges and nearby anchors reduce capacity.
MistakeLoading adhesive anchors before the cure time at the base material temperature.
InsteadWait the full cure time for the actual concrete temperature.
MistakeHanging heavy items from drywall anchors.
InsteadFasten heavy and life-safety items to studs or installed backing.
MistakeSubstituting a different anchor because it looks the same.
InsteadInstall exactly the specified anchor; capacities differ widely.
Summary and key terms
- Anchors hold by friction, keying or bonding; installation quality controls their strength.
- Cast-in inserts avoid drilling and are placed before the pour.
- Mechanical anchors need the right hole, depth, cleaning and setting; drop-ins must be fully set.
- Adhesive anchors need thorough hole cleaning, proper mixing and full cure at the base material temperature.
- Structural and life-safety anchors are designed by engineers using products with evaluation reports.
- Masonry needs approved anchors; heavy items on drywall must go into studs or backing.
- Post-installed anchor
- An anchor installed in concrete or masonry after it has hardened.
- Wedge anchor
- A stud anchor with an expansion clip that expands as the nut is tightened.
- Drop-in anchor
- An internally threaded anchor set flush with the surface by a setting tool.
- Screw anchor
- A hardened screw that threads directly into a hole in concrete or masonry.
- Adhesive anchor
- A rod or bar bonded into a drilled hole with resin.
- Embedment depth
- How deep an anchor is set into the base material.
- Breakout cone
- The cone of concrete that pulls out when an anchor is overloaded in tension.
- Cast-in insert
- A threaded socket cast into concrete for hanger rods.
Practice problems
Work each problem on paper first, then reveal the answer to check.
Name three ways anchors transfer load.
Show answer
Friction or expansion, keying, and bonding.
What is the usual hole-cleaning sequence for adhesive anchors?
Show answer
Blow, brush, blow, repeated as the manufacturer instructs.
When is a drop-in anchor fully set?
Show answer
When the setting tool's shoulder reaches the anchor.
Why does edge distance matter?
Show answer
A nearby edge cuts the breakout cone short and reduces capacity, and can break off the edge.
The slab is at 46 °F. Using the table 41 °F 24 h and 50 °F 12 h, what is the interpolated cure time?
Show answer
24 - 12 x (5/9) = about 17.3 hours.
Where should a grab bar be fastened?
Show answer
To studs or solid backing installed in the wall, not to drywall anchors.
Lesson quiz · 5 questions
Score 60% or more to complete this lesson.
Create a free account to save your progress, take quizzes and earn a certificate.