
ELEC-420 · Lesson 1 of 12 · 25 min
A systematic troubleshooting method
Troubleshooting is the skill that most clearly separates an experienced electrician from a beginner. Two people with the same meter and the same drawings can take very different amounts of time to find a fault: one replaces parts at random, follows hunches and creates new problems, while the other gathers facts, forms hypotheses, tests them in a logical order and finds the cause in a fraction of the time. Good troubleshooting is not a gift; it is a method that can be learned and practiced. This course teaches that method and the tests, instruments and safety practices that support it, then applies them to commissioning, the process of proving that new installations work as intended before they are handed over. This first lesson sets out a general troubleshooting procedure, the reasoning techniques behind it, and the habits that make it efficient and safe.
Why a method matters
Electrical systems are full of interacting parts, and symptoms often appear far from their causes. A motor that trips its overload may have a mechanical problem in the driven equipment, a supply voltage problem, a failing winding, a loose connection or a wrongly set overload relay. Guessing leads to replacing good parts, which costs money and time, and can hide the real fault until it recurs. A method makes troubleshooting efficient (fewer tests and less downtime), safe (hazards are identified before work starts), and reliable (the root cause is found and fixed rather than a symptom). It also produces a record that helps the next person and supports warranty claims, insurance and incident investigations.
A seven-step procedure
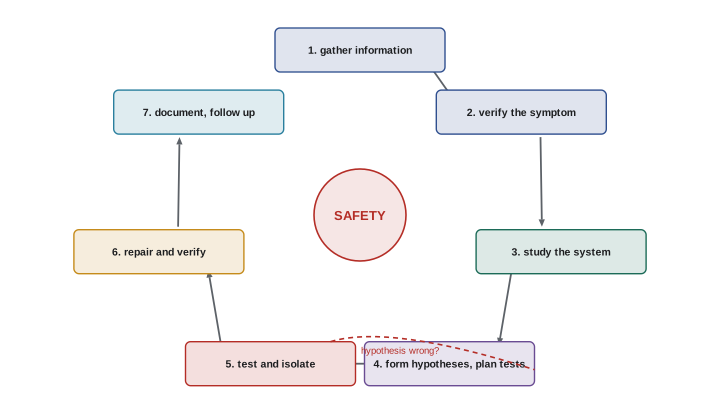
Many organizations teach troubleshooting as a sequence of steps. A practical version is:
- 1. Gather information: talk to the operator, read logs and alarms, find out what happened, when it started, what changed recently and whether it has happened before.
- 2. Verify the symptom: observe the problem yourself, safely, so you know exactly what is wrong and can confirm later that it is fixed.
- 3. Study the system: use drawings, manuals and your knowledge to understand how the system should work and which parts could produce the symptom.
- 4. Form hypotheses and plan tests: list possible causes, rank them by likelihood and ease of testing, and decide which tests will divide the possibilities most effectively.
- 5. Test and isolate: carry out tests safely, interpreting each result and narrowing down the fault until it is located.
- 6. Repair and verify: fix the root cause, then confirm the system works correctly under normal operating conditions, not only that the symptom has gone.
- 7. Document and follow up: record the symptom, cause, repair and tests, update drawings if needed, and consider whether similar equipment could fail the same way.
Gathering information
The first minutes of a call often provide the most valuable clues. Useful questions include: What exactly is the problem, in the operator's words? When did it start, and is it constant or intermittent? Did anything change: maintenance, new equipment, a power outage, a storm, a software update, a production change? Has it happened before, and what was done then? Are there alarm messages, fault codes, tripped breakers, burnt smells, noises or heat? Experienced troubleshooters listen carefully but verify everything, because people describe symptoms imprecisely and sometimes reset equipment or try fixes before calling for help. Maintenance histories, alarm logs from PLCs and drives, and power monitoring data can reveal patterns, such as trips that always occur when a large motor starts or on hot afternoons.
Understanding how the system should work
You cannot find what is wrong without knowing what right looks like. Drawings, including single-line diagrams, schematics, ladder diagrams and wiring diagrams, show how power and control signals flow. Manuals describe normal operating values, fault codes and test procedures. Nameplates give ratings. When documentation is missing or out of date, as it often is, troubleshooters trace circuits and sketch their own diagrams, a task that also builds understanding. A useful mental model is to think of the system as a chain of functional blocks: supply, protection, control, power switching, load and feedback. The symptom tells you which part of the chain is not producing its expected output, and tests at each block boundary tell you whether the fault is upstream or downstream.
Reasoning techniques
Several reasoning techniques make testing efficient:
- Half-splitting: in a series chain of components, test at the midpoint. If the signal is good there, the fault is downstream; if bad, upstream. Each test halves the possibilities, so a chain of 16 points needs only about four tests rather than up to 16.
- Input–output testing: check whether each block has the correct input and produces the correct output. A block with good input and bad output is faulty (or its load is).
- Probability and ease: test the most likely causes first, and, among equally likely causes, the easiest to check. Loose connections, blown fuses, tripped devices and failed switches are far more common than failed transformers or controllers.
- Substitution: replace a suspected part with a known good one, useful for plug-in modules and cheap components, but not a substitute for diagnosis, because a replaced part may fail again if the root cause remains.
- Comparison: compare readings with a similar working system, or with previous records, to spot abnormal values.
- Change analysis: ask what changed just before the problem started; recent changes are often the cause.
Worked problem
Half-splitting a control circuit
A conveyor control circuit has eight series contacts between the control transformer and the motor starter coil: a fuse, stop button, two emergency stops, a guard switch, an overload contact, a PLC output and an interlock. The coil does not energize. Using a meter from the control circuit common, plan the tests.
Show solution
- Confirm control voltage at the transformer secondary (for example 120 V).
- Test at the midpoint, after the fourth device (the second emergency stop). Suppose voltage is present: the first four are good.
- Test after the sixth device (the overload contact). Suppose no voltage: the fault is in the guard switch or overload contact.
- Test after the fifth device (guard switch). Suppose voltage is present: the overload contact is open.
- Investigate why the overload tripped (motor current, mechanical load) before resetting; three tests located the open device among eight.
Answer: Three voltage tests isolate the open overload contact; then find out why it tripped.
Root cause and contributing factors
Finding the failed part is not the end. The root cause is the underlying reason it failed: a fuse blew because of a short in a damaged cable, which was damaged because it rubbed against a sharp edge, which happened because a clamp was never installed. Replacing the fuse alone guarantees a repeat call. Techniques such as the "five whys", asking why repeatedly until reaching a cause that can be corrected, help reach the root. Often several factors contribute: an overload trips because a bearing is failing, the ambient temperature is high and the overload is set too close to the motor's full-load current. Addressing contributing factors improves reliability across the whole system.
Intermittent faults
Intermittent problems are the hardest: the fault is absent when the troubleshooter arrives. Strategies include gathering as much information as possible about the conditions when it occurs (time of day, temperature, vibration, load, weather); monitoring with data loggers, power quality analyzers or PLC trending to catch the event; using thermal imaging under load; flexing cables and tapping components gently, with care, to provoke loose connections; and checking for environmental factors such as moisture, which causes leakage faults that appear only in humid weather or during washdowns. Patience and good records are essential. A common error is declaring an intermittent fault fixed because it did not recur during a short visit.
Safety throughout
Troubleshooting often requires testing energized circuits, which is one of the most hazardous tasks electricians perform. Every step must be planned with safety in mind: identifying hazards, deciding whether a test can be done de-energized, establishing an electrically safe work condition with lockout where possible, using appropriate meters and personal protective equipment when energized testing is justified, and never bypassing safety devices to "see what happens". Lesson 9 covers electrical safe work practices in detail, but the rule for every lesson is the same: no fault is worth an injury.
In the United States, OSHA regulations (29 CFR 1910 Subpart S and 1926 Subpart K) require that live parts be de-energized before work unless de-energizing creates greater hazards or is infeasible, and NFPA 70E provides the consensus requirements for energized work permits, risk assessment and PPE.
Professional habits
Efficient troubleshooters develop consistent habits: they bring drawings and the right instruments, check their meter on a known source before and after testing (live–dead–live), write down readings as they go, change one thing at a time, put things back as they found them, and communicate clearly with operators about what they are doing and when equipment will be available. They also know when to stop and ask for help, from a colleague, the manufacturer's technical support or an engineer, rather than continuing to guess. A troubleshooter who explains the fault and the fix clearly to the customer builds trust and repeat business.
Troubleshooting with drawings that do not match
Field conditions often differ from drawings. Circuits are added without updating panel schedules, conductors are reused for new purposes, and modifications made during previous repairs go unrecorded. When readings do not make sense, the drawing may be wrong rather than the equipment. Experienced troubleshooters verify key assumptions before relying on them: they confirm which breaker actually feeds a load by switching it off and testing, check wire numbers at both ends, and trace conductors when labels are missing. Every discrepancy found should be marked on the drawings and reported, because the next person will face the same confusion. A small notebook or a phone photo of each enclosure before and after work is cheap insurance against misremembering how things were connected.
Communicating with customers and operators
Troubleshooting is also a communication task. Operators know how the equipment normally behaves and often notice subtle changes, so asking good questions and listening carefully pays off. While working, keep operators and supervisors informed of what you are doing, what you have found and how long the equipment will be unavailable, especially when you need to shut down systems or run tests that could affect production. When the job is done, explain the cause and the fix in plain language, describe any follow-up work needed, and suggest ways to prevent a recurrence, such as better maintenance, operator training or a design change. Clear explanations build trust and help customers understand why root-cause repairs are worth paying for.
Learning from every call
Each troubleshooting call is an opportunity to learn. Keeping a personal log of unusual faults, the clues that led to them and the tests that found them builds a mental library that speeds future diagnosis. Many companies hold short reviews of difficult jobs so that the whole team benefits. Over time, patterns emerge: a particular brand of contactor that fails early, a machine whose sensors loosen from vibration, or a building whose neutral connections were poorly made during construction. Sharing these patterns turns individual experience into organizational knowledge.
Common mistakes
MistakeReplacing parts until the problem goes away.
InsteadDiagnose with a logical sequence of tests.
MistakeAccepting the reported symptom without checking.
InsteadVerify the symptom yourself, safely.
MistakeResetting a tripped device without finding why it tripped.
InsteadFind the cause before restoring power.
MistakeChanging several things at once.
InsteadChange one thing at a time and retest.
MistakeLeaving without documenting the fault and repair.
InsteadRecord symptom, cause, repair and tests.
Summary and key terms
- A method makes troubleshooting faster, safer and more reliable.
- Gather information, verify, study, hypothesize, test, repair and verify, then document.
- Know how the system should work before testing.
- Half-splitting halves the possibilities with each test.
- Test likely and easy causes first; use comparison and change analysis.
- Find and fix the root cause and contributing factors.
- Intermittent faults need monitoring, records and patience.
- Troubleshooting
- Systematic location and correction of faults.
- Symptom
- The observable effect of a fault.
- Hypothesis
- A proposed cause to be tested.
- Half-splitting
- Testing at the midpoint to halve possibilities.
- Input–output testing
- Checking each block's input and output.
- Substitution
- Replacing a suspect part with a known good one.
- Root cause
- The underlying reason a failure occurred.
- Five whys
- Asking why repeatedly to reach a root cause.
- Intermittent fault
- A fault that comes and goes.
- Live–dead–live
- Checking a tester before and after a test.
Practice problems
Work each problem on paper first, then reveal the answer to check.
List the seven troubleshooting steps.
Show answer
Gather, verify, study, hypothesize, test, repair and verify, document.
Why verify the symptom yourself?
Show answer
Reports are imprecise, and you need a baseline to confirm the fix.
How many tests does half-splitting need for 32 points?
Show answer
About 5.
Which faults are most common?
Show answer
Loose connections, blown fuses, tripped devices, failed switches.
When is substitution appropriate?
Show answer
For cheap or plug-in parts, alongside diagnosis.
What does change analysis ask?
Show answer
What changed just before the problem began.
Give an example of a root cause chain.
Show answer
Fuse blown ← cable short ← chafing ← missing clamp.
Name two strategies for intermittent faults.
Show answer
Data logging, thermal imaging, flexing cables, checking moisture.
What is live–dead–live?
Show answer
Testing the meter on a live source before and after.
Why change one thing at a time?
Show answer
To know which change had which effect.
Lesson quiz · 5 questions
Score 60% or more to complete this lesson.
Create a free account to save your progress, take quizzes and earn a certificate.