
ROOF-330 · Lesson 8 of 12 · 29 min
Measuring and taking off a roof
▶ Video coming soon A video version of this lesson is on the way.
The owner of 15 Linden Street had watched Crew 5 re-roof four of her neighbours' houses in August, and in October she asked Ridgecap for a price to do hers in the spring of 2027. Glen used it as the practice job for the November 2 session. He gave Rory and Keisha the measurements Wes had taken from the ground and a ladder, a sketch of the roof, and one instruction: "Measure twice, calculate once, and show your work, because I'm going to check it." Every price in roofing starts with a takeoff, the list of quantities that the estimate in lesson 9 turns into money.
This lesson covers measuring roofs on site and from drawings, turning plan areas into true roof areas with pitch factors, measuring the lines that need edge metal, starter, ridge and flashing, working out low-slope areas and details, and allowing for waste.
Getting the measurements
Roofs are measured in one of four ways. On site, a roofer measures the roof directly with a tape or a wheel, which is accurate but means climbing on every roof, or measures the building from the ground and the eaves and calculates the roof from its slope. From drawings, the roof plan and elevations give the dimensions, which must be checked against the scale and against any field changes. From aerial images, measurement services and software produce roof reports with areas, slopes and lengths, which are fast but should be checked against at least a few site measurements, because trees, shadows and image angle cause errors. And from a laser or drone survey, as Dana and Rory did for Northgate's drainage design on October 24.
Whatever the source, a takeoff starts with a sketch of the roof: each plane labelled, with its slope, the eaves, rakes, ridges, hips, valleys and walls marked, and every penetration shown. The sketch is what makes the numbers checkable.
Plan area and roof area
A roof's plan area is its area seen from directly above, including the overhangs. Its roof area, or true area, is larger on a sloped roof, because the roof surface is longer than its horizontal run. The ratio between them is the pitch factor, which depends only on the slope.
| Slope (rise in 12) | Pitch factor (roof area ÷ plan area) | Hip and valley factor (hip length ÷ run of the common rafter) |
|---|---|---|
| 4 in 12 | 1.054 | 1.453 |
| 5 in 12 | 1.083 | 1.474 |
| 6 in 12 | 1.118 | 1.500 |
| 8 in 12 | 1.202 | 1.563 |
| 10 in 12 | 1.302 | 1.641 |
| 12 in 12 | 1.414 | 1.732 |
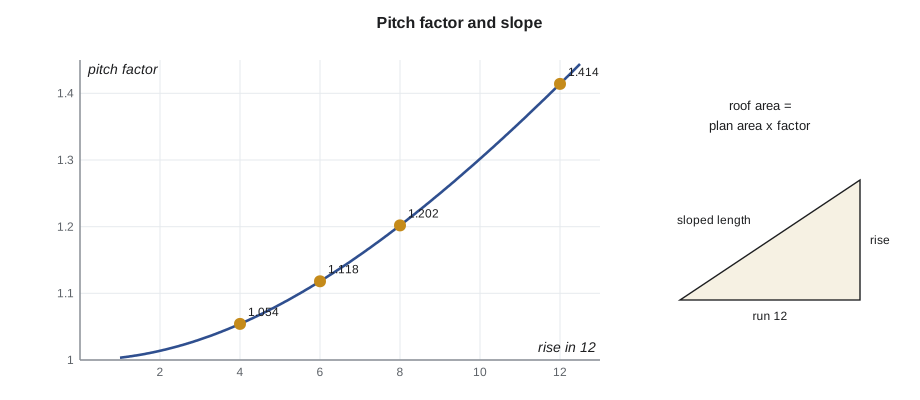
Multiplying the plan area by the pitch factor gives the roof area for any roof whose planes all have the same slope, however many hips and valleys it has. Roofs with planes of different slopes are worked plane by plane. Roof area is then usually converted to squares: one square is 100 ft², about 9.29 m², the unit shingles, underlayment and many other materials are sold and priced by in Canada as well as the US.
Worked problem
Taking off 15 Linden Street
15 Linden Street is a two-storey house with a simple gable roof at 8 in 12. The walls measure 8.0 m across the gable ends and 11.0 m along the eaves, and the overhangs are 0.3 m all round. Find the plan area, the roof area and the number of squares.
Show solution
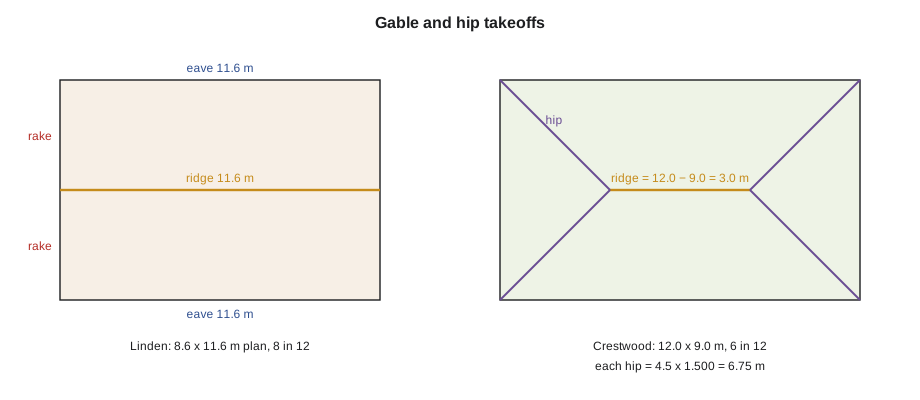
- Plan dimensions with overhangs = (8.0 + 0.6) × (11.0 + 0.6) = 8.6 × 11.6 m.
- Plan area = 8.6 × 11.6 = 99.76 m².
- Roof area = 99.76 × 1.202 = 119.9 m².
- Squares = 119.9 ÷ 9.29 = 12.9 squares.
Answer: About 119.9 m², or 12.9 squares, before waste. Rory checked it the long way: each roof plane runs 4.3 m horizontally from eave to ridge, so its sloped length is 4.3 × 1.202 = 5.17 m, and two planes of 5.17 × 11.6 m make 119.9 m².
Lines: eaves, rakes, ridges, hips and valleys
Many materials are measured by length rather than area: drip edge along eaves and rakes, starter strip, eave protection, ridge and hip cap, valley lining and metal, step and wall flashing, and gutters. Eaves and ridges are horizontal, so their lengths come straight from the plan. Rakes, hips and valleys slope, so their true lengths are longer than they look on the plan. A rake is as long as the sloped length of the plane; a hip or valley between two planes of the same slope is the run of the common rafter times the hip and valley factor.
Worked problem
Lines on 15 Linden Street
Using the dimensions above, find the total length of eaves, rakes and ridge on 15 Linden Street.
Show solution
- Eaves: two of 11.6 m = 23.2 m.
- Rakes: four of 5.17 m (two at each gable) = 20.7 m.
- Ridge: one of 11.6 m.
- Drip edge runs on eaves and rakes = 23.2 + 20.7 = 43.9 m.
Answer: Eaves 23.2 m, rakes 20.7 m, ridge 11.6 m, and 43.9 m of drip edge and starter. Lesson 9 turns these into pieces, rolls and bundles.
Worked problem
A hip roof
Keisha took off a second house for practice: a bungalow on Crestwood Drive with a hip roof at 6 in 12, measuring 12.0 m by 9.0 m in plan including overhangs. Find the roof area, the length of the four hips and the ridge.
Show solution
- Plan area = 12.0 × 9.0 = 108.0 m².
- Roof area = 108.0 × 1.118 = 120.7 m², or 13.0 squares.
- Run of the common rafter = half the width = 9.0 ÷ 2 = 4.5 m.
- Each hip = 4.5 × 1.500 = 6.75 m; four hips = 27.0 m.
- Ridge = length − width = 12.0 − 9.0 = 3.0 m.
Answer: 120.7 m², 27.0 m of hips and 3.0 m of ridge, so 30.0 m of hip and ridge cap. A hip roof has no rakes, but all four sides have eaves: 2 × (12.0 + 9.0) = 42.0 m.
Waste
No roof uses exactly its area in material. Shingles are cut at rakes, hips and valleys; membranes are lapped and cut around details; boards are trimmed at edges. A takeoff adds a waste factor to the area before ordering. Typical allowances for shingles are about 10 in 100 on a simple gable roof and about 15 in 100 on a hip roof or a roof with many valleys and dormers, but each contractor learns its own numbers by comparing what it ordered with what it used.
Worked problem
Ordering for waste
Add waste to the two houses: 10 in 100 for the gable at Linden, 15 in 100 for the hip on Crestwood.
Show solution
- Linden: 119.9 × 1.10 = 131.9 m² = 14.2 squares.
- Crestwood: 120.7 × 1.15 = 138.8 m² = 14.9 squares.
Answer: About 14.2 squares for Linden and 14.9 for Crestwood. The two roofs have nearly the same area, but the hip roof needs more material because of the extra cutting.
Low-slope takeoffs
Low-slope roofs are mostly flat in plan, so their areas come straight from the plan, but their details take more measuring. A low-slope takeoff lists the field area of each roof section, its perimeter and the type of edge along each side, the length and height of every wall and parapet flashing, every drain, scupper and overflow, every curb with its size, every pipe and penetration by size and type, expansion joints, area dividers and walkway pads. The insulation takeoff adds the layers and the tapered insulation for crickets and slope. ROOF-320 lesson 11 showed how to read these from the drawings.
Worked problem
Parkdale: area, perimeter and parapet flashing
The Parkdale roof is 46.0 m by 30.0 m with a parapet all round. After the re-roof, the flashing will run 315 mm up the inside of the raised parapet, 250 mm across its top, 100 mm down the outside face under the coping, and 150 mm onto the roof. Find the field area, the perimeter and the area of parapet flashing membrane.
Show solution
- Field area = 46.0 × 30.0 = 1,380 m².
- Perimeter = 2 × (46.0 + 30.0) = 152 m.
- Flashing girth = 315 + 250 + 100 + 150 = 815 mm = 0.815 m.
- Flashing area = 152 × 0.815 = 123.9 m².
Answer: 1,380 m² of field, 152 m of perimeter and about 124 m² of flashing membrane, before laps and waste. Lesson 12 carries these into the bid.
A good takeoff is checkable. Glen's rule is that every quantity on the takeoff sheet must point to where it came from on the sketch or drawing, and that a second person checks the big numbers by a different method, as Rory did with the Linden roof planes. Errors in a takeoff are the most expensive mistakes in estimating, because every price built on them is wrong.
Measuring from drawings
On commercial work, most takeoffs are done from drawings before anyone visits the roof. The scale is the first thing to check: drawings are often printed or viewed at a size different from the original, so a dimension measured with a scale rule on a reduced print is wrong. Use the written dimensions wherever they are given, and where you must scale, check the scale against a known written dimension on the same sheet first. On digital drawings, takeoff software lets the estimator calibrate the scale and trace areas and lengths directly, but the same check applies: calibrate on a long known dimension and confirm it on another.
Worked problem
Checking a scale
On a printed roof plan marked 1:100, Rory measured a parapet wall with a written length of 30.0 m and found it was 225 mm long on the paper. What scale is the print really at, and what is the true length of a drain line that measures 96 mm on the same print?
Show solution
- At 1:100, 30.0 m should measure 300 mm, but it measures 225 mm.
- True scale = 30,000 ÷ 225 = 1:133, so the print was reduced.
- Drain line = 96 × 133.3 = 12,800 mm = 12.8 m.
Answer: The print was reduced to three-quarters of full size. Measuring the drain line at the marked scale would have given 9.6 m instead of 12.8 m, an error of a quarter on every scaled number.
Dormers, valleys and complicated roofs
Complicated steep roofs are taken off plane by plane. A sketch with every plane numbered, its shape (rectangle, triangle or trapezoid) and its plan dimensions, lets the estimator find each plan area, multiply by the plane's pitch factor, and add them up. Dormer roofs are separate planes, usually at a different slope from the main roof; the area of main roof they cover is not deducted unless the dormer is large, because the cutting around it uses the material anyway. Valleys are measured like hips, with the same factor where the two planes have the same slope, and each valley needs valley lining or metal along its full sloped length, plus ice and water protection under it.
| Line | How its length is found | Materials it controls |
|---|---|---|
| Eave | From the plan | Drip edge, starter, eave protection, gutters |
| Rake | Run of the plane × pitch factor | Drip edge, starter at rakes |
| Ridge | From the plan | Ridge cap, ridge vent |
| Hip | Run of the common rafter × hip factor | Hip cap |
| Valley | Run of the common rafter × valley factor | Valley lining or metal, eave protection under it |
| Wall and chimney | Measured along the slope or from elevations | Step and apron flashing, counterflashing |
An aerial roof report should be checked the same way. Before relying on one, Glen checks the eaves length against the building's measured length, the slope against a level and rule at the eave, and the total area against a rough plan area times the pitch factor. If they agree within a few parts in 100, he uses the report; if not, someone goes to measure.
Common mistakes
MistakeUsing plan area as roof area on a sloped roof.
InsteadMultiply plan area by the pitch factor.
MistakeMeasuring hips and rakes from the plan view.
InsteadUse the sloped length: run times the pitch factor or the hip factor.
MistakeOrdering exactly the roof area.
InsteadAdd a waste factor suited to the roof's shape.
MistakeTrusting an aerial report without a check.
InsteadCheck a few measurements on site or on the drawings.
MistakeLeaving out details on low-slope takeoffs.
InsteadList every edge, wall, drain, curb, penetration and joint with its size.
Summary and key terms
- Measure on site, from drawings, from aerial reports or by survey, and always start with a labelled sketch.
- Roof area = plan area × pitch factor for planes of one slope; work planes of different slopes separately.
- A square is 100 ft² (about 9.29 m²).
- Eaves and ridges come from the plan; rakes, hips and valleys are run times the pitch or hip factor.
- Add waste: typically about 10 in 100 for simple gables and 15 in 100 for hips and cut-up roofs.
- Low-slope takeoffs list areas, perimeters, wall flashings, drains, curbs, penetrations and joints; check big numbers twice.
- Takeoff
- The list of quantities measured from a roof or drawings for an estimate.
- Plan area
- The area of a roof seen from directly above, including overhangs.
- Pitch factor
- The ratio of roof area to plan area for a given slope.
- Square
- 100 ft² of roof, about 9.29 m².
- Hip and valley factor
- The ratio of a hip or valley length to the run of the common rafter.
- Waste factor
- The extra material allowed for cutting and laps.
- Girth
- The total width of a flashing or metal piece measured around its bends.
Practice problems
Work each problem on paper first, then reveal the answer to check.
A gable roof at 6 in 12 has a plan area of 140 m². What is its roof area?
Show answer
140 × 1.118 = 156.5 m².
A hip roof at 8 in 12 is 10 m wide. How long is each hip?
Show answer
5 × 1.563 = 7.8 m.
A hip roof is 15 m by 10 m. How long is its ridge?
Show answer
15 − 10 = 5 m.
How many squares are 156.5 m² with 10 in 100 waste?
Show answer
156.5 × 1.1 = 172.2 m² ÷ 9.29 = 18.5 squares.
A flat roof is 40 m by 25 m. What are its area and perimeter?
Show answer
1,000 m² and 130 m.
Lesson quiz · 5 questions
Score 60% or more to complete this lesson.
Create a free account to save your progress, take quizzes and earn a certificate.