
ROOF-120 · Lesson 10 of 12 · 26 min
Wind uplift and securement
▶ Video coming soon A video version of this lesson is on the way.
The call came in at six on Sunday morning, April 26, 2026. A windstorm overnight had gusted to about 100 km/h (62 mph), and the roof of the Northgate Medical Building had peeled back at one corner. By the time Glen and Dana arrived, a strip of white membrane the size of a tennis court was flapping over the parking lot, insulation boards were scattered across three properties, and rain was falling into the second-floor offices. The rest of the roof, a few metres away, was untouched. "It always starts at a corner or an edge," Glen said, pulling on his harness. "Let's get it weighted down and dried in, and then we'll find out why."
Wind is the force that most often tears roofs off buildings, and the damage nearly always starts where the roof is weakest: corners, edges, ridges and details. This lesson explains how wind pulls on roofs, why corners and edges take the worst of it, how roof systems are tested and rated for wind, and how roofers secure shingles, membranes, insulation and edge metal so the roof stays on. Lesson 12 returns to Northgate to find out exactly what went wrong.
How wind loads a roof
Moving air carries energy. When it is slowed or turned by a building, that energy becomes pressure. The pressure depends on the square of the wind speed: double the speed and the pressure goes up four times. That is why a storm only a little stronger than usual can do far more damage.
Worked problem
Wind speed and pressure
The basic pressure of moving air is about 0.613 × V² pascals, with V in metres per second. Compare the pressure from a 100 km/h gust with a 130 km/h gust.
Show solution
- Convert the speeds: 100 km/h ÷ 3.6 ≈ 27.8 m/s; 130 km/h ÷ 3.6 ≈ 36.1 m/s.
- Pressure at 27.8 m/s = 0.613 × 27.8² ≈ 0.613 × 773 ≈ 474 Pa, about 0.47 kPa.
- Pressure at 36.1 m/s = 0.613 × 36.1² ≈ 0.613 × 1,303 ≈ 799 Pa, about 0.80 kPa.
- Ratio = 799 ÷ 474 ≈ 1.69.
Answer: A gust 30 per cent faster pushes about 69 per cent harder. The actual pressures on a roof are this basic pressure multiplied by factors for height, terrain, gusts and the roof zone, set by the designer.
When wind hits a building, it pushes on the windward wall. As it flows up and over the roof edge, it separates from the roof surface, speeds up and swirls, creating low pressure above the roof. The roof is sucked upward. At the same time, if wind gets into the building through an open door, a broken window or gaps at the roof edge, it raises the pressure inside and pushes the roof up from below. Suction above plus pressure below is the total uplift.
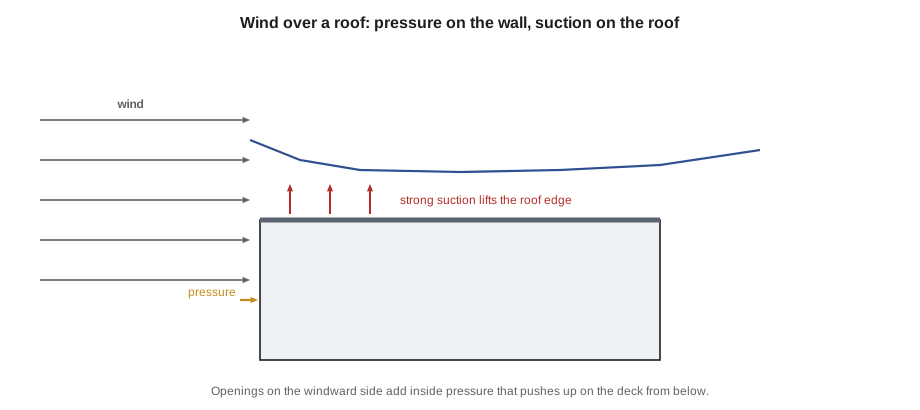
On steep roofs, the windward slope may be pushed down on steeper roofs or sucked up on lower ones, while the leeward slope and the ridge are sucked up. Hips, ridges, rakes and eaves are the high-suction areas, and ridge caps and rake shingles are often the first to go.
Corners, edges and the field
Suction is not even across a roof. When wind blows at an angle to a corner, the air rolls into cone-shaped vortices along the two edges that meet there, like tiny tornadoes lying on their sides. These vortices create the strongest suction anywhere on the building. Designers divide low-slope roofs into zones:
- Field (interior): the central area, with the lowest suction.
- Perimeter (edge): a strip along each edge, with higher suction.
- Corner: the squares where two perimeters meet, with the highest suction, often two to three times the field.
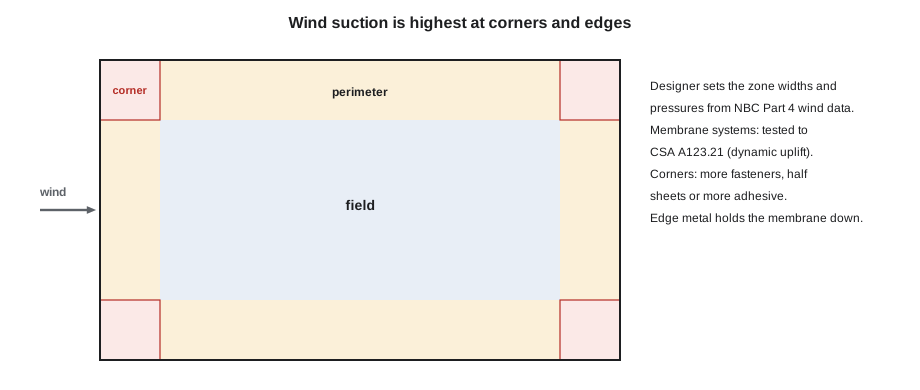
The width of the perimeter and corner zones depends on the building's size and height and on the code method; on a large, low building it may be a few metres. The roof drawings show the zones and the fastening or adhesive pattern for each. A parapet changes the airflow and can reduce the corner suction a little, but a low parapet does not remove the need for enhanced corner securement.
Who decides the wind design
For buildings designed under Part 4 of the National Building Code and the Ontario Building Code, the designer works out the wind pressures from the reference wind pressure for the location (the code lists climatic values for each municipality) and factors for the building's importance, height, terrain, gusts and roof zone. For low-slope membrane roofs, the code relies on dynamic wind uplift testing to CSA A123.21: the whole roof assembly, from the deck up, is built in a test chamber and put through cycles of fluctuating pressure that mimic real gusts, and the result is the assembly's tested resistance. The designer chooses an assembly whose tested resistance meets the design pressure in each zone. For houses and small buildings under Part 9, the code's prescriptive rules and the manufacturers' instructions cover shingles and their fastening.
Roofers do not calculate wind loads, but they must build the tested assembly exactly: the same deck, the same insulation and cover board, the same fasteners and plates at the same spacing, the same adhesive at the same bead spacing, and the same membrane. Any substitution, such as a different cover board, a cheaper screw, or wider fastener rows, means the roof is no longer the assembly that passed the test.
Worked problem
Matching the assembly to the zones
A roof designer gives factored uplift pressures of 1.6 kPa in the field, 2.7 kPa in the perimeter and 4.0 kPa in the corners. The membrane maker has two tested patterns for this deck and insulation: a standard pattern with a tested resistance of 2.9 kPa, and an enhanced pattern with 4.3 kPa. Which pattern goes in each zone?
Show solution
- Field: 1.6 kPa is less than 2.9 kPa, so the standard pattern works.
- Perimeter: 2.7 kPa is less than 2.9 kPa, so the standard pattern works, with little margin.
- Corners: 4.0 kPa is more than 2.9 kPa, so the standard pattern fails; 4.0 is less than 4.3 kPa, so the enhanced pattern works.
Answer: Standard pattern in the field and perimeter, enhanced pattern in the corners. Many designers use the enhanced pattern in the perimeter too, for margin.
Securing shingles
Asphalt shingles resist wind in two ways: nails, and the factory sealant strip that bonds each shingle to the one above once the sun warms it. A shingle that has sealed down acts as part of a continuous layer; one that has not is held only by its nails and can flip up and tear at the nails in a gust.
Shingles are tested and labelled for wind resistance. Two common test methods are used for products sold in both countries:
| Test | How it works | Classes (rated wind speed) |
|---|---|---|
| ASTM D3161 (fan-induced) | a fan blows wind over sealed shingles for two hours | Class A (about 60 mph), Class D (90 mph), Class F (110 mph) |
| ASTM D7158 (uplift resistance) | measures the force to lift sealed shingles and calculates resistance | Class D (90 mph), Class G (120 mph), Class H (150 mph) |
The label on the wrapper shows the class. Building codes require a class suitable for the local design wind speed, and manufacturers offer higher wind warranties when extra steps are taken. The rules for getting full wind performance from shingles are:
- Use the manufacturer's starter strip at the eaves and rakes, so the first course and the rake edges are sealed down. A cut-up shingle laid upside down does not put the sealant in the right place.
- Nail in the nailing zone, with six nails per shingle in high-wind areas, on steep slopes or where the warranty asks for it.
- Make sure the sealant strips can work. In cold weather, shingles may not seal until spring; makers then require hand-sealing with dabs of asphalt cement under each tab, and especially along rakes and eaves.
- Keep the deck sound. Nails cannot hold in rotten or thin decks.
- Install hip and ridge caps with the longer nails and the pattern the maker specifies.
- Fasten drip edge and rake metal so it holds the edge shingles and starter.
Securing low-slope membranes
On a low-slope roof, the load path runs from the membrane, through its attachment to the insulation or cover board, through their attachment to the deck, through the deck's attachment to the structure. Every link must be strong enough. Securement methods are:
- Mechanically attached: fasteners and seam plates in each side lap. Wind lifts the sheet between rows, so the load on each fastener depends on the distance between rows and the spacing of fasteners along them. Perimeter and corners use narrower sheets (often half sheets) to bring the rows closer together, and closer fastener spacing.
- Adhered: adhesive over the whole sheet. Perimeter and corners get more adhesive coverage, closer foam bead spacing or extra fastening of the boards beneath.
- Ballasted: heavier stone or pavers at the perimeter and corners than in the field.
Insulation and cover boards are part of the load path too. Each board needs the specified number of fasteners and plates, or the specified adhesive pattern, with more in the perimeter and corners. A membrane perfectly attached to a cover board that is barely attached to the deck will still blow off.
Worked problem
Load on each membrane fastener
A mechanically attached TPO roof uses 3.05 m sheets (2.90 m between fastener rows after the lap) with fasteners every 300 mm. The field design uplift is 1.2 kPa. In the corners, the uplift is 2.4 kPa and the crew uses half sheets (1.525 m wide, 1.375 m between rows) with fasteners still at 300 mm. What load does each fastener carry in the field and in the corners?
Show solution
- Each fastener holds an area equal to the row spacing × the fastener spacing.
- Field area per fastener = 2.90 × 0.30 = 0.87 m²; load = 1.2 kPa × 0.87 m² ≈ 1.04 kN.
- Corner area per fastener = 1.375 × 0.30 ≈ 0.41 m²; load = 2.4 kPa × 0.41 m² ≈ 0.99 kN.
Answer: About 1.04 kN per fastener in the field and 0.99 kN in the corners. Halving the sheet width roughly halved the area each fastener holds, so the fasteners in the corners carry no more than those in the field even though the pressure doubled.
This is why using full sheets in the corners, skipping fasteners or spreading the spacing to save time is so dangerous: the corner fasteners would carry about twice the load they were designed for.
Edge metal: where failures start
Most low-slope roof blow-offs begin at the edge. Wind catches a lifted piece of edge metal or coping, peels it off, and then gets under the membrane, which unzips across the roof. Edge metal must therefore be strong enough to stay on in the design wind and to hold the membrane down along the perimeter. In Canada, edge details are covered by the manufacturer's tested system and the roofing contractors' association details; many manufacturers also test their edge systems to the US ES-1 method. What makes edge metal strong:
- Wood nailers at the edge, solidly anchored to the structure, the same height as the insulation.
- A continuous cleat along the face, fastened at close spacing, that locks the hemmed bottom edge of the fascia so wind cannot lift it.
- The right metal thickness for the face height.
- Fasteners of the specified type and spacing, often closer at corners.
- Copings held with continuous cleats or clips on both sides, not just fastened through the top.
Shop-made edge metal can work, but only if it matches a tested or engineered design. A face nailed straight through into the nailer, with no cleat, is the classic weak edge.
Wind during construction
Roofs are most vulnerable while they are being built. Loose insulation boards, unrolled membrane, empty packaging and partly fastened sheets are all ready to fly. A sheet of insulation blown off a roof can kill someone below. Crews protect the roof and the public by:
- Checking the forecast each morning and stopping work that leaves loose material when high winds are expected.
- Never laying more insulation than can be fastened and covered the same day.
- Fastening or weighting every loose board, roll and bundle at the end of each day, and at any break when wind rises.
- Completing perimeter and corner securement first, or at least the same day, rather than leaving edges for last.
- Sealing the day's work with a night seal or water cut-off so wind and water cannot get under the finished roof.
- Bagging and removing packaging and debris continually.
Inspecting after a storm
After a windstorm, roofers are often first on the roof. Look for lifted or missing edge metal, loose copings, open or fluttering seams, displaced ballast, creased or missing shingles (a crease across a shingle shows it flipped up and back), lifted ridge caps, and blown-off flashings. Inside, check for wet insulation at edges. Take photos before making temporary repairs, because insurers and investigators will want to see what happened. Make the area safe first: an unstable flapping membrane can throw a worker off a roof.
Securing Northgate for the night
Glen and Dana's crew weighted the flapping membrane with sandbags and pavers, cut away the torn section, laid temporary underlayment over the exposed deck, and fastened it down with plates around its edges. By noon the offices were dry. Rory, two weeks into the job, carried pavers and kept count of every bag that went up so they would all come down again. Walking the roof edge afterward, Dana pointed at the lifted edge metal: plain bent steel nailed through the face, no cleat. Then she pulled a fastener out of the corner by hand. "Twelve inches apart, same as the field," she said. "That's not a corner pattern."
Common mistakes
MistakeUsing full sheets and field fastener spacing in the perimeter and corners.
InsteadFollow the zone patterns: half sheets, closer fasteners or more adhesive where suction is highest.
MistakeSubstituting a different screw, plate or cover board on a tested assembly.
InsteadBuild the tested assembly exactly, or get the designer's written approval for a tested alternative.
MistakeLeaving edge metal and perimeter securement until the end of the job.
InsteadSecure edges and corners first or the same day; most blow-offs start there.
MistakeCutting up shingles as a starter strip and relying on cold-weather sealing.
InsteadUse the manufacturer's starter and hand-seal tabs when temperatures are too low for the sealant strips.
MistakeLeaving loose boards and rolls on the roof overnight.
InsteadFasten, weight or remove all loose material at the end of each day.
Summary and key terms
- Wind pressure rises with the square of wind speed.
- Roofs are sucked up from above and can be pushed up from inside; the total is the uplift.
- Suction is highest at corners, then perimeters, then the field.
- Designers set pressures from Part 4 of the code; membrane assemblies are tested to CSA A123.21.
- Shingles rely on starter strips, correct nailing and activated sealant strips; check the wind class on the wrapper.
- Load per fastener = pressure × row spacing × fastener spacing; corners need closer rows or spacing.
- Strong, cleated edge metal and same-day securement prevent most blow-offs.
- Uplift
- The net upward force of wind on a roof, from suction above and pressure below.
- Field zone
- The central area of a roof, with the lowest wind suction.
- Perimeter zone
- The strip along the edges of a roof, with higher suction.
- Corner zone
- The area where two perimeters meet, with the highest suction.
- Tested assembly
- A specific combination of deck, insulation, fasteners or adhesive and membrane that has passed a wind uplift test.
- Continuous cleat
- A strip of metal fastened along a roof edge that locks the bottom of the edge metal face.
- Half sheet
- A membrane sheet of half the usual width, used to bring fastener rows closer together at perimeters and corners.
- Night seal
- A temporary watertight seal at the edge of each day's roofing work.
Practice problems
Work each problem on paper first, then reveal the answer to check.
If wind speed doubles, what happens to wind pressure?
Show answer
It increases four times.
Rows 2.9 m apart, fasteners every 0.3 m, uplift 1.0 kPa: load per fastener?
Show answer
2.9 × 0.3 × 1.0 = 0.87 kN.
Where on a low-slope roof is suction highest?
Show answer
In the corners.
Which test does the Canadian code use for low-slope membrane assemblies?
Show answer
CSA A123.21 dynamic wind uplift testing.
Name two ways to protect a roof from wind during construction.
Show answer
For example, fasten or weight loose material each day and complete edge and corner securement first.
Lesson quiz · 5 questions
Score 60% or more to complete this lesson.
Create a free account to save your progress, take quizzes and earn a certificate.