
NET-101 · Lesson 3 of 12 · 23 min
Motherboards, power supplies and building a PC
▶ Video coming soon A video version of this lesson is on the way.
Most support technicians rarely build a computer from parts, but every technician needs to know how the parts fit together. Replacing a failed power supply, adding memory, fitting a second drive or swapping a dead motherboard all use the same knowledge as a full build. This lesson walks through the motherboard and power supply in detail, explains the firmware settings that matter, and then follows Sam and Jordan as they assemble a replacement computer for Ridgeline's office, step by step and safely.
Motherboard form factors
A form factor is a standard for the size and shape of a motherboard and the position of its mounting holes and back-panel ports, so that boards and cases from different makers fit together. Three form factors cover most desktops. ATX is the full-size standard, about 30 by 24 centimetres in Canada and 12 by 9.6 inches in the US, with room for several expansion slots. Micro-ATX is a shorter, square version with fewer slots that still fits in an ATX case. Mini-ITX is a small square board, 17 centimetres on each side, with one expansion slot, used in compact computers. Mini PCs such as Theo's shipping computer, and all laptops, use custom boards designed for that one product.
What is on a motherboard
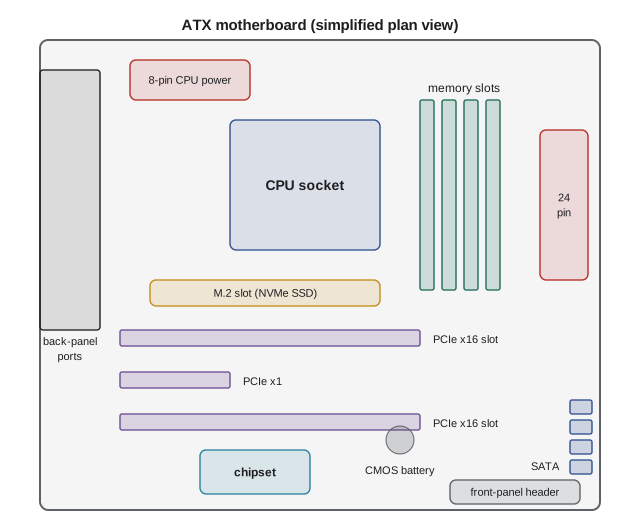
The processor socket determines which processors fit. Intel and AMD use different sockets, and each maker changes sockets every few generations, so a processor and a motherboard must be chosen together. Intel's recent desktop sockets are land grid arrays, where the pins are in the socket and the processor has flat contacts; AMD's current desktop socket, AM5, works the same way. Bent socket pins are one of the few ways to destroy a motherboard during a build, so the socket cover stays on until the processor goes in.
Next to the socket are the memory slots, usually two or four. The manual says which slots to use first for dual-channel operation, typically the second and fourth from the processor. The chipset is a set of controller chips, mostly hidden under a heat sink, that provides extra connections such as USB ports, SATA ports and additional PCI Express lanes, and determines features such as overclocking support.
PCI Express, or PCIe, is the high-speed connection used for graphics cards, NVMe drives and expansion cards. Slots come in physical sizes named by their lane count: x1, x4, x8 and x16, where each lane is a pair of one-way data links. A card works in any slot at least as long as its connector, at the lower of the two lane counts, so an x4 network card works in an x16 slot. Each PCIe generation doubles the speed per lane: PCIe 3.0, 4.0 and 5.0 are all in use, and they work with one another at the speed of the older part.
Storage connects through M.2 slots and SATA ports. Along the bottom edge are headers, small pin connectors for the case's front-panel USB ports, audio jacks, power button, reset button and indicator lights. The front-panel header is fiddly, with tiny two-pin plugs that must go on the right pins; the manual's diagram is essential. Fan headers supply power to fans and let the firmware control their speed. Finally, a small coin battery, often called the CMOS battery, keeps the firmware's clock and settings when the computer is unplugged. When it runs flat after several years, the computer forgets the date and time at every start, which breaks secure websites and signing in to network services.
UEFI firmware and its settings
The firmware that starts the computer is called UEFI, the Unified Extensible Firmware Interface, which replaced the older BIOS on computers made from about 2012 onward. People still say BIOS out of habit, and many setup screens use both words. You reach the setup screen by pressing a key during start-up, often Delete, F2 or F10, or from within Windows through the advanced start-up options. A handful of settings matter for support work.
| Setting | What it controls | When a technician changes it |
|---|---|---|
| Boot order | Which devices the firmware tries to start from, in order | Booting from a USB drive to install or repair an operating system |
| Secure Boot | Only starts boot loaders signed by trusted keys | Leave on; required for Windows 11. Some Linux tools need it set correctly. |
| TPM (firmware TPM, PTT or fTPM) | A security chip that stores encryption keys | Must be enabled for Windows 11 and BitLocker drive encryption |
| Virtualization (VT-x or AMD-V) | Processor support for virtual machines | Enabling it to run virtual machines or Windows Sandbox |
| Memory profile (XMP or EXPO) | Runs memory at its rated speed rather than a safe default | Turning it on after fitting fast memory, or off when diagnosing instability |
| Fan curves | How fan speed rises with temperature | Quietening a noisy computer or improving cooling |
| Setup password | Prevents changes to firmware settings | Protecting shared or public computers |
Two of those settings deserve more explanation. Secure Boot protects the start-up process against malware that tries to load before the operating system, by refusing to run boot code that has not been signed with a trusted key. The Trusted Platform Module, or TPM, is a small security processor, today usually built into the main processor's firmware rather than a separate chip. It stores keys securely and can check that the start-up code has not been tampered with. Windows 11 requires both, along with a supported processor, which is why many older computers cannot be upgraded to it. Firmware updates fix bugs and security flaws, and sometimes add support for newer processors; they should be applied carefully, with the computer on reliable power, using only the motherboard maker's official tool, because an interrupted update can leave a board unable to start.
The power supply
A power supply unit converts the mains supply, 120 volts at 60 hertz in both Canada and the United States, into the direct current the components use. It provides 12 volts for the processor, graphics card, drives and fans, and 5 volts and 3.3 volts for smaller circuits. A modern desktop power supply has several cables: the 24-pin main connector for the motherboard, an 8-pin connector (sometimes two) for the processor, PCIe power connectors for graphics cards, including the newer 16-pin 12V-2x6 connector for high-power cards, and SATA power connectors for drives. Modular power supplies let you attach only the cables you need, which makes the inside of the case tidier and improves airflow.
Power supplies are rated by their maximum continuous output in watts and by their efficiency. The 80 PLUS certification program certifies efficiency levels from basic through Bronze, Silver, Gold, Platinum and Titanium; a Gold power supply wastes less of the energy it draws as heat than a Bronze one. To choose a size, add up the power drawn by the main components and add a margin of a quarter to a half for safety, ageing and future upgrades. A power supply that is far too small causes crashes under load; one that is far too large is merely wasteful.
# Power budget for the replacement office PC (watts, at full load)
parts = {
    "processor": 65,
    "motherboard and chipset": 40,
    "memory (2 modules)": 10,
    "NVMe SSD": 8,
    "hard drive": 9,
    "fans (3)": 9,
    "USB devices": 15,
}
total = sum(parts.values())
recommended = total * 1.4          # 40 in 100 headroom
for name, watts in parts.items():
    print(f"{name:<25}{watts:>4} W")
print(f"{'total load':<25}{total:>4} W")
print(f"recommended supply: at least {recommended:.0f} W")processor 65 W motherboard and chipset 40 W memory (2 modules) 10 W NVMe SSD 8 W hard drive 9 W fans (3) 9 W USB devices 15 W total load 156 W recommended supply: at least 218 W
The budget shows that an office computer with integrated graphics needs very little power; a quality 450 or 500 watt unit leaves plenty of room. A gaming or workstation computer with a powerful graphics card is a different story, because the card alone can draw several hundred watts, and its maker states a recommended power supply size that should be followed.
Try it yourself
Choose a power supply size
Write a function psu_size(watts, headroom=0.4) that takes a list of component power draws in watts, adds the headroom fraction, and returns the smallest standard power supply size from the list SIZES that is at least that large.
For the office PC, psu_size([65, 40, 10, 8, 9, 9, 15]) needs at least 218.4 W, so it returns 300. If no size is large enough, return None.
SIZES = [300, 450, 550, 650, 750, 850, 1000]

def psu_size(watts, headroom=0.4):
    needed = sum(watts)
    return SIZES[0]

print(psu_size([65, 40, 10, 8, 9, 9, 15]))
Building a PC safely
In the spring, Anita's old desktop finally failed, and Sam decided to build its replacement, OFFICE-01, with Jordan watching. The order of work matters, and so does protecting the parts from static electricity. Electrostatic discharge, ESD, is the spark you feel touching a door handle after walking across a carpet; a discharge far too small to feel can still damage a memory module or a motherboard. Technicians work on a hard floor or an anti-static mat, wear an anti-static wrist strap clipped to bare metal on the case, keep parts in their anti-static bags until needed and handle boards by their edges. Lesson 11 covers ESD and electrical safety in more detail.
| Step | What Sam and Jordan did | Why |
|---|---|---|
| 1. Prepare | Cleared the bench, laid out the mat and strap, read the motherboard manual | Mistakes come from rushing and missing details in the manual |
| 2. Processor | Lifted the socket lever, lined up the triangle mark, lowered the CPU in place with no force, closed the lever | Any force bends pins or contacts |
| 3. Memory and M.2 drive | Fitted two modules in the recommended slots and the NVMe drive with its screw, on the board outside the case | Easier to reach before the board is installed |
| 4. Cooler | Applied thermal paste if the cooler had none, mounted the cooler evenly, plugged its fan into the CPU fan header | Paste fills gaps between the CPU and the cooler so heat flows |
| 5. Board into case | Fitted the back-panel shield, checked the standoffs matched the board's holes, screwed the board down | A stray standoff can short the board |
| 6. Power supply and drives | Mounted the power supply and the hard drive, connected SATA data and power | Securing heavy parts before cabling |
| 7. Cables | Connected the 24-pin and 8-pin power, front-panel header, USB and audio headers, case fans | Every connector is checked against the manual |
| 8. First start | Started the computer with the side off, entered UEFI, checked that the CPU, memory and drives were detected and temperatures were normal | Confirms the build before installing an operating system |
The first start is a tense moment even for experienced builders. If nothing happens, the most common causes are a power supply switch left off, a missing 8-pin processor power cable, the front-panel power button plug on the wrong pins, or memory not fully seated. Starting with only the essentials connected, and checking each in turn, finds the problem quickly. Once the firmware screen appears, Sam set the memory profile, confirmed that Secure Boot and the TPM were enabled for Windows 11, and set the NVMe drive as the first boot device. Lesson 5 continues with installing the operating system.
Worked problem
Planning an upgrade
Kai asks whether a spare graphics card from a friend can be added to OFFICE-02, Theo's mini PC, to run a second monitor. The mini PC has no PCIe slot and a 90 W external power adapter. What should Jordan tell him?
Show solution
- A graphics card needs a PCIe slot and, for most cards, more power than a 90 W adapter can supply; the mini PC has neither.
- The real need is a second monitor, not more graphics power.
- Check the mini PC's ports: it has HDMI and a USB-C port that carries DisplayPort video, so it can drive two monitors with its integrated graphics.
- Buy a USB-C to DisplayPort or HDMI cable rather than any internal hardware.
Answer: The card cannot be fitted, and is not needed: the mini PC already supports two monitors through HDMI and USB-C.
Common mistakes
MistakeBuying a processor and motherboard without checking that the socket and chipset match.
InsteadChoose them together, and check the board maker's supported processor list, which may require a firmware update.
MistakeForcing a processor into its socket or a memory module into its slot.
InsteadLine up the marks and notches; correctly aligned parts drop or click in with gentle pressure.
MistakeForgetting the 8-pin processor power cable.
InsteadThe computer may power its fans but never start; connect both the 24-pin and 8-pin connectors.
MistakeWorking on a carpet without ESD protection.
InsteadUse an anti-static mat and wrist strap, and handle boards by their edges.
MistakeChoosing a power supply by maximum wattage alone.
InsteadSize it to the load plus headroom and prefer a reputable unit with an 80 PLUS rating.
MistakeInterrupting a firmware update or using an unofficial update file.
InsteadUse the maker's own tool and file, on reliable power, and do not touch the computer until it finishes.
Summary and key terms
- ATX, micro-ATX and mini-ITX are the main desktop form factors; laptops and mini PCs use custom boards.
- The processor and motherboard must use the same socket and a compatible chipset.
- PCIe slots are named by lane count; cards work in larger slots and newer and older generations work together.
- UEFI firmware controls boot order, Secure Boot, TPM, virtualization and memory profiles; Windows 11 needs Secure Boot and TPM 2.0.
- Power supplies convert 120 V AC to 12, 5 and 3.3 V DC; size them to the load plus a safety margin and prefer 80 PLUS units.
- Protect parts from ESD with a mat and wrist strap, and follow the motherboard manual during assembly.
- A first start inside the firmware setup confirms the build before the operating system goes on.
- form factor
- A standard size and layout for motherboards and cases, such as ATX.
- socket
- The connector on the motherboard that holds the processor.
- chipset
- Controller chips on the motherboard providing extra connections and features.
- PCI Express
- A high-speed serial connection for cards and drives, measured in lanes.
- UEFI
- Modern motherboard firmware that replaced the BIOS.
- Secure Boot
- A UEFI feature that runs only signed boot code.
- TPM
- Trusted Platform Module, a security processor for keys and start-up checks.
- CMOS battery
- The coin cell that keeps the firmware clock and settings.
- 80 PLUS
- A certification of power supply efficiency.
- ESD
- Electrostatic discharge, which can damage electronic parts.
- thermal paste
- A compound that improves heat transfer between the CPU and its cooler.
Practice problems
Work each problem on paper first, then reveal the answer to check.
A computer forgets the date and time every time it is unplugged. What part should be replaced?
Show answer
The CMOS coin battery on the motherboard.
Will a PCIe 4.0 x4 NVMe adapter card work in a PCIe 3.0 x16 slot?
Show answer
Yes, at PCIe 3.0 speed and four lanes.
Which two firmware features must be enabled for Windows 11?
Show answer
Secure Boot and TPM 2.0.
A new build powers on its fans but shows nothing and never beeps. Name two things to check first.
Show answer
Any two of: the 8-pin CPU power cable, memory seating, the CPU installed correctly, the monitor connected to the motherboard's video port.
Parts draw 320 W in total. Using 40 in 100 headroom, what supply size is needed?
Show answer
At least 448 W, so a 450 W or 550 W unit.
Why are motherboards handled by their edges?
Show answer
To avoid ESD damage and fingerprints on contacts and components.
Lesson quiz · 5 questions
Score 60% or more to complete this lesson.
Create a free account to save your progress, take quizzes and earn a certificate.