
INS-340 · Lesson 10 of 12 · 21 min
Installing and maintaining covers
▶ Video coming soon A video version of this lesson is on the way.
The removable acoustic covers for Compressor No. 5 arrived from Pellam on Thursday, August 27, 2026: four valve covers and six flange covers for the discharge line, and three small covers for the oil separator's drain valve, relief valve connection and level transmitter. Wendell and Priya installed them the next day, Friday, August 28, with the compressor running. By early afternoon the last bare metal on the discharge system was covered, and Priya walked the line once more, knocking on each cover and checking each tag against the list.
A cover is only as good as its installation and its care afterwards. A well-made cover left off, put on the wrong item, or soaked in oil does nothing, or does harm. This lesson covers receiving and checking covers, installing them, training the people who will take them off, storing them, and the inspection and repair that keep them working for years.
Receiving and checking
When covers arrive, check them before they go anywhere near the job:
- Count and match. Compare the delivery with the cover list: every cover number present, every tag matching the list and the item tags.
- Look for damage. Torn fabric, crushed mat, missing straps or hardware, or water damage from shipping.
- Check the materials. The fabrics, thread and hardware should be those on the approved submittal; a cover made with a substitute fabric may not be suitable for the service.
- Trial fit. On a batch, fit one or two covers first, before installing the rest, so a measuring or pattern error is found while it affects only one cover.
On the Compressor No. 5 batch, Priya's check found one flange cover with its tag reading "NPS 5" instead of "NPS 6". The cover itself was the right size; the tag had been stamped wrong. Wendell called Ferris, who sent a new tag the following week, and Priya marked the old one with tape in the meantime.
Installing a cover
Installation is quick when the cover fits, and there are a few rules that make the difference between a cover that works and one that just sits there:
- Know the hazards. Covers are often fitted on live, hot equipment. Wear heat-resistant gloves, sleeves and eye protection, keep clear of steam leaks and moving parts, and follow the hazard sheet. Do not reach over a hot item to reach a fastener on the far side; walk around.
- Start clean. Make sure the adjacent insulation ends are intact and jacketed, and the item is free of leaks. A cover installed over a weeping flange hides the leak and soaks it up.
- Orient it. Put the closing seam and fasteners on the side or underside where they can be reached and where water will not run in; on outdoor covers, flaps overlap downward and drain grommets go at the low point.
- Close the ends first. Fit the cover over the item, pull the drawstrings or end flaps snug onto the adjacent insulation, then close the main seam. There should be no gap between the cover and the insulation on either side.
- Fasten evenly. Tighten straps or lacing from the middle outward, enough to close the cover without crushing the mat or distorting the shape. A cover pulled too tight thins the mat at the corners and runs hot there.
- Keep the clear areas clear. Stems, handwheels, gauges, drains, nameplates and test points must be left as designed, and nothing should touch moving parts.
- Check it. Look for gaps and bare spots, check the tag faces out and is readable, and, on acoustic covers, that every overlap is sealed.
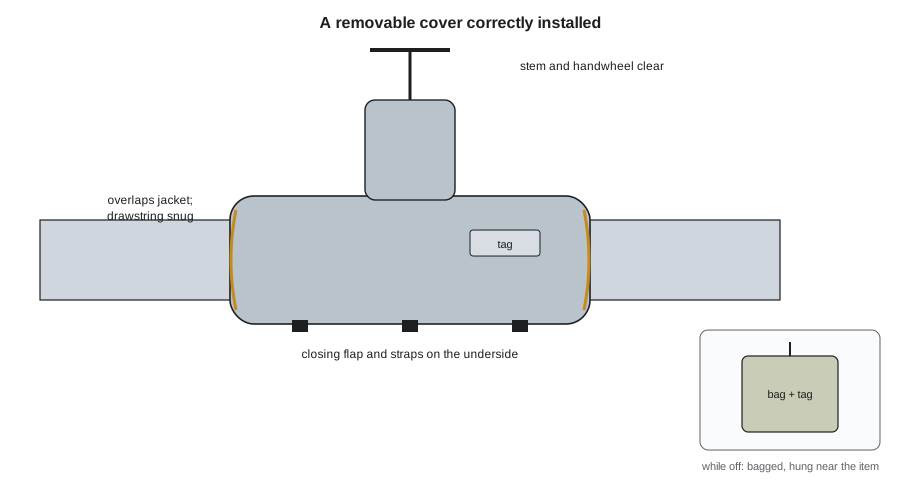
On the acoustic covers, Pellam had sewn a strip of barrier into each closing flap so that the barrier overlapped across the seam, and each end skirt overlapped the lagging jacket by 200 mm (8 in), as Sunniva's specification required. Priya pulled each skirt tight with its drawstring and then wrapped a strip of barrier tape around the outside of the skirt where it met the jacket, sealing the joint without fixing the cover to the lagging. The covers could still be taken off by peeling the tape.
Training the people who will take them off
Insulators install covers, but plant maintenance workers and operators are the ones who remove and reinstall them, often in a hurry and with gloves on. A short handover makes a great difference:
- Show how it comes off and goes back. One demonstration on a real cover, with the maintenance supervisor present.
- Explain the tags. The number on the cover matches the number on the item; covers are not interchangeable even when they look alike.
- Explain the hazards. Gloves when handling hot covers; covers soaked with oil or chemicals are not to be reused; covers must not be stood on or used as kneeling pads.
- Give them a place to keep covers. Storage bags or hooks, so covers are not left on the floor.
On August 28, Wendell spent half an hour with the engine room's two senior operators and Lou Brisebois, taking a valve cover off and putting it back. Lou had the plant's maintenance planner add a line to every work order on the discharge system: "Remove cover, bag and tag; reinstall cover before closing the order."
Storing covers while they are off
A cover taken off for a repair spends anything from an hour to several weeks off its item. Its condition when it goes back depends on how it was kept:
- Bag it. A labelled storage bag, or the cover's own packing, keeps it clean and dry and keeps the tag with it.
- Hang it or shelve it, off the floor and away from oil, water, chemicals, hot surfaces and traffic.
- Keep it near its item, so it is put back rather than forgotten; some plants hang the bag on the valve itself.
- Do not fold hot covers tightly or stack heavy items on them, which crushes the mat.
Kellerton's boiler house now has a row of hooks on the wall by the door with numbered storage bags hanging from them, one for each cover in the room. An empty hook with an empty bag is a quick sign that a cover is off.
Inspection and maintenance
Covers need periodic inspection like any other insulation, and more often than permanent insulation because they are handled. A typical program has three parts:
- After every maintenance job. The person closing the work order checks that the cover is back, on the right item, fully fastened.
- A walk-down once or twice a year. An insulator or trained maintenance worker walks each area with the cover list, checking every cover for presence, fit, damage, contamination and tags.
- Infrared surveys. An infrared camera shows missing covers, gaps, slumped mats and wet insulation as hot spots, and is quick to use on large systems. INS-320 described how the Carrow Park survey used the same method on cold lines.
Typical defects and what to do about them:
| Defect | What it looks like | Action |
|---|---|---|
| Missing cover | Bare item; empty storage bag or hook | Find and reinstall, or order a replacement from the cover number |
| Wrong item | Cover tag does not match item tag; poor fit | Move the cover to its own item |
| Loose or open | Straps undone, gaps at ends or seam | Close and fasten; replace broken straps or hooks |
| Oil or chemical soaked | Darkened, wet or smelly fabric | Remove and replace; find and fix the leak; oil-soaked insulation is a fire risk |
| Wet | Water-stained, heavy, outdoor covers with water inside | Dry or replace; check flaps and drains face downward |
| Torn or worn | Holes in outer jacket, frayed edges | Repair at the shop with matching materials, or replace |
| Slumped mat | Thin, hot top, bulging bottom | Re-quilt or replace |
| Heat damage | Brown, brittle fabric or thread | Replace with materials rated for the temperature |
Worked problem
What does a missing cover cost?
A year after the Kellerton boiler house covers are installed, a walk-down finds two of the NPS 6 valve covers missing, one off for three months and one for six months. Each bare valve loses about 1,790 W, and a cover would save about 90 in 100 of it. How much energy was lost because the covers were off?
Show solution
- Hours off: 3 months ≈ 7,550 × 3 ÷ 12 = 1,890 h; 6 months ≈ 3,780 h; total 5,670 h.
- Extra loss = 1,790 W × 0.90 × 5,670 h = 9.13 MWh.
- In GJ: 9.13 × 3.6 = 32.9 GJ, about three quarters of a year's saving from one cover.
Answer: About 32.9 GJ lost, roughly 430 dollars of gas at the sample price in lesson 6. A cover that stays in its bag pays back nothing.
Repairs follow Tomasz's rule from lesson 9: the same thread, fabric and hardware as the original, and the tag checked before the cover goes back. A cover that is soaked with oil, badly heat-damaged or torn through the mat is replaced, not patched. Because every cover has a number and the fabricator keeps the pattern on file, a replacement can usually be ordered without measuring again.
Records
The cover list is a living document. Each walk-down updates it with the condition of every cover, repairs and replacements are logged against cover numbers, and new covers are added when items are added. A plant with good records can see at a glance which areas are losing covers and why, and target training or design changes where they are needed. Lou keeps Kellerton's cover list in the maintenance software, linked to each item's equipment number, and Coldstream's annual walk-down report updates it.
On Wednesday, September 2, Sunniva made her final check in the engine room with all the covers in place. The walkway beside Compressor No. 5 measured 84 dBA, against 95 dBA before the work, and the discharge line could no longer be picked out from the general noise of the room by ear. Lesson 12 goes through the whole job and its results.
When a cover does not fit
Even with good measurements, a cover sometimes does not fit when it arrives. The common reasons are a dimension missed or misread, a change to the item between measuring and delivery, such as a new valve with a different face-to-face length, or a pattern error at the fabricator. The insulator's job is to find out which before anything is cut:
- Check the item against the measurement sheet. If the item has changed, the cover may be right for what was measured.
- Check the cover against the sheet. Measure the finished cover's inside dimensions and compare.
- Report with photos. Send the fabricator the cover number, photos of the cover on the item and the measurements, and let them decide whether to alter or remake it.
What the insulator should not do is cut or re-sew a cover in the field to make it fit. A cut through the mat and jackets lets the mat spill and the edges fray, and the cover becomes a poor fit that nobody wants to reinstall. Small adjustments, such as moving a strap, can be made in Coldstream's shop with matching materials, as lesson 9 described.
Seasonal covers
Some plants use covers only part of the year, for example on outdoor steam lines that are shut down in summer, or on freeze protection for water lines in winter. Seasonal covers are taken off, cleaned, inspected and stored dry, bagged and tagged, at the end of each season, and checked before they go back on. A cover stored wet over the summer grows mould and loses its insulation value, and a cover stored on a shelf without a tag is a cover that will not find its way back to the right valve.
For the PRV station covers due on November 30, Marcel and Devon plan a short session with Kellerton's boiler house maintenance crew when the covers go on, like Wendell's in August, so that the people who will take them off for the PRV's twice-yearly service know how they go back.
Common mistakes
MistakeInstalling a full batch of covers without a trial fit.
InsteadFit one or two first, so any measuring or pattern error is caught early.
MistakePutting the closing seam on top of an outdoor cover.
InsteadPut seams and fasteners on the side or underside, with flaps overlapping downward and drains at the low point.
MistakePulling straps so tight that the mat is crushed.
InsteadFasten evenly, just enough to close the cover and the ends.
MistakeLeaving covers on the floor during a repair.
InsteadBag, tag and hang them near the item, away from oil, water and traffic.
MistakePatching an oil-soaked cover.
InsteadReplace it, and fix the leak; oil-soaked insulation is a fire risk.
Summary and key terms
- Check deliveries against the cover list, look for damage, confirm materials and trial-fit a cover or two before installing the batch.
- Install with the hazards controlled, ends closed onto the insulation, fasteners accessible and on the underside, and clear areas left clear.
- Train the people who remove covers, give them a storage place, and tie cover reinstallation to closing the work order.
- Inspect covers after maintenance, on regular walk-downs and with infrared surveys; replace oil-soaked, heat-damaged and badly torn covers.
- Keep the cover list up to date; numbered covers and filed patterns make replacements easy.
- Trial fit
- Fitting one or two covers from a batch before installing the rest, to catch errors.
- Walk-down
- A planned inspection of an area against a list.
- Storage bag
- A labelled bag in which a removed cover is kept while off its item.
- Infrared survey
- An inspection using an infrared camera to find hot and cold spots in insulation.
- Work order
- A maintenance document authorizing and recording a repair job.
Practice problems
Work each problem on paper first, then reveal the answer to check.
A cover is off for 2,000 hours on a valve that loses 1,500 W bare. With 90 in 100 savings, how much energy is lost in GJ?
Show answer
1,500 × 0.90 × 2,000 = 2.7 MWh = 9.7 GJ.
Why should the closing seam of a cover face down?
Show answer
So water does not run into it and the fasteners are easy to reach.
What should happen to a cover found soaked with oil?
Show answer
It should be replaced, and the leak found and fixed.
Name two ways a missing cover can be found.
Show answer
An empty storage bag or hook, a walk-down with the cover list, or an infrared survey.
Why should a batch of covers be trial-fitted?
Show answer
To catch a measuring or pattern error while it affects only one cover.
Lesson quiz · 5 questions
Score 60% or more to complete this lesson.
Create a free account to save your progress, take quizzes and earn a certificate.