
HSE-107 · Lesson 5 of 12 · 31 min
Ergonomic risk assessment tools
You cannot control what you have not assessed. Ergonomic risk assessment identifies which jobs and tasks put workers at risk of MSDs, how serious the risk is, which risk factors drive it, and which changes would make the biggest difference. Many tools exist, from simple checklists anyone can use to detailed methods that require training. This lesson explains how to plan an assessment, how to gather information, and how the most widely used tools work. The general process of hazard identification and risk assessment is covered in the hazard recognition and risk assessment course; this lesson focuses on what is special about ergonomic assessment.
A staged approach
Most organizations use a staged approach. First, screen all jobs quickly to find those with obvious or likely MSD risk. Second, assess the jobs flagged by screening in more detail, using a tool suited to the main risk factors. Third, for complex, high-risk or disputed jobs, bring in a qualified ergonomist for specialist analysis. This avoids wasting effort on detailed analysis of low-risk jobs and makes sure the highest risks get attention first.
Jobs should be screened and assessed when there are reports of discomfort or injury, when new jobs, equipment or processes are introduced, when existing jobs change, when workers raise concerns, and periodically as part of a regular program. In several jurisdictions, an MSI report or reported symptoms trigger a legal duty to review the job.
Gathering information
Good assessments draw on several sources of information:
- Injury and first aid records, compensation claims and absence data, showing where MSDs have occurred.
- Worker reports, interviews and discomfort surveys, showing where people feel strain before injuries occur.
- Direct observation of the job over several cycles and at different times of the shift, since tasks often vary.
- Video recordings, which allow postures and frequencies to be measured accurately and reviewed with workers.
- Measurements: weights of loads, push and pull forces using a force gauge, heights and reach distances with a tape measure, joint angles, cycle times and the number of repetitions.
- Production data such as quotas, line speeds, overtime and the number of units handled per shift.
Involve the workers who do the job. They know which parts of the task are hardest, how the task varies, what shortcuts people take and what has been tried before. Always explain that the assessment is of the job, not the person.
Discomfort surveys
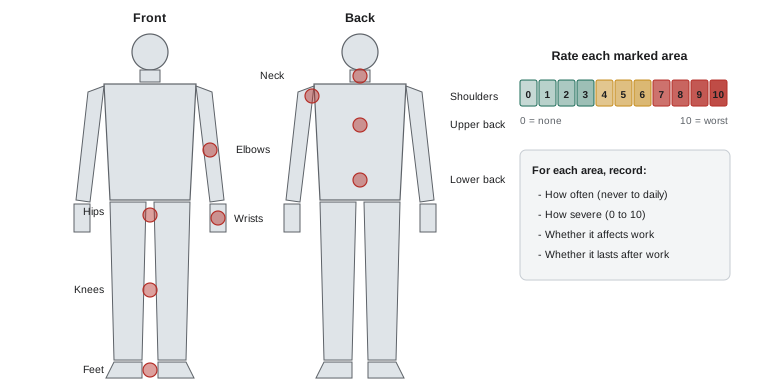
A discomfort survey asks workers to mark on a body map where they have felt ache, pain, numbness or tingling over a recent period, such as the last week or year, and to rate how often and how severe it is. The Nordic Musculoskeletal Questionnaire is a widely used standardized version. Surveys are cheap, quick and confidential, and they reveal problems before claims appear. Repeating the same survey after changes shows whether the changes helped.
Worked problem
Prioritizing departments from a discomfort survey
A survey asked workers to report low back discomfort in the last month and rate it from 0 to 10. Results: Shipping, 18 of 30 workers reported discomfort with an average rating of 6. Assembly, 12 of 40 with an average of 4. Office, 9 of 45 with an average of 3. Using a simple priority index of the percentage reporting multiplied by the average rating, rank the departments.
Show solution
- Shipping: \( 18 \div 30 = 60\% \); index \( 60 \times 6 = 360 \).
- Assembly: \( 12 \div 40 = 30\% \); index \( 30 \times 4 = 120 \).
- Office: \( 9 \div 45 = 20\% \); index \( 20 \times 3 = 60 \).
- Rank: Shipping first, then Assembly, then Office. Shipping's handling tasks should be assessed in detail first.
Answer: Shipping (index 360) is the clear priority, followed by Assembly (120) and Office (60).
Screening checklists
Checklists ask yes or no questions about the presence of risk factors, often with thresholds of duration. A typical checklist asks whether a worker lifts more than a certain weight more than a certain number of times per day, works with hands above the head or elbows above the shoulders for more than two hours a day, kneels or squats for more than two hours a day, repeats the same motion with the neck, shoulders, elbows, wrists or hands for more than two hours a day, grips with force, or uses vibrating tools for long periods. A yes answer flags the job for more detailed assessment.
WorkSafeBC publishes an MSI risk factor identification worksheet and an assessment worksheet for use under the BC regulation, and other provinces and safety associations, such as WSPS in Ontario, CNESST in Quebec and WorkSafe Saskatchewan, offer similar checklists. The Ontario MSD Prevention Guideline toolbox includes a hazard identification tool and links to the assessment methods described below.
Checklists are good at finding jobs that need attention, but they do not tell you how much risk there is or which change would reduce it most. For that, you need the methods that follow.
Observational posture methods: RULA and REBA
The Rapid Upper Limb Assessment (RULA), published in 1993, is an observational method for jobs where the upper body and arms are the main concern, such as assembly, computer work and many manufacturing tasks. The analyst observes the job, selects the posture that is held longest or is most extreme, and scores each body part using diagrams on a one-page worksheet: upper arm, lower arm and wrist (group A), and neck, trunk and legs (group B). Additional points are added for muscle use (static postures or repetitive actions more than four times a minute) and for force or load. Lookup tables combine the scores into a grand score from 1 to 7.
The Rapid Entire Body Assessment (REBA), published in 2000, uses a similar approach but is designed for whole-body tasks with unpredictable postures, such as health care, warehousing and service work. It scores the trunk, neck and legs, and the upper arms, lower arms and wrists, adds points for load or force, coupling and activity, and gives a final score from 1 to 15.
| RULA grand score | Action level | REBA score | Risk level and action |
|---|---|---|---|
| 1 to 2 | Acceptable if not maintained or repeated for long periods | 1 | Negligible; no action needed |
| 3 to 4 | Further investigation needed; changes may be needed | 2 to 3 | Low; change may be needed |
| 5 to 6 | Investigation and changes needed soon | 4 to 7 | Medium; further investigation, change soon |
| 7 | Investigation and changes needed immediately | 8 to 10 | High; investigate and implement change |
| 11 to 15 | Very high; implement change now |
Worked problem
Interpreting a RULA assessment
An analyst scores an assembly task in which a worker reaches forward to a part bin 55 cm away, about 15 times a minute. Upper arm flexion is about 60 degrees (score 3), the lower arm is extended beyond 100 degrees (score 2), the wrist is bent about 20 degrees (score 3), the neck is flexed about 25 degrees (score 3) and the trunk is flexed about 15 degrees (score 2), with legs supported. Muscle use adds 1 point to each group because the action repeats more than four times a minute; the part weighs under 2 kg, so force adds nothing. The worksheet tables return a grand score of 6. What does this mean, and what would you change?
Show solution
- Interpret the score: a RULA grand score of 5 or 6 means investigation and changes are needed soon.
- Identify the drivers: the forward reach raises the upper arm and extends the elbow; the bin position bends the wrist; looking down into the bin bends the neck.
- Plan changes: move the bin closer (within about 40 cm) and tilt it toward the worker, or use a gravity-fed parts presentation at elbow height.
- Re-score after the change: with the upper arm below 45 degrees (score 2), the elbow at 60 to 100 degrees (score 1), a straight wrist (score 1) and the neck flexed less than 20 degrees, the grand score would fall to about 3, an action level calling for further investigation only.
Answer: A score of 6 means changes are needed soon. Bringing parts closer and presenting them at a better angle reduces arm, wrist and neck scores and could bring the grand score down to about 3.
RULA and REBA are quick and need only a worksheet, which makes them popular. Their limitations are that they assess a single posture rather than the whole shift, and they do not account well for duration or recovery. Use them to compare postures before and after a change, and combine them with frequency and duration information.
Tools for repetitive hand and arm work
For jobs dominated by repetitive hand and arm motions, several methods consider force, repetition, posture and duration together. The Strain Index, developed by Moore and Garg in 1995 and later revised, multiplies ratings for intensity of exertion, duration of exertion, efforts per minute, hand and wrist posture, speed of work and duration per day to estimate risk for distal upper limb disorders. The OCRA method, widely used in Europe and the basis of ISO 11228-3, compares the actual number of technical actions per shift with a recommended number adjusted for force, posture, repetitiveness, recovery and other factors.
The ACGIH, a scientific organization that publishes threshold limit values (TLVs) for chemical and physical agents, publishes a TLV for hand activity. It combines a hand activity level (HAL), rated on a scale of 0 to 10 based on the frequency of exertions and recovery time, with the normalized peak force of the hand, rated on the same scale. Plotting the two on a chart shows whether a job is below the action limit, between the action limit and the TLV, or above the TLV. Lesson 10 returns to repetitive work and tools.
Several Canadian jurisdictions, including British Columbia and Alberta, base their exposure limits for chemical and physical agents largely on ACGIH TLVs, and Canadian ergonomists commonly use the ACGIH hand activity and lifting TLVs as assessment benchmarks, although these ergonomics TLVs are not generally adopted as legal limits.
Tools for lifting, pushing, pulling and carrying
For manual material handling, the most widely used tool is the revised NIOSH lifting equation, which calculates a recommended weight limit for a specific two-handed lifting task. It is covered in detail in Lesson 6. Other tools include:
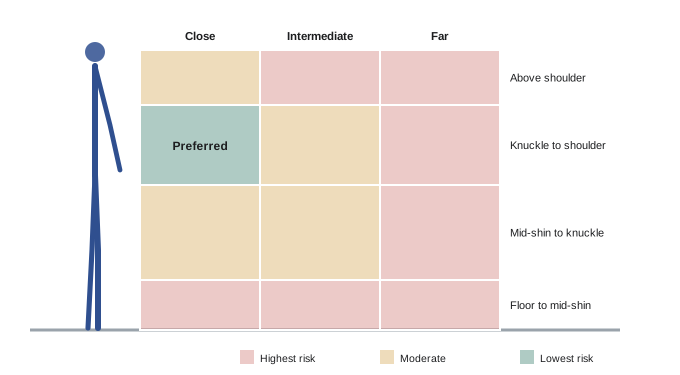
- The ACGIH lifting TLV, which gives recommended weight limits for zones defined by the horizontal distance of the load from the body and its vertical height, for different durations and frequencies. The highest values apply to loads lifted close to the body between knuckle and shoulder height, and they fall sharply for loads far from the body, near the floor or above the shoulders.
- The Liberty Mutual manual materials handling tables, first published by Snook and Ciriello in 1991 and since updated, which give the maximum acceptable weights for lifting, lowering and carrying and the maximum acceptable forces for pushing and pulling, based on studies of what percentage of male and female workers find a task acceptable for a full shift. They allow you to estimate what percentage of the working population could perform a task without excessive fatigue.
- ISO 11228-1 and ISO 11228-2, international standards for lifting, carrying, pushing and pulling, which incorporate methods similar to the NIOSH equation and the Liberty Mutual tables.
- Push and pull force gauges, which measure the initial force needed to start a cart moving and the sustained force needed to keep it moving, for comparison with the Liberty Mutual tables or other guidelines (Lesson 8).
Choosing the right tool
No single tool fits every job. Choose the tool that matches the main risk factors and the decision you need to make:
| Main concern | Suitable tools | Notes |
|---|---|---|
| Screening many jobs | Checklists, discomfort surveys, injury records | Quick; identify jobs for detailed assessment |
| Upper body posture, assembly, computer work | RULA | Single posture; combine with duration |
| Whole-body postures, health care, service work | REBA | Single posture; includes load and coupling |
| Repetitive hand and wrist work | Strain Index, ACGIH hand activity TLV, OCRA | Consider force, frequency, recovery |
| Two-handed lifting and lowering | Revised NIOSH lifting equation, ACGIH lifting TLV | See Lesson 6 for limits of use |
| Pushing, pulling and carrying | Liberty Mutual tables, ISO 11228-2, force gauge measurements | See Lesson 8 |
| Complex or disputed jobs | Specialist analysis by a qualified ergonomist | May use biomechanical models and motion capture |
From assessment to action
An assessment is only useful if it leads to action. A good assessment report states the job and task assessed, who did the assessment and when, the information gathered, the tool used and the scores obtained, the main risk factors identified, and recommended controls ranked by the hierarchy of controls. It should set priorities based on the level of risk, the number of workers exposed and the availability of practical solutions, and it should name who is responsible for each action and by when. After controls are in place, reassess the job using the same tool to confirm that the risk has fallen, and ask workers whether the change works for them.
Worked problem
Setting priorities across jobs
An assessment of four jobs produced these results: Job W, REBA 9, 12 workers; Job X, REBA 6, 30 workers; Job Y, RULA 7, 4 workers; Job Z, REBA 3, 50 workers. A quick fix is available for Job X (raising a conveyor). How should the jobs be prioritized?
Show solution
- Job W (REBA 9, high) and Job Y (RULA 7, change immediately) have the highest risk scores and need prompt action, despite fewer workers.
- Job X (REBA 6, medium) exposes the most workers to medium risk, and a quick, cheap fix exists, so it should be done right away alongside W and Y.
- Job Z (REBA 3, low) exposes many workers but at low risk; schedule a review and monitor discomfort reports.
- Record the plan with owners and dates, and reassess each job after changes.
Answer: Act promptly on Jobs W and Y because of their high scores, implement the quick fix for Job X at the same time because it protects 30 workers, and monitor Job Z.
Common mistakes
MistakeAssessing a job from a single short observation.
InsteadObserve several cycles at different times, measure loads and forces, and talk to workers.
MistakeUsing one tool for every job.
InsteadMatch the tool to the main risk factors of the job.
MistakeTreating a checklist result as a full assessment.
InsteadUse checklists to screen, then assess flagged jobs in detail.
MistakeScoring the worker rather than the job.
InsteadExplain that the assessment is of the task and its design.
MistakeFiling the report without follow-up.
InsteadAssign actions, implement controls and reassess with the same tool.
Summary and key terms
- Use a staged approach: screen all jobs, assess flagged jobs in detail, and use specialists for complex cases.
- Gather information from records, observation, video, measurements, production data and workers.
- Discomfort surveys reveal problems before injuries and show whether changes helped.
- RULA scores upper body postures from 1 to 7; REBA scores whole-body postures from 1 to 15.
- Strain Index, OCRA and the ACGIH hand activity TLV assess repetitive hand work.
- The NIOSH equation, ACGIH lifting TLV and Liberty Mutual tables assess manual handling.
- Assessments must lead to prioritized, assigned actions and reassessment.
- Screening
- A quick check to find jobs that need detailed assessment.
- Discomfort survey
- Questionnaire with a body map asking where workers feel strain.
- RULA
- Rapid Upper Limb Assessment, scoring upper body postures from 1 to 7.
- REBA
- Rapid Entire Body Assessment, scoring whole-body postures from 1 to 15.
- Strain Index
- Method rating force, duration, frequency, posture and speed for hand work.
- OCRA
- Method comparing actual and recommended technical actions per shift.
- Threshold limit value (TLV)
- ACGIH guideline level for exposure to an agent.
- Hand activity level (HAL)
- Rating of the frequency and recovery of hand exertions.
- Liberty Mutual tables
- Maximum acceptable weights and forces by population percentage.
- Force gauge
- Instrument measuring push or pull force.
Practice problems
Work each problem on paper first, then reveal the answer to check.
What are the three stages of a staged assessment approach?
Show answer
Screening, detailed assessment, and specialist analysis for complex jobs.
Name four sources of information for an ergonomic assessment.
Show answer
Injury records, worker interviews, discomfort surveys, observation, video, measurements, production data.
What does a discomfort survey ask workers to do?
Show answer
Mark on a body map where they feel discomfort and rate its frequency and severity.
What range of scores does RULA produce?
Show answer
1 to 7.
What does a REBA score of 9 indicate?
Show answer
High risk; investigate and implement change.
Which tool suits whole-body postures in health care?
Show answer
REBA.
Which tools suit repetitive hand work?
Show answer
Strain Index, OCRA and the ACGIH hand activity TLV.
What do the Liberty Mutual tables tell you?
Show answer
The maximum acceptable weights or forces for given percentages of workers.
A department has 25 of 50 workers reporting discomfort at an average rating of 5. What is the priority index?
Show answer
50 × 5 = 250.
What should happen after controls are implemented?
Show answer
Reassess with the same tool and ask workers for feedback.
Lesson quiz · 5 questions
Score 60% or more to complete this lesson.
Create a free account to save your progress, take quizzes and earn a certificate.