
ARCH-100 · Lesson 12 of 12 · 21 min
Final project: a small pavilion
The brief is pinned to the studio wall in large type: 'A pavilion at Kestrel Point. A place to wait, to read and to watch the river, open to everyone, in every season. Floor area about 24 m² (260 square feet).' The students have four weeks. On the first day Visser takes them back to the riverbank. The snow has gone and the cottonwoods are just coming into leaf; the river is high and brown with spring melt. 'Everything you have done this term, you will need now,' she says. 'Draw what you see. Measure the sun. Walk the path. Find the place where someone would want to stop.' Ingrid sits on a log and draws the line of the far bank. Joon-ho paces out the distance from the path to the water. Callum lies on his back under a tree and looks up at the light through the leaves. This lesson sets out the final project: the brief, the site, the process and deliverables, the checks the design must pass and how the work will be assessed. It brings together every lesson in the course, from seeing and sketching through light, space, movement, materials, process, models and presentation.
The brief
A brief, or program, states what a building must provide. For this project it is short, which leaves room for interpretation. The pavilion must:
- Provide sheltered seating for at least eight people, protected from rain, summer sun and the cold north wind.
- Include a quieter place for one or two people to sit and read.
- Frame at least one important view of the river.
- Be reachable by everyone, including people using wheelchairs, strollers and walkers, by a step-free route from the riverside path.
- Keep its floor above the level of the spring floods, which reach 0.45 m (18 inches) above the path at the chosen spot.
- Use no more than two main materials, chosen for their fit with the site and the climate.
- Cover a floor area of about 24 m² (260 square feet), for example 4 by 6 m (13 by 20 feet).
The pavilion is a small building with no heating, plumbing or electricity, so the design can concentrate on the fundamentals: how it sits on the land, how it shapes space, light and movement, what it is made of and how it feels to be there.
The site
Kestrel Point is a wooded bend on the river, crossed by a popular walking and cycling path. The bank slopes gently down to the south toward the water. Tall cottonwood trees stand along the bank, with open grass between them. The prevailing winter wind comes from the north-west, across the open fields behind the trees. The main view is south and south-west across the river to the far bank; there is a smaller view east along the river toward a bridge. Each student chooses a spot within the site, which must be recorded with a measured site analysis in the first week.
The climate is continental: long, cold winters with snow, and warm, sunny summers. The site analysis from Lesson 9 should map the sun's path in winter and summer, the wind, the views, the paths people already use, the trees to be kept and the flood line. A good pavilion responds to all of these, but most good designs are driven by one or two of them.
Learning from precedents
Before designing, study at least three precedents: buildings that respond to similar questions. Small pavilions are an important type in architecture, because they allow designers to test ideas at full scale. Since 2000, the Serpentine Galleries in London have commissioned a temporary summer pavilion each year from an architect who has not yet built in England. The first was by Zaha Hadid. In 2017, the Burkinabè architect Diébédo Francis Kéré designed a pavilion whose wide roof was inspired by the great tree that serves as a meeting place in his home village of Gando, in Burkina Faso. In 2025 the Bangladeshi architect Marina Tabassum designed a long, narrow timber pavilion titled A Capsule in Time, drawing on traditions of temporary shelter in Bangladesh.
Closer to home, the warming huts built on the frozen rivers at The Forks in Winnipeg each winter, starting in 2010, show how small structures can test big ideas in a harsh climate. Patkau Architects' skating shelters of 2011, made of thin flexible plywood bent into leaning cones and clustered together against the wind, are a beautiful example of a single material used to make shelter, light and a sense of place. Mies van der Rohe's Barcelona Pavilion of 1929, which you studied in Lesson 3, remains the classic demonstration that a tiny building can change architecture.
For each precedent, draw a plan and a section from published drawings or photographs, and write what you have learned from it. Do not copy the precedent: borrow an idea, a strategy or a way of thinking, and transform it to suit your site and brief.
The process
The four weeks follow the design loop from Lesson 9, with a review at the end of each stage.
| Week | Focus | Work produced | Review |
|---|---|---|---|
| 1 | Understand | Site analysis, measured site drawing, three precedent studies, site model | Desk crits |
| 2 | Generate and choose | Twenty thumbnails, three schemes as study models, design matrix, concept statement | Pin-up |
| 3 | Develop | Plans, sections and elevations at large scale, sun and light studies, material studies, larger model | Mid-review |
| 4 | Present | Final drawings, final model, model photographs, process book, presentation | Final review |
The schedule is a guide, not a cage: you may need to go back to the site in week three, or rethink the concept after the mid-review. What matters is that you keep iterating and keep a full process record.
Drawings and models
The final submission includes a site plan at 1:200; a floor plan, at least two sections and two elevations at 1:50; one large detail at 1:20 or 1:10, showing how the main materials meet; at least one perspective or eye-level model photograph; a concept diagram; sun studies for June and December; a final model at 1:50 including the site and trees, with scale figures; and the process book.
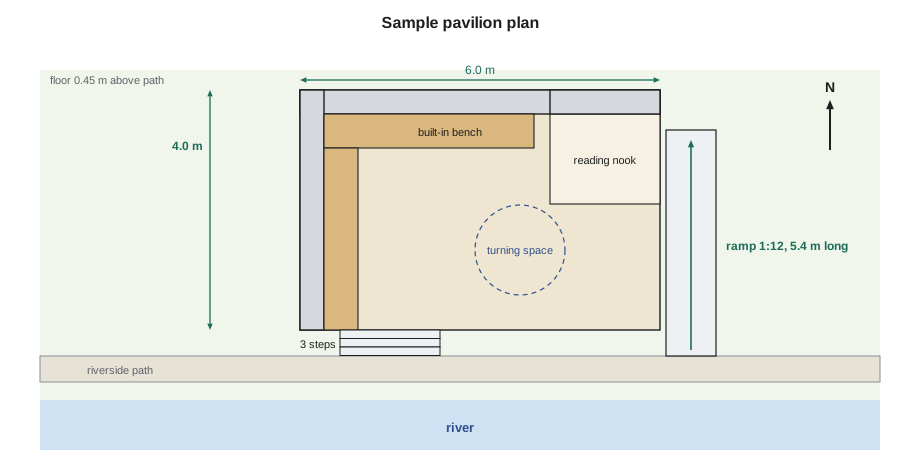
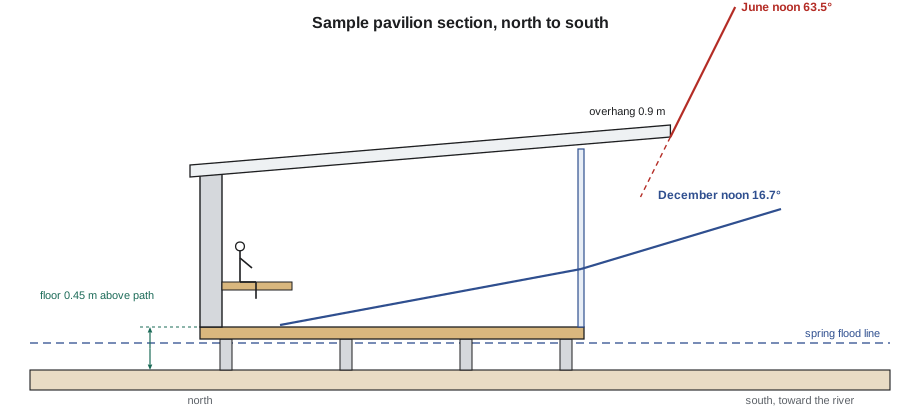
The sample plan and section show one way of meeting the brief, using the strategies from this course: a sheltering wall (Lesson 6), a sequence from path to ramp to seat to view (Lesson 7), an overhang tuned to the sun (Lesson 5) and a limited palette of materials (Lesson 8). Your design should come from your own site analysis and concept, and may look nothing like it.
Checking the design
Before the final review, check that the design actually works. A short program can check the numbers.
# Final project checks for a small pavilion at Kestrel Point.
import math
length, width, h_low, h_high = 6.0, 4.0, 2.7, 3.3    # m
glass, floor_up = 1.8, 0.45                       # m
max_riser, tread = 0.18, 0.30                      # m (NBC limits)
area = length * width
volume = area * (h_low + h_high) / 2          # single-sloped roof
print(f"Floor area {area:.0f} m2, volume {volume:.0f} m3 (brief: about 24 m2)")

lat = 49.9                                    # degrees north
summer = 90 - lat + 23.44                      # noon sun altitude, June
winter = 90 - lat - 23.44                      # noon sun altitude, December
depth = glass / math.tan(math.radians(summer))
drop = depth * math.tan(math.radians(winter))
print(f"South overhang to shade {glass} m of glass at June noon: {depth:.2f} m")
print(f"December noon: shadow covers only the top {drop:.2f} m, so winter sun still enters")

risers = math.ceil(floor_up / max_riser)
r = floor_up / risers
print(f"Steps: {risers} risers of {r * 1000:.0f} mm with {tread * 1000:.0f} mm treads")
print(f"Ramp at 1:12: {floor_up * 12:.1f} m long for a {floor_up} m rise")
print("Turning circle inside: 1500 mm (CSA B651) clear diameter needed")Floor area 24 m2, volume 72 m3 (brief: about 24 m2) South overhang to shade 1.8 m of glass at June noon: 0.90 m December noon: shadow covers only the top 0.27 m, so winter sun still enters Steps: 3 risers of 150 mm with 300 mm treads Ramp at 1:12: 5.4 m long for a 0.45 m rise Turning circle inside: 1500 mm (CSA B651) clear diameter needed
The output confirms that the sample pavilion meets the brief. An overhang about 0.9 m deep shades 1.8 m of south glass at noon in June, while in December its shadow covers only the top quarter of a metre or so, so the low winter sun still reaches the bench. Three steps of 150 mm rise to the floor, within the limits in the National Building Code, and a ramp at 1:12 must be 5.4 m long. That ramp is a design element in its own right: in the sample plan it runs along the east side and doubles as a place to sit and look downriver. Check also that the inside has a clear turning space of 1500 mm for a wheelchair, as CSA B651 requires.
Check the design in other ways too. Draw a person in every section. Test the light in a light model in real sun. Walk through the sequence in model photographs. Ask whether a stranger would understand where to enter. Ask what the pavilion will be like in a snowstorm, at dusk in October and on a hot July afternoon.
Assessment
The final project is assessed against the course outcomes. Reviewers look at five areas, each weighted equally:
- Response to site: how well the design responds to sun, wind, views, trees, paths and floods.
- Concept and space: whether there is a clear concept, and whether the spaces, light and sequence express it.
- Materials and making: whether the materials suit the site, climate and concept, and whether the detail shows how they meet.
- Communication: the clarity of drawings, models and the presentation.
- Process: the range of ideas explored, the evidence of iteration and the response to reviews.
A design that is modest but clear, well drawn and well considered will always score better than one that is ambitious but confused. Aim for one strong idea, carried through every part of the design.
Worked problem
From concept to checked design
Callum's concept, from lying under the cottonwood, is 'a roof like a leaf canopy, letting dappled light fall on people sitting below'. He must turn it into a design that meets the brief.
Show solution
- Site: he chooses a spot between two large trees, so the pavilion extends the canopy they already make.
- Space: a thin roof of slatted timber over a raised timber floor, with a solid wall only on the north-west, against the wind.
- Light: he tests slat spacing in three light models in the sun and chooses the spacing that gives dappled light without letting much rain through; a clear layer beneath keeps the seating dry.
- Access: a ramp at 1:12 curves between the trees from the path, so arriving feels like walking under the canopy.
- Checks: his floor area is close to the brief, the overhang shades the bench in June, and the ramp length and turning space meet the code. He records each test in his process book.
Answer: A strong concept guides every decision, and testing it with models and calculations turns it into a design that works.
Exercise 12: the final pavilion
This is the final project of the course and takes about four weeks.
- Week 1: site analysis, measured site drawing, three precedent studies and a site model.
- Week 2: twenty thumbnails, three schemes as study models, a design matrix and a concept statement.
- Week 3: developed plans, sections and elevations, sun and light studies, material studies and a larger model.
- Week 4: final drawings, final model, eye-level photographs, process book and a five-minute presentation.
- Deliverable: the full submission listed under Drawings and models, presented at the final review.
Self-critique checklist
- Can I state my concept in one sentence, and does every drawing support it?
- Does my design respond to the sun, wind, views, trees and flood line on my site?
- Is there a step-free route, and have I checked the ramp, steps and turning space?
- Is there a scale figure in every section and model?
- Does my process book show at least three schemes and how the design changed after each review?
Common mistakes
MistakeDesigning a building and then fitting it to the site.
InsteadStart from the site analysis and let the place shape the design.
MistakeTreating the ramp as an afterthought.
InsteadDesign the accessible route from the start; it can be the best part of the sequence.
MistakeUsing too many materials.
InsteadLimit the palette and use each material for what it does well.
MistakeLeaving checks until the last day.
InsteadCheck sun, access and dimensions during development, while there is time to change.
Summary and key terms
- The final project asks for a small pavilion that responds to a real site, climate and people.
- Study precedents for ideas and strategies, not forms to copy.
- Follow the design loop: understand, generate, choose, develop and present, with reviews.
- Check the design with drawings, models and simple calculations for sun, access and size.
- A clear concept carried through every part of the design is the key to a strong project.
- Brief
- A statement of what a building must provide; also called a program.
- Pavilion
- A small, often open, building, usually for leisure or display.
- Flood line
- The level that floodwater reaches, above which a floor should be raised.
- Process book
- A record of the design process, with sketches, models, tests and reviews.
- Step-free route
- An accessible path with no steps, using level ground or ramps.
Practice problems
Work each problem on paper first, then reveal the answer to check.
How long is a ramp at 1:12 for a 0.45 m rise?
Show answer
5.4 m.
How deep must an overhang be to shade 1.8 m of south glass at June noon at latitude 49.9° N?
Show answer
About 0.9 m, since the sun's altitude is about 63.5°.
What clear turning diameter does CSA B651 call for?
Show answer
1500 mm.
Name two Serpentine Pavilion architects.
Show answer
For example, Zaha Hadid (2000), Diébédo Francis Kéré (2017) or Marina Tabassum (2025).
What are the five assessment areas?
Show answer
Response to site, concept and space, materials and making, communication, and process.
Lesson quiz · 5 questions
Score 60% or more to complete this lesson.
Create a free account to save your progress, take quizzes and earn a certificate.