
ARCH-100 · Lesson 11 of 12 · 20 min
Presenting and critiquing work
It is the afternoon of the first pin-up, and the long wall of the studio is covered with drawings. Each student has twelve minutes. Wren goes first and talks for nine of them, describing every line on her boards while the reviewers wait to speak. Callum mumbles for one minute and then stares at the floor while a visiting architect asks him questions. Ingrid begins with a single sentence, 'My pavilion is a wall that bends to shelter people from the north wind and opens them to the river,' points to one diagram, walks the reviewers through the plan in two minutes and then asks them a question about the roof. The conversation that follows is the most useful of the afternoon. Afterwards Visser says, 'The crit is not an exam. It is the best chance you will get all term to hear what other people see in your work. Make it easy for them to help you.' This lesson covers how to prepare and present design work, how to give and receive critique and how to use the review to improve your design.
The studio review
The review, also called the crit or the jury, is a central ritual of architectural education. Students pin up drawings and models and present them to instructors, classmates and often visiting architects, who then discuss the work. The tradition goes back to the École des Beaux-Arts in Paris in the nineteenth century. Students there worked on design problems in the ateliers of their masters and had to deliver their drawings to the school by a fixed deadline. The word charrette, French for cart, comes from the cart sent round to collect the drawings; students would jump onto it to finish their work on the way. Today a charrette means an intense period of design work toward a deadline, or a short, collaborative design workshop.
Reviews take several forms. A desk crit is a one-to-one conversation with an instructor at your table, usually several times a week. A pin-up is an informal review with the studio group. A mid-review or final review is a formal presentation to a panel, usually including visiting critics. All of them have the same purpose: to help you see your work from outside, test it against other people's understanding and decide what to do next.
Preparing the boards
Drawings for a review are usually arranged on boards or sheets of a standard size. Many schools in Canada use ISO paper sizes, such as A1 (594 by 841 mm) or A0 (841 by 1189 mm). Plan the layout of your boards before you start the final drawings. A good layout has a clear hierarchy: the most important image, often a large perspective, section or model photograph, is the largest and first seen; supporting drawings are grouped logically, such as plans with plans and sections with sections; and text is short and placed close to the image it explains.
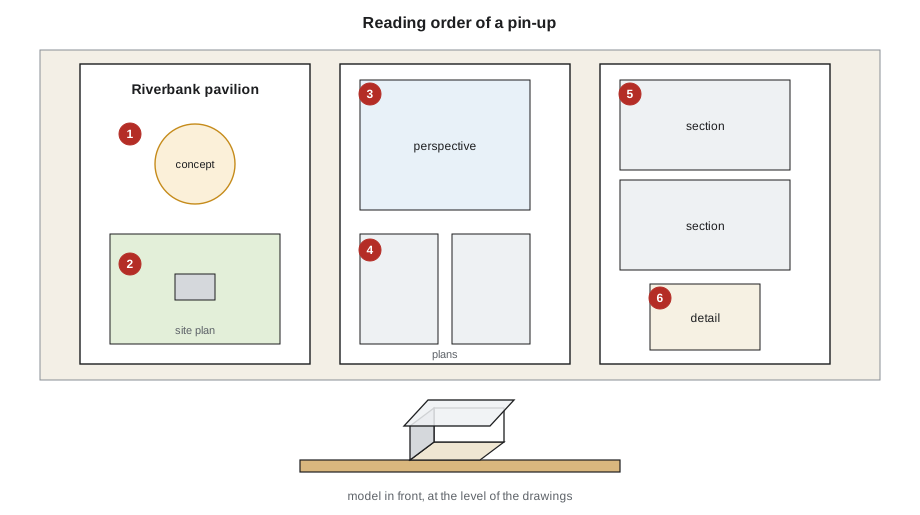
Align drawings of the same building to each other: put the plan directly below the section, at the same scale, so that the eye can move between them. Orient all plans the same way, with north arrows, and use a consistent set of line weights, colours and fonts. Leave white space; crowded boards are hard to read from a distance. A useful test is to pin your boards up, step back 3 or 4 m (10 to 13 ft) and ask whether a stranger could tell from that distance what the project is and where to look first.
Include a few drawings that explain the thinking: a concept diagram, a site analysis, a sequence of small diagrams showing how the design developed. Reviewers want to understand why the design is the way it is, not only what it looks like. Bring your process work, too: sketchbooks and study models on a side table often lead to the most useful discussions.
Presenting
A design presentation is short. In a typical studio review, you may have three to five minutes before the discussion begins. Plan it, and practise it aloud with a timer. A simple structure works well:
- Begin with the concept in one sentence. Tell the reviewers what the project is about before you show them anything in detail.
- Show the site and the problem: what was there, what you noticed, what you set out to do.
- Walk them through the building, using the drawings in order. A good way is to describe the experience of a visitor, from approach to arrival to the main space.
- Point out one or two key decisions and why you made them.
- End with a question you want help with, such as whether the roof is too heavy or whether the entrance is clear enough.
Do not read the boards aloud; the reviewers can read. Point at the drawings as you speak. Speak to the reviewers, not to the wall. Do not apologize for unfinished work at the start: say what you have and what you are still testing. Do not argue with every comment during the discussion. You may explain what you intended, but listen first.
# Planning a pin-up review: does everyone get a fair turn?
students = ["Wren", "Callum", "Ingrid", "Joon-ho", "Amara", "Theo", "Priya", "Luis"]
present, discuss, change = 3, 9, 2       # minutes per student
start_h, start_m = 13, 30                # review starts at 1:30 pm
t = start_h * 60 + start_m
for i, name in enumerate(students, 1):
    end = t + present + discuss
    print(f"{i}. {name:<8} {t // 60:02d}:{t % 60:02d}-{end // 60:02d}:{end % 60:02d}")
    t = end + change
    if i == 4:
        print("   -- 10-minute break --")
        t += 10
total = t - (start_h * 60 + start_m) - change
print(f"Review length: {total // 60} h {total % 60} min for {len(students)} students")1. Wren 13:30-13:42 2. Callum 13:44-13:56 3. Ingrid 13:58-14:10 4. Joon-ho 14:12-14:24 -- 10-minute break -- 5. Amara 14:36-14:48 6. Theo 14:50-15:02 7. Priya 15:04-15:16 8. Luis 15:18-15:30 Review length: 2 h 0 min for 8 students
A schedule like this makes the time limits visible. With eight students, three minutes of presentation and nine of discussion each, a short changeover and a break, the review runs about two hours. If the first student talks for nine minutes instead of three, someone at the end loses their discussion. Keeping to time is a courtesy to your classmates.
Giving critique
Every student in a studio is also a critic. Good critique is specific, honest and useful. It responds to what the designer is trying to do, rather than to what the critic would have done. A helpful structure has three steps: describe what you see, interpret what you think it means, and only then evaluate whether it works. Questions are often more useful than judgments: 'What happens to the path when it reaches the wall?' helps the designer think; 'The path is wrong' does not.
The American choreographer Liz Lerman developed a widely used method for feedback on creative work, the Critical Response Process. In it, responders first say what was meaningful or striking to them; the artist then asks questions about the work; responders then ask neutral questions, without hidden opinions; and only then, with the artist's permission, do responders offer opinions. Studios adapt this order to make reviews kinder and more productive. Some instructors use a simpler form: 'I like, I wish, I wonder.'
- Be specific: point to the drawing and the part you mean.
- Judge the work against its own goals before your own.
- Say what works as well as what does not, and say why.
- Offer possibilities rather than instructions.
- Remember the person: critique the work, never the designer.
Receiving critique
Hearing criticism of something you have worked hard on is difficult. Reviewers will disagree with each other, and some comments will be wrong. Your task is not to agree with everything but to understand it. Write down what is said, or ask a classmate to take notes for you, because it is hard to remember while you are presenting. Ask questions when a comment is unclear. Afterwards, sort the comments: which ones several people made; which ones match problems you already suspected; which ones you disagree with and why. Then decide what to change.
The American philosopher Donald Schön, in The Reflective Practitioner (1983), described design as a reflective conversation with the situation: the designer makes a move, sees how the situation talks back and responds. A review is that conversation made public. The best students treat it as information for the next iteration of the design loop, not as a verdict on their talent.
Worked problem
Turning a review into a plan
After her mid-review, Ingrid has three pages of notes from four reviewers. She needs to turn them into a plan for the next two weeks.
Show solution
- She groups the comments: three reviewers said the entrance is hard to find; two liked the bending wall; one thought the roof was too thick; one wanted more trees in the site plan.
- She separates the important from the minor: the entrance problem affects the whole experience, the roof thickness is a detail, the trees are a drawing issue.
- She notes her own view: she agrees about the entrance, partly agrees about the roof and disagrees with a suggestion to replace the wall with columns, because the wall is the concept.
- She writes three goals: make the entrance clear with a change in the wall and the path; test a thinner roof with two section models; redraw the site plan with the existing trees.
- She pins the goals above her desk and checks them off as the work progresses.
Answer: A review is useful only if its comments are sorted, weighed against the concept and turned into specific next steps.
Exercise 11: a pin-up and a peer review
This exercise takes about five hours plus the review session.
- Lay out your work from Exercises 9 and 10 on two boards, with a clear hierarchy and reading order.
- Write and practise a three-minute presentation that begins with a one-sentence concept and ends with a question.
- Present at a studio pin-up; ask a classmate to note every comment.
- Give written feedback to two classmates using the describe, interpret, evaluate structure.
- Deliverable: the boards, your presentation notes, the comment notes and a one-page plan with three goals for the next iteration.
Self-critique checklist
- Can a stranger tell what my project is from 3 m (10 ft) away?
- Did my presentation start with the concept and stay within time?
- Did I listen to the comments without arguing?
- Is my feedback to others specific and kind?
- Have I turned the comments into specific next steps?
Writing about your design
Boards need a little text, and many reviews also ask for a short written statement. Good design writing is plain, specific and short. Start with the concept, then describe the main decisions and the reasons for them, tied to the site, the users and the brief. Avoid vague words such as interesting, dynamic or unique; say what actually happens. 'The roof rises toward the river so that people on the bench see the far bank under its edge' tells a reader far more than 'a dynamic roof form creates an interesting relationship with the landscape'.
A useful exercise is to write a fifty-word statement for your project, then a twenty-word one, then a single sentence. Each shorter version forces you to decide what matters most. The single sentence often becomes the best title for your boards and the opening line of your presentation.
Presenting to people who are not architects
Architects present not only to other architects but to clients, community groups, councils and the public. These audiences may not read plans and sections easily, and technical words can lose them. For these audiences, lead with eye-level views, model photographs and simple diagrams; explain plans by walking through them as a visitor would; and answer the questions people actually have: what will it be like to use, how will it affect me, and what will it cost? Listening matters even more here. A neighbour's worry about shadows on her garden or a parent's question about safety for children is real information about the design, and a good architect responds to it rather than defending the drawings.
Practise by explaining your project to a friend or relative who has never studied architecture. If they can explain it back to you in their own words, your presentation is clear.
Common mistakes
MistakeReading the boards aloud.
InsteadSpeak about the ideas and point to the drawings; the reviewers can read.
MistakeArguing with every comment.
InsteadListen, ask questions and decide later what to change.
MistakeCrowded boards with no hierarchy.
InsteadMake one image dominant, group drawings logically and leave white space.
MistakeTreating the review as a verdict.
InsteadTreat it as information for the next iteration.
Summary and key terms
- The review, or crit, is a central part of architectural education, rooted in the École des Beaux-Arts.
- Good boards have a clear hierarchy, aligned drawings, consistent graphics and white space.
- A short presentation starts with the concept, walks through the experience and ends with a question.
- Good critique describes, interprets and then evaluates, and respects the designer's goals.
- Receiving critique well means noting, sorting and turning comments into next steps.
- Crit
- A review in which design work is presented and discussed.
- Pin-up
- An informal review with drawings pinned to a wall.
- Charrette
- An intense period of design work toward a deadline, or a short collaborative design workshop.
- Hierarchy
- The order of importance in a layout, shown by size, position and contrast.
- Critical Response Process
- Liz Lerman's structured method for giving feedback on creative work.
Practice problems
Work each problem on paper first, then reveal the answer to check.
Where does the word charrette come from?
Show answer
From the cart sent round at the École des Beaux-Arts to collect students' drawings at the deadline.
How should a design presentation begin?
Show answer
With the concept in one sentence.
What are the three steps of helpful critique?
Show answer
Describe, interpret, then evaluate.
What did Donald Schön call design?
Show answer
A reflective conversation with the situation.
Why end a presentation with a question?
Show answer
To direct the discussion toward the help you most need.
Lesson quiz · 5 questions
Score 60% or more to complete this lesson.
Create a free account to save your progress, take quizzes and earn a certificate.