
APP-330 · Lesson 3 of 12 · 24 min
Microwave door interlocks and leakage testing
▶ Video coming soon A video version of this lesson is on the way.
Mabel Kilbane in Trenholme called on Wednesday, August 26, 2026, about a microwave that "blew a fuse every time anyone opened the door to stir something." Her son had already replaced the fuse twice. Dee unplugged the oven, discharged the capacitor and began with the door switches, because a fuse that blows the moment the door opens is almost always the safety system doing what it was designed to do. With the leads removed, the primary interlock switch read closed whether the door was open or shut: its contacts had welded together. When the door opened, the monitor switch closed as it should, and because the primary interlock had not opened first, the monitor put a dead short across the line and blew the fuse. The maker's manual for that model called for replacing the primary interlock and the monitor switch together whenever the monitor had blown the fuse, and for checking the latch and the switch order afterwards. Dee fitted both, adjusted the switch bracket until the sequence was right, fitted the correct fuse and ran the oven with a water load. Her survey meter found a maximum of 0.3 mW/cm² at one corner of the door, below Penfold's limit for returning an oven to service. She recorded the reading, the meter's serial number and its calibration date on the invoice.
This lesson explains how the door safety system keeps the magnetron from running with the door open, how to test and adjust the switches, what stops microwaves from leaking around the door, what the leakage limits are, and how to make and record a leakage survey.
Why the door has three switches
A microwave oven must never be able to run its magnetron with the door open, even if a switch fails. Makers achieve this with several switches worked by the door's latch hooks, each in a different part of the circuit:
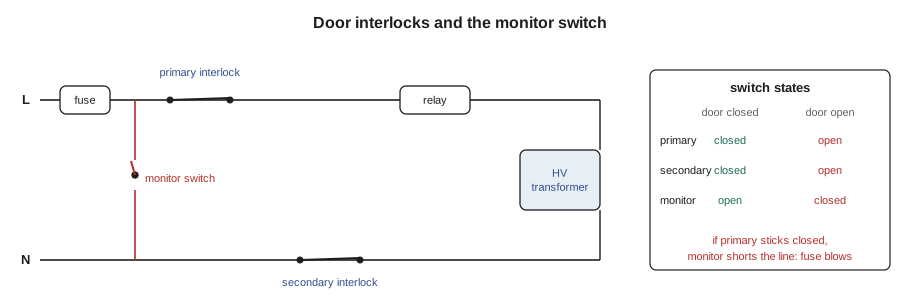
- The primary interlock (sometimes called the door switch or main interlock) opens the line to the high-voltage transformer when the door opens.
- The secondary interlock opens a second, separate path, often the other side of the line or the relay circuit, so that one failed switch cannot keep the magnetron running. A door-sensing switch also tells the control board that the door is open, which stops the cooking program and turns on the light.
- The monitor switch is wired across the line after the fuse. It is open when the door is closed and closes when the door opens. If the interlocks have opened as they should, closing the monitor does nothing because there is no voltage to short. If an interlock has failed closed, the monitor shorts the line and blows the fuse, making the oven dead until a technician finds the fault.
Canadian regulations under the Radiation Emitting Devices Act set safety requirements for microwave ovens sold in Canada, including requirements related to the door safety system; the service manual gives the exact switch arrangement and tests for each model.
The order in which the switches change matters as much as the switches themselves. When the door opens, the interlocks must open first and the monitor must close last. When the door closes, the monitor must open first and the interlocks must close last. If the latch, the switch bracket or a switch actuator is bent or worn, the order can change and the oven can blow fuses, or worse, run with a switch that has not fully opened.
Testing and adjusting the switches
The door switch test is done with the oven unplugged and the capacitor discharged, because the switches sit next to the high-voltage parts. Dee's sequence follows the makers' manuals:
- Disconnect the leads from each switch, noting their positions with photographs or labels, so the meter reads only the switch.
- With the door closed, the primary and secondary interlocks should read closed and the monitor open. With the door open, the reverse.
- Open and close the door slowly, watching each switch, to confirm the order. Many technicians fit the meter to the monitor and listen for the interlocks clicking before the monitor closes.
- Check the latch hooks, the door hinges and the switch bracket for wear, cracks and bending. A door that sags on worn hinges can upset the timing even when every switch is good.
- Replace switches only with the maker's exact parts, which have the correct contact rating and actuator, and replace them in the sets the maker specifies. Many makers require the monitor switch to be replaced whenever it has blown the fuse, because the short can damage its contacts.
- Fit the exact fuse on the wiring diagram. A larger fuse, or a fuse with the wrong time characteristic, defeats the monitor's protection.
A switch must never be bypassed, jumped or taped, even for a quick test, and an oven must never be returned to service with a switch adjusted so that it barely makes contact. If the door, hinges or latch cannot be brought back to the maker's specification, the oven is not repaired.
What keeps the microwaves in
The cavity is a metal box, and metal reflects microwaves, so the walls keep the energy in. The door is the weak point. Three features let it open and still seal:
- The viewing window has a metal screen or perforated metal sheet whose holes are only a few millimetres across, far smaller than the 12 cm (4.8 in) wavelength, so microwaves cannot pass through while light can.
- A choke built into the door's edge is a channel about a quarter wavelength deep that reflects microwaves back on themselves and cancels them, so the door does not need a perfect metal-to-metal seal. A plastic cover keeps grease out of the choke.
- The door's hinges and latch hold it in exactly the right place against the cavity face. A bent door, a cracked choke cover, a broken hinge or a damaged latch can open a gap.
Food and grease built up on the door seal and cavity face can also hold the door slightly open and can arc. Cleaning the seal area is part of every microwave service. A door that has been dropped, bent, or forced on a hinge is replaced with the maker's door assembly rather than straightened.
Leakage limits
Under Canada's Radiation Emitting Devices Regulations, a microwave oven sold in Canada must not leak more than 1 mW/cm² measured at 5 cm from any external surface with the specified water load in the cavity, and not more than 5 mW/cm² without a load. Health Canada has noted that these limits apply to ovens before sale; used ovens are not covered by the regulations, but the same figures are the accepted yardstick, and service manuals set their own service limits.
These limits are far below the levels that would harm a person, and well-maintained ovens usually read far less. The limits exist to catch damaged doors, failed seals and bad repairs. Penfold's rule, adopted from the makers' manuals, is that an oven goes back into service only if the highest reading after the repair is below 1 mW/cm². A reading between 1 and 5 means the door, seal or latch is repaired or adjusted and the oven is surveyed again. A reading above 5 means the oven is unplugged and tagged out, the customer is told not to use it, and the maker is contacted as the service manual directs.
Worked problem
Leakage and distance
A survey meter reads 0.8 mW/cm² at the standard 5 cm from a door corner. Microwave power density from a small leak falls roughly with the square of the distance. About what would a person standing 50 cm away receive?
Show solution
- Distance ratio:
- \[50 \div 5 = 10\]
- Square of the ratio:
- \[10^{2} = 100\]
- Power density at 50 cm:
- \[0.8 \div 100 = 0.008 \text{ mW/cm}^{2}\]
Answer: About 0.008 mW/cm², a hundredth of the reading at the door. The standard measurement is made close to the surface precisely because it is the worst case; customers can be reassured that normal use exposes them to far less.
Making a leakage survey
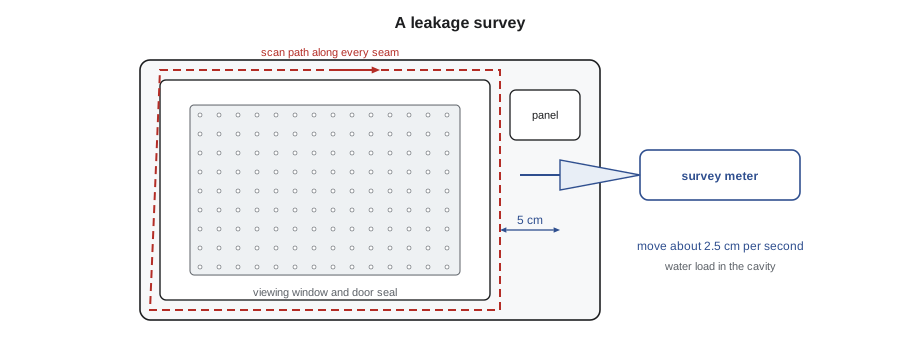
A leakage survey uses a microwave survey meter made for 2,450 MHz, with a probe and a spacer cone that holds the probe exactly at the standard distance. The meter must be in calibration; Penfold sends its meters out for calibration once a year (typical), and the date is on a label on the meter. Dee's procedure follows the makers' manuals:
- Put the specified water load in the centre of the cavity: 275 mL of water at about 20 °C (typical; use the manual's figure). The load protects the magnetron and gives a realistic test.
- Set the oven to full power and start it. Hold the probe with its cone touching the surface and move it slowly, about 2.5 cm (1 in) per second (typical), so the meter has time to respond.
- Scan the whole door seal all the way round, the viewing window, the door handle area, the hinges, the latch openings, the vents and the outer cabinet near the magnetron and waveguide.
- Note the highest reading and where it was, stop the oven, and replace the water load if the survey takes long enough for the water to boil.
- Record the result, the meter, its calibration date and the technician on the work order. A survey is done after every repair that touched the door, hinges, latch, switches, waveguide, magnetron or cabinet, and whenever a customer asks about leakage.
Worked problem
How long a door scan takes
A door is 38 cm wide and 25 cm high. Dee scans its whole perimeter once at 2.5 cm per second. How long does that take?
Show solution
- Perimeter:
- \[2 \times (38 + 25) = 126 \text{ cm}\]
- Time:
- \[126 \div 2.5 \approx 50 \text{ s}\]
Answer: About 50 seconds for the door seal alone. Adding the window, hinges, latch openings and vents, a full survey takes a few minutes, and the water load should be checked and replaced so it does not boil dry.
Survey meters respond slowly, so a fast sweep can miss a leak. A reading that jumps when the door is pressed or the handle is pulled points to a hinge, latch or door-alignment problem. A reading near the vents or the cabinet seams, rather than the door, points to the waveguide, the magnetron's mounting gasket or a damaged cabinet, and calls for a careful look before anything else.
Where leaks come from
When a survey finds a reading above Penfold's limit, the location of the reading points to the cause. The table below lists the usual ones (typical); the service manual's adjustment procedures and parts govern the fix.
| Where the reading is high | Usual causes | Typical fix |
|---|---|---|
| Door corner or edge | Sagging hinge, bent door, worn latch, grease on the seal face | Clean the seal area; adjust or replace hinges, latch or door |
| Along the whole door seal | Damaged choke or choke cover, warped door | Replace the door assembly |
| Viewing window | Damaged screen or perforated panel | Replace the door assembly |
| Vents or cabinet seams near the magnetron | Magnetron not seated, damaged gasket, loose waveguide | Reseat the magnetron with its gasket; tighten the waveguide |
| Changes when the handle is pulled | Latch or hinge play | Adjust or replace the latch and hinges |
Customers sometimes ask for a leakage test because they have read about microwave safety or because a door looks damaged. The survey takes a few minutes and is worth doing whenever there is any doubt. Dee explains the result in plain words: what was measured, how it compares with the limits, and what a reading at the door means at the distance where people actually stand. A customer who has dropped an oven, or whose door no longer closes squarely, is told not to use it until it has been checked.
A damaged door is never straightened, glued or taped. The door's screen, choke and alignment are what keep the energy in, and the maker sells the door as a complete assembly for that reason. If the maker no longer supplies the door, the oven is not repaired.
The survey meter itself needs care. It is stored in its case, its probe and cable are protected from being crushed or bent, and its battery is checked before each use. Many meters have a self-test, and some shops keep a known low-level reference source to confirm that the meter responds. A meter that has been dropped is sent for recalibration before it is used again, because a meter that reads low is worse than no meter at all: it gives false confidence.
Common mistakes
MistakeReplacing the fuse after it blew when the door opened.
InsteadTest the interlocks and monitor; the monitor blew the fuse because an interlock failed.
MistakeReplacing only the switch that failed after the monitor blew the fuse.
InsteadFollow the manual, which usually calls for replacing the monitor and primary interlock together.
MistakeChecking the switches without checking their order.
InsteadOpen and close the door slowly and confirm the interlocks open before the monitor closes.
MistakeSweeping the survey probe quickly around the door.
InsteadMove about 2.5 cm (1 in) per second so the meter can respond.
MistakeReturning an oven to service without a leakage survey after a door or switch repair.
InsteadSurvey every time and record the reading, the meter and its calibration date.
Summary and key terms
- Three door switches, worked by the latch, keep the magnetron from running with the door open.
- The monitor switch shorts the line and blows the fuse if an interlock fails closed.
- Switch order matters: interlocks open first and the monitor closes last when the door opens.
- Switches are tested cold, replaced with the maker's parts in the maker's sets, and never bypassed.
- The door screen, the choke and correct alignment keep microwaves in.
- The leakage limits are 1 mW/cm² before sale and 5 mW/cm² as the upper bound, measured close to the surface.
- Penfold returns an oven to service only with a highest reading below 1 mW/cm² after repair.
- A survey uses a calibrated meter, a water load and a slow scan of every seam, and it is recorded.
- Primary interlock
- The door switch that opens the line to the high-voltage transformer when the door opens.
- Secondary interlock
- A second door switch that opens a separate path, so one failure cannot keep the oven running.
- Monitor switch
- A switch that shorts the line and blows the fuse if an interlock fails to open.
- Choke
- A channel in the door edge that cancels microwaves trying to leak past the door.
- Survey meter
- A calibrated instrument that measures microwave leakage in mW/cm².
- Water load
- The measured water placed in the cavity during a leakage survey.
- Power density
- Microwave power per unit area, measured in mW/cm².
Practice problems
Work each problem on paper first, then reveal the answer to check.
What does the monitor switch do if the primary interlock has welded closed?
Show answer
It shorts the line when the door opens and blows the fuse.
In what order should the switches change when the door opens?
Show answer
The interlocks open first; the monitor closes last.
What stops microwaves passing through the viewing window?
Show answer
A metal screen with holes far smaller than the wavelength.
What is Penfold's limit for returning an oven to service?
Show answer
A highest reading below 1 mW/cm² after repair.
Why is the survey probe moved slowly?
Show answer
The meter responds slowly, and a fast sweep can miss a leak.
Lesson quiz · 5 questions
Score 60% or more to complete this lesson.
Create a free account to save your progress, take quizzes and earn a certificate.