
APP-320 · Lesson 8 of 12 · 25 min
Service and diagnostic modes
▶ Video coming soon A video version of this lesson is on the way.
In the afternoon of the electronics day, Ines lined up three training machines along the shop wall, a washer, a dishwasher and a refrigerator, each with its tech sheet taped to the side, and gave Kiran ten minutes to get each one into its service mode. The washer needed a sequence of key presses within a few seconds of switching on. The dishwasher needed two keys held together while the door was closed. The refrigerator needed a key combination held for several seconds, and then showed a menu of numbered tests. Kiran managed the washer at the second try, the dishwasher at the fourth and the refrigerator only after reading the tech sheet a second time, slowly. "That," said Ines, "is the point. Nobody remembers these. You read them every time."
This lesson explains what service and diagnostic modes are, what they offer, how they are entered in general terms, how to use component tests and sensor readouts safely, and the special modes, such as showroom or demo modes and factory resets, that cause their own service calls.
What a service mode is
A service mode, also called a diagnostic mode, test mode or technician mode, is a hidden part of the control's program that gives the technician tools the customer does not see. It is designed into the appliance by the maker and described on the tech sheet and in the service manual. The details differ by brand, model and year, but most service modes offer some or all of the following.
- Fault history. The last few fault codes, often with how many times each occurred or the cycle step in which it happened.
- Component test or activation. Each output, such as the inlet valve, drain pump, heater, door lock, motor or fan, switched on one at a time so the technician can check it.
- Sensor readout. Live values from thermistors, the water level sensor, flow meter, motor speed and door switches.
- Keypad and display test. A mode that lights every segment and shows which key the board sees, as in Dee's dishwasher case in lesson 3.
- Software version and configuration. The board's program version and model setting, needed when ordering parts and after a board replacement.
- Calibration and adjustments. Offsets for oven temperature, water level or dispenser timing on some models.
- Quick test cycles. A shortened cycle that runs through every stage in a few minutes, useful after a repair.
- Reset functions. Clearing the fault history, restoring factory settings or leaving special modes such as demo mode.
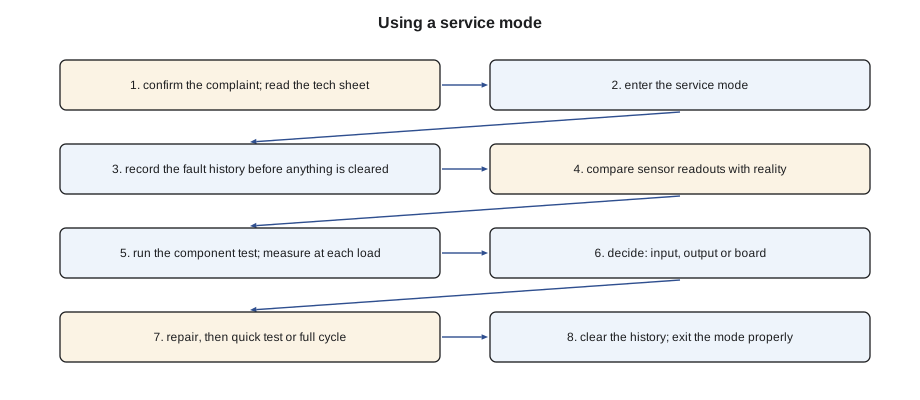
Entering a service mode
Makers use several ways of protecting their service modes from being entered by accident. Common ones are: a sequence of key presses or a knob turn pattern within a few seconds of switching on or of opening the door; holding two or more keys together for a set time; a magnet held against a marked spot or a switch behind a panel; a service connector on the board; and, on connected models, an app or a maker's tool that connects to the appliance by a cable, Bluetooth or Wi-Fi. The exact method is always on the tech sheet for that model. This course does not list any maker's sequences: they change between models and years, and the tech sheet is the authority.
A few general habits make entry reliable. Read the whole procedure before starting, because timing usually matters. Start from the state the procedure names, such as the appliance switched off, the door closed or the cycle selector at a particular position. Press keys firmly and deliberately on capacitive panels, which ignore quick taps. If the attempt fails, switch the appliance off, wait the time the tech sheet gives, and start again from the beginning rather than pressing on in the hope of catching up.
Reading the fault history first
The fault history is evidence, and it should be read and written down before anything else is done. Many service modes clear the history when a test is run, when a board is replaced or when the technician presses the wrong key. Write down each code, its count and, if shown, when it happened. A history with one code many times tells a different story from a history with many different codes once each. A single old code may be the result of a power cut or a customer opening the door mid-cycle, and needs no repair at all. A code that matches the customer's complaint and recurs is the one to follow.
Worked problem
Reading a fault history
A washer's history shows: F21 (long drain) 6 times, all in the last two weeks; F45 (door lock did not confirm) once, three months ago; SUD (excess suds) 3 times. The customer complains that the washer stops with water in it. Which code should be followed first, and what does SUD add?
Show solution
- F21 matches the complaint and recurs recently: follow it first.
- F45 is a single old event, likely a door opened during a cycle: note it, no repair.
- SUD three times suggests too much or the wrong detergent, which can also slow draining by foaming.
Answer: Start with the drain path (F21): filter, pump, hose and pressure sensing. Mention the detergent to the customer, because the suds may be making the drain problem worse. The old F45 needs no work.
Using component tests safely
A component test switches outputs directly, and in doing so it may bypass some of the checks the normal program makes. A heater switched on in component test may not check that there is water over it, a drain pump may run dry, and a door lock may be cycled with the door open. Makers design most tests with protections, but not all, and the tech sheet gives the conditions for each test. Before testing a heater, make sure the tub or sump holds water as the tech sheet requires. Before testing a motor, make sure the drum or impeller is free and the door is closed and locked. Before testing an inlet valve, make sure the drain is connected and working, so a stuck valve cannot flood the floor.
During each test, measure at the load. The service mode shows that the board has sent the command, not that the load received it or that the load works. If the board switches the drain pump on and the pump hums but does not pump, the pump or its impeller is jammed. If the pump is silent, measure the voltage at its terminals: present means the pump has failed; absent means the harness, connector or board output, as lesson 1 explained.
Worked problem
Is there enough water over the heater?
A dishwasher's tech sheet says its heater test should only be run with the sump filled to the normal wash level, about 3.5 L (0.9 gal), and that the heater must not run for more than two minutes in the test. The 1,100 W heater would raise 3.5 L (0.9 gal) of water how much in two minutes, ignoring losses? Use about 4.19 kJ per litre per °C (8.34 Btu per gallon per °F).
Show solution
- Energy in two minutes:
- \[1{,}100 \text{ W} \times 120 \text{ s} = 132{,}000 \text{ J} = 132 \text{ kJ}\]
- Temperature rise:
- \[\Delta T = \frac{132}{3.5 \times 4.19} \approx 9.0 \text{ °C}\]
Answer: About 9 °C in two minutes, a rise the sensor readout should show clearly. With no water, the same heat would go into the heater alone and could damage it and the tub, which is why the fill condition matters.
Using sensor readouts
Sensor readouts show what the board believes. Comparing them with reality is one of the fastest checks in electronic diagnosis. A thermistor readout is compared with a thermometer placed beside the sensor and given time to settle. A level readout is compared with the tub empty and at a known fill. A motor speed readout is compared with the drum turning slowly by hand, which should show a small speed, or with the command during a spin test. A door switch readout should change as the door opens and closes. When the readout and reality disagree, the problem lies in the sensor, its connection or the board's input, and lesson 4 gives the tests.
| Readout | Compare with | If they disagree |
|---|---|---|
| Compartment or water temperature | Thermometer beside the sensor, settled | Test the thermistor and connector (lesson 4) |
| Water level or sensor frequency | Empty tub and the tech sheet value | Check the hose, air trap and sensor |
| Motor speed | Drum turned slowly by hand; spin test command | Check Hall sensors, connector and motor (lesson 6) |
| Door switch or lock | Door opened and closed; lock engaged | Test the switch and lock |
| Flow meter count | Water visibly entering | Check the meter, its magnet and connector |
Showroom modes, resets and leaving the mode
Some service calls are caused by special modes rather than faults. A refrigerator in showroom or demo mode lights its display, runs its lights and fans and responds to keys, but does not run its compressor, so a store's floor model does not waste energy. Occasionally a new refrigerator is delivered still in that mode, or a customer enters it by pressing keys while cleaning. The display may show a small indicator, and the tech sheet or use and care guide says how to leave it. Ovens and cooktops have similar modes, and so do some washers and dishwashers. Dee's case file for Thursday, August 27 was one: Agnieszka Holt in Berrisfield had a new refrigerator, delivered two days before, that was cool but not cold. The display looked normal. A small "demo" indicator in the corner of the display, and a compressor that never started, told the story. Leaving demo mode took ten seconds. Dee charged the standard service call, explained the mode and showed the customer the indicator.
A factory reset returns user settings, and sometimes learned settings such as an adaptive defrost interval, to their defaults. It can clear a confused state after a power disturbance, but it can also erase settings the customer chose, a Wi-Fi connection, or calibration offsets made during an earlier repair. Use it only when the tech sheet recommends it for the symptom, tell the customer what it will change, and write down any custom settings first.
Finally, leave the service mode properly. Many appliances leave service mode by switching off, but some stay in a test state until the exit step is done, and some keep a heater, a pump or a lock in its last test state. Follow the exit step on the tech sheet, then run a normal cycle or confirm normal operation before leaving the customer's home. On connected appliances, check that the Wi-Fi connection and app still work after any reset (lesson 10).
By the end of the afternoon Kiran had entered all three service modes twice, read each fault history aloud, run each component test with Dee watching, and exited each correctly. Ines left the training machines' tech sheets taped to their sides. "When you can do that from the sheet on a machine you have never seen," she said, "you are ready."
Calibration and adjustments in service mode
Some service modes let the technician adjust how the appliance measures or controls. An oven may allow a temperature offset, as the cooking course showed, to correct a control that runs a few degrees hot or cold. A washer may run an auto-calibration after a board or sensor replacement, filling and draining while it learns the level sensor's readings and the drum's inertia. A refrigerator may let the technician reset an adaptive defrost interval, or run a forced defrost to test the heater. A dishwasher may let the technician set the water hardness or the rinse aid dose, settings that are usually the customer's.
Adjustments are powerful and should be used only as the tech sheet describes. An oven offset that hides a failing temperature sensor, or a washer calibration run with laundry still in the drum, creates a new problem. Record any adjustment on the work order and in the customer's paperwork, so a later technician knows the control is not at its factory setting.
Worked problem
Is an offset the right fix?
An oven set to 175 °C (350 °F) averages 165 °C (330 °F) on a thermometer over several cycles. Its tech sheet allows an offset of up to ±20 °C (±35 °F), and its sensor reads correctly against its table at room temperature. Is an offset a reasonable fix, and what offset is needed?
Show solution
- Error:
- \[175 - 165 = 10 \text{ °C low}\]
- The sensor checks correctly, and 10 °C is within the allowed ±20 °C.
Answer: An offset of +10 °C is reasonable here, because the sensor is good and the error is steady and within range. An erratic error or a sensor outside its table would need a repair, not an offset.
A final caution: some service modes include factory functions, such as writing a serial number or clearing a board's memory completely, that are meant only for the production line or the maker's own technicians. If the tech sheet does not describe a menu item, leave it alone.
Common mistakes
MistakeRunning tests before writing down the fault history.
InsteadRead and record the history first; many tests or resets clear it.
MistakeTrusting the component test display as proof a load works.
InsteadMeasure at the load while it is commanded on.
MistakeTesting a heater with no water over it.
InsteadFill to the level the tech sheet requires and keep within its time limit.
MistakeDoing a factory reset as a first step.
InsteadUse it only when recommended, after recording the customer's settings.
MistakeLeaving without exiting the service mode.
InsteadFollow the exit step and confirm a normal cycle.
Summary and key terms
- Service modes offer fault history, component tests, sensor readouts, keypad tests, versions, calibration and resets.
- Entry methods vary by maker and model; always read the tech sheet.
- Read and record the fault history before running tests or resets.
- Follow the recurring code that matches the complaint; single old codes may need no repair.
- Component tests may bypass safety checks; meet the tech sheet's conditions for each test.
- Measure at the load during component tests.
- Compare sensor readouts with reality to find sensor and input faults.
- Showroom modes and resets cause service calls; exit service mode properly before leaving.
- Service mode
- A hidden part of the control program for diagnosis and testing.
- Fault history
- The stored list of recent fault codes.
- Component test
- A test that switches each output on in turn.
- Sensor readout
- A live display of what a sensor reports to the board.
- Showroom mode
- A mode that runs the display and lights without the compressor or heaters.
- Factory reset
- Restoring settings to the maker's defaults.
- Quick test cycle
- A shortened cycle that checks every stage.
Practice problems
Work each problem on paper first, then reveal the answer to check.
What should be done before running any component test?
Show answer
Read and record the fault history.
Why must water be over a heater during its component test?
Show answer
The test may bypass the check, and a dry heater can be damaged.
A refrigerator's lights and display work, but the compressor never runs. What special mode should be checked?
Show answer
Showroom or demo mode.
How is a thermistor readout checked?
Show answer
Against a thermometer beside the sensor.
Why tell the customer before a factory reset?
Show answer
It can erase their settings and connections.
Lesson quiz · 5 questions
Score 60% or more to complete this lesson.
Create a free account to save your progress, take quizzes and earn a certificate.