
APP-110 · Lesson 9 of 12 · 25 min
Installation requirements and clearances
▶ Video coming soon A video version of this lesson is on the way.
On Monday, November 2, Dee and Kiran installed a new electric dryer and a dishwasher for a family who had just moved into a townhouse in Stoney Creek. The dryer was going into a closet off the upstairs hall, and the old dryer had been vented through a white plastic accordion duct that ran up into the attic. Dee pulled the old duct out and held it up. "The instructions for the new dryer don't allow this, the code doesn't allow it, and it's how houses catch fire," she said. "Today you learn that installation isn't just plugging things in. It's following the instructions, every line of them."
A large part of appliance service work is installation: setting new appliances and reinstalling repaired ones. A good installation keeps the appliance safe and working for years; a bad one causes fires, floods, gas leaks, tip-overs and callbacks. The rule in this lesson is the rule of the trade: the manufacturer's installation instructions come first, and building, electrical and gas codes require that they be followed.
The installation instructions come first
Every appliance comes with installation instructions written for that model and tested as part of its safety certification. They state the electrical supply, the clearances, the venting, the water and drain connections, the gas connection, the anti-tip device and the levelling. The codes that govern houses refer back to these instructions:
In Ontario, the Ontario Building Code covers exhaust from clothes dryers and other building requirements, the Ontario Electrical Safety Code covers the electrical supply, and the natural gas and propane installation code, CSA B149.1, adopted under the Technical Standards and Safety Act, covers gas connections. Each requires appliances to be installed according to the manufacturer's instructions as well as the code itself.
When the instructions and the code differ, follow the stricter one. An installer who ignores the instructions may also void the warranty. Penfold technicians read the installation instructions before every installation, even for models they have installed many times, because requirements change.
The electrical supply
Most appliances plug into an ordinary 120 V receptacle, but several have their own circuit requirements, given on the rating plate and in the instructions:
| Appliance | Typical supply in the instructions | Notes |
|---|---|---|
| Refrigerator | 120 V, 15 or 20 A, often an individual circuit | Grounded receptacle; no extension cords |
| Dishwasher | 120 V, 15 or 20 A, individual circuit | Cord-and-plug or hard-wired at a junction box |
| Electric dryer | 240 V, 30 A | Four-wire or three-wire connection, per the instructions |
| Electric range | 240 V, 40 or 50 A | Four-wire or three-wire connection, per the instructions |
| Microwave over the range | 120 V, 15 or 20 A, often an individual circuit | Grounded receptacle in the cabinet above |
Electric ranges and dryers connect with either a three-wire or a four-wire cord, and the cord must match both the receptacle and the instructions. In a four-wire connection the appliance gets two hot conductors, a neutral and a separate grounding conductor, and the strap or wire that bonds the neutral terminal to the cabinet must be removed or moved as the instructions say. In a three-wire connection the neutral and the cabinet are bonded together. Getting this wrong can leave the cabinet live if the neutral fails. Follow the instructions exactly for the cord kit you fit, and if the receptacle does not match the appliance, the fix is a new receptacle or circuit by a licensed electrical contractor, not an adapter.
Kiran checked the townhouse's dryer receptacle before unboxing the dryer: four slots, L1 to L2 240 V, each leg to neutral 120 V, neutral to ground 0 V. The dryer came with its four-wire cord fitted at the factory, so there was no strap to move.
Clearances
Clearances are the minimum distances the instructions require between the appliance and walls, cabinets, countertops and other appliances. They exist for three reasons: to keep combustible materials, such as wood cabinets, away from hot surfaces; to let air flow where the appliance needs it, such as around a refrigerator's condenser; and to leave room for service. Typical clearances found in instructions include:
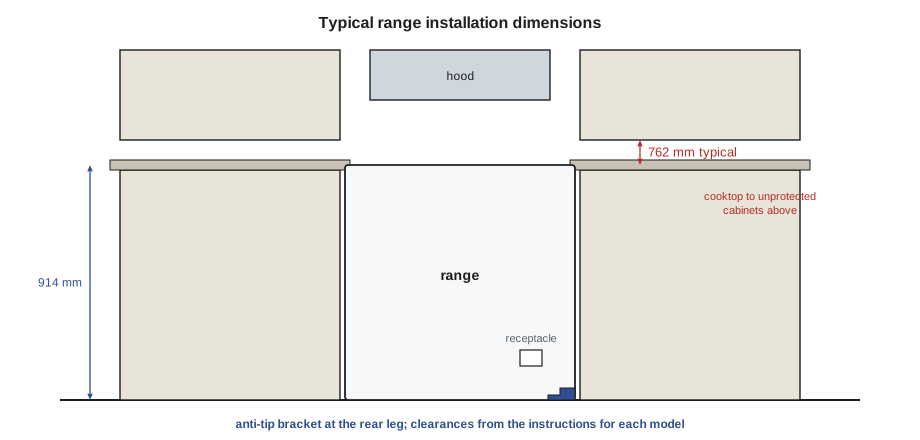
- A range or cooktop: a minimum vertical distance from the cooking surface to unprotected combustible cabinets above, often 762 mm, which some instructions allow to be reduced with a listed range hood or a protective shield; and side clearances to walls or tall cabinets.
- A refrigerator: a small gap at the top, sides and back, often 25 mm at the top and back, so that air can carry heat away from the condenser; built-in models need specific cabinet openings.
- A dryer in a closet: specific clearances on all sides and openings in the closet door for air, because the dryer needs air in to replace the air it exhausts.
- A dishwasher: a cabinet opening of the right width and height, with clearance for the door to open and the hoses and cord to pass.
Worked problem
Checking a range clearance
A new range's instructions require at least 762 mm from the cooking surface to unprotected combustible cabinets above. The cooktop is 914 mm above the floor and the underside of the wall cabinets is 1,600 mm above the floor. Does the installation meet the requirement?
Show solution
- Clearance: 1,600 − 914 = 686 mm.
- 686 mm is less than 762 mm, short by 76 mm.
Answer: No. The cabinets are too low. The options are those the instructions allow, such as a listed hood or protection of the cabinet, or raising or removing the cabinet. The installer does not guess at a fix.
Dryer venting
An electric or gas dryer moves a large volume of hot, moist, lint-laden air. Lint is highly flammable, and dryers are a leading cause of house fires, most often because lint has built up in the dryer or its duct. A blocked or long duct also makes the dryer run hot and slow, blows its thermal fuse (lesson 7) and wastes energy. The duct must:
- Be made of the material the instructions require, normally rigid metal duct of 100 mm (4 in) diameter with smooth walls. Plastic and foil accordion ducts are not allowed for the duct run.
- Use only a short, listed flexible metal transition duct between the dryer and the wall, if one is used at all, kept as straight as possible and never crushed behind the dryer.
- Have joints that are taped with foil tape or clamped, with no screws poking into the duct where they would catch lint.
- Stay within the maximum length the instructions allow, counted as an equivalent length that adds an allowance for each elbow.
- End outdoors, not in an attic, crawl space, garage or chimney, with a termination hood that has a backdraft damper and no screen.
The Ontario Building Code requires dryer exhaust to be vented to the outdoors and kept separate from other exhaust systems, and refers to the manufacturer's instructions for duct size and length. The instructions give a table of maximum lengths for each duct type and number of elbows.
Worked problem
Equivalent length of the townhouse duct
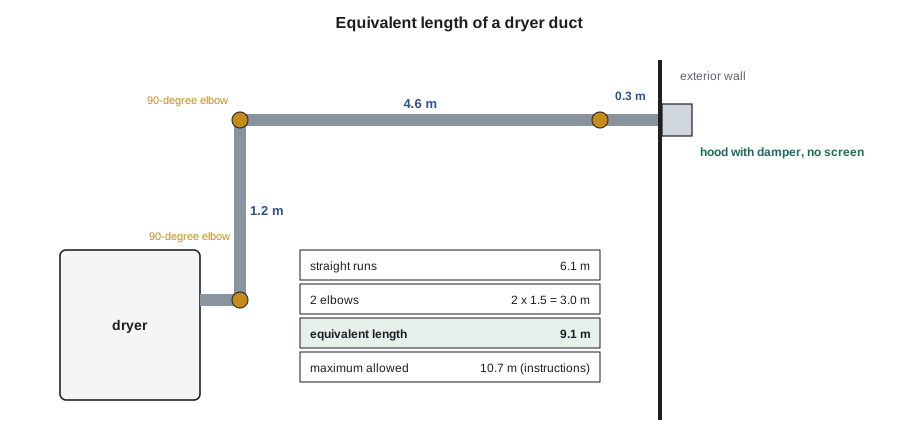
The new dryer's instructions allow a maximum equivalent length of 10.7 m for 100 mm (4 in) rigid duct, counting 1.5 m for each 90-degree elbow and nothing extra for the exterior hood. The planned route is 1.2 m up the wall, a 90-degree elbow, 4.6 m along the closet ceiling to an exterior wall, a second 90-degree elbow and 0.3 m through the wall to the hood. Is the route within the limit?
Show solution
- Straight lengths: 1.2 + 4.6 + 0.3 = 6.1 m.
- Elbows: 2 × 1.5 m = 3.0 m.
- Equivalent length: 6.1 + 3.0 = 9.1 m.
- 9.1 m is less than 10.7 m.
Answer: Yes, 9.1 m against a limit of 10.7 m. The old route into the attic is abandoned and sealed, and the new duct goes out through the wall.
Kiran and Dee spent most of the morning on the vent: a new rigid duct along the closet ceiling to the outside wall, an exterior hood with a damper, foil tape on every joint, and a short semi-rigid transition behind the dryer. Dee had Kiran measure the airflow at the hood with an anemometer once the dryer was running, and wrote the equivalent length on a label in the closet for the next technician.
Dishwashers
A built-in dishwasher has more connections than most appliances: the water supply, the drain, the electrical supply and the mounting. The instructions typically require:
- A cabinet opening of the stated size, with the dishwasher level and its door clearing the cabinets on both sides.
- Mounting brackets screwed to the underside of the countertop or to the cabinet sides, so that the dishwasher cannot tip forward when its loaded door is open.
- A hot or cold water supply, as the instructions say, from a shutoff valve, with a new supply line; lesson 10 covers water connections.
- A drain connection with a high loop or an air gap, so that dirty water from the sink cannot siphon back into the dishwasher; lesson 10.
- The electrical connection, either a cord and plug or a hard-wired connection in the dishwasher's junction box, with the grounding conductor connected.
Before sliding the new dishwasher in, Kiran checked that the water supply line, drain hose and cord would not be pinched or kinked under it, and that the cord would reach the receptacle under the sink. After installation he ran a full cycle and checked for leaks with a flashlight under the unit.
Gas appliances
Connecting a gas range, cooktop or dryer, and converting an appliance from natural gas to propane, are gas work under the Technical Standards and Safety Act, done only by a person holding the right TSSA gas technician certificate. At Penfold, Hiro Nakashima, who holds a G.2 certificate, does it. He uses a new certified flexible connector, never reuses an old one, checks that there is an accessible manual shutoff valve, tests every joint for leaks, checks the burners and the oven, and tags the appliance as the regulation requires. An appliance technician without the certificate can disconnect power, move a gas appliance that is not connected, and service its electrical parts, but leaves the gas connection alone.
Built-in and over-the-range appliances
Built-in appliances, such as wall ovens, cooktops, built-in refrigerators and over-the-range microwave ovens, fit into cabinets or walls and have their own installation requirements. A wall oven needs a cabinet cut-out of exact size, a support platform strong enough for its weight, which can be 70 kg (150 lb) or more for a double oven, and a junction box or receptacle in the location the instructions show. A cooktop over a wall oven needs specific clearances between them, and some models cannot be combined at all; the instructions say which combinations are approved.
An over-the-range microwave oven is fastened to a wall plate screwed into the wall studs and bolted through the cabinet above. It must be fastened to at least the number of studs the instructions require, because hollow-wall anchors alone will not carry its weight plus a heavy dish on its open door. Its exhaust can be set to vent outdoors through a duct or to recirculate through a filter, and the installer sets the blower direction to match. The receptacle is usually in the cabinet above. Lifting it into place is a two-person job with a ladder or step stool, as lesson 4 described.
Worked problem
Checking a cut-out
A wall oven's instructions call for a cabinet cut-out 724 to 730 mm wide. Kiran measures the existing opening at 718 mm. What should he do?
Show solution
- Required minimum: 724 mm.
- Measured: 718 mm, which is 6 mm too narrow.
Answer: The opening is too narrow, and the oven must not be forced in. The cabinet has to be modified by a cabinetmaker or carpenter, or a model that fits the opening chosen. Measure cut-outs before the delivery day, not after the old oven is out.
On every built-in installation, Penfold technicians photograph the finished installation, including the brackets and the connections, and attach the photos to the work order.
Common mistakes
MistakeInstalling from memory without reading the instructions.
InsteadRead the installation instructions for the model every time; follow the stricter of the instructions and the code.
MistakeUsing a plastic or foil accordion duct for a dryer.
InsteadUse rigid metal duct of the required size, with only a short listed transition.
MistakeVenting a dryer into an attic, crawl space or garage.
InsteadVent to the outdoors through a hood with a damper and no screen.
MistakeLeaving the neutral bonding strap in place on a four-wire dryer connection.
InsteadFollow the instructions for the cord type; on a four-wire connection the strap is removed or moved.
MistakeUsing an adapter when the receptacle does not match the cord.
InsteadThe fix is a matching receptacle or circuit by a licensed electrical contractor.
MistakeReusing an old gas connector.
InsteadA new certified connector, installed and leak tested by a certified or authorized gas technician.
Summary and key terms
- The manufacturer's installation instructions come first; codes require that they be followed.
- Check the supply against the rating plate; three-wire and four-wire connections must match the instructions and the receptacle.
- Clearances protect combustibles, allow air flow and leave service room; check them with a tape measure.
- Dryer ducts are rigid metal, short, sealed without screws and vented outdoors; count elbows in the equivalent length.
- Dishwashers need brackets, a level installation, a proper drain and an unkinked supply.
- Gas connections are made only by certified or authorized gas technicians.
- Installation instructions
- The manufacturer's instructions for installing a specific model, part of its certification.
- Clearance
- The minimum distance the instructions require between an appliance and nearby surfaces.
- Four-wire connection
- A 240 V connection with two hots, a neutral and a separate ground.
- Bonding strap
- A strap that connects the neutral terminal to the cabinet in a three-wire connection.
- Equivalent length
- The straight length of a duct plus an allowance for each elbow, compared with the maximum allowed.
- Transition duct
- The short flexible metal duct between a dryer and the wall duct.
- Backdraft damper
- A flap in a vent hood that opens with exhaust flow and closes to keep outside air out.
Practice problems
Work each problem on paper first, then reveal the answer to check.
What comes first in any installation?
Show answer
The manufacturer's installation instructions for that model.
What must happen to the bonding strap on a four-wire dryer connection?
Show answer
It is removed or moved as the instructions say.
Name three requirements for a dryer duct.
Show answer
Rigid metal of the right size; within the maximum equivalent length; vented outdoors through a damper hood without a screen; no screws into the duct.
Why does a dishwasher need mounting brackets?
Show answer
So it cannot tip forward when its loaded door is open.
Who connects a gas range at Penfold?
Show answer
Only a technician with the right TSSA certificate, Hiro.
Lesson quiz · 5 questions
Score 60% or more to complete this lesson.
Create a free account to save your progress, take quizzes and earn a certificate.