
ROOF-320 · Lesson 5 of 12 · 23 min
Pipes, vents and penetrations
▶ Video coming soon A video version of this lesson is on the way.
On the Wednesday of the Ferncliff Bakery week, rain stopped work on the roof, and after Marco's kettle training in the yard, Theo pulled Rory into the shop for the afternoon. On the bench was a box of things that had come off Ridgecap's roofs over the years: a lead plumbing vent sleeve chewed open by squirrels, a cracked rubber boot with its clamp rusted solid, a pitch pan full of shrunken black filler that had pulled away from a steel post, and a sheet metal collar from a gas pipe with a ring of hardened caulking where it had once met the pipe. "Everything in this box was somebody's idea of a permanent flashing," Theo said. "Let's see why none of them was."
This lesson covers the pipes, vents, stacks, conduits, posts and supports that pass through a roof: the kinds of flashing used for each, how hot stacks are handled, why pitch pans are a last resort, how much room each penetration needs, and how to deal with clusters of pipes and conduits. Drains were covered in ROOF-310; curbs in lesson 4.
Kinds of penetration
A penetration is anything that passes through the roof deck and membrane. Each kind brings its own problems.
- Plumbing vents: cold or room-temperature plastic, cast iron or copper pipes that let the drain system breathe. They move little but are numerous, and the local plumbing code sets how far they must rise above the roof.
- Exhaust and flue stacks: pipes or ducts that carry hot gases from furnaces, boilers, water heaters, ovens and generators. Heat is the main problem.
- Gas lines and conduits: small pipes that should cross a roof on supports and enter equipment from the side, but often come up through the deck in clusters.
- Structural posts and supports: steel columns for signs, screens, antennas, solar racks and dunnage, which move with the structure and carry loads.
- Guy wires and anchors: tie-down and fall arrest anchors that pass through or fasten into the roof.
- Abandoned or unknown pipes: cut-off pipes that nobody can identify. Find out what they are before removing them.
Pre-molded boots and field-wrapped flashings
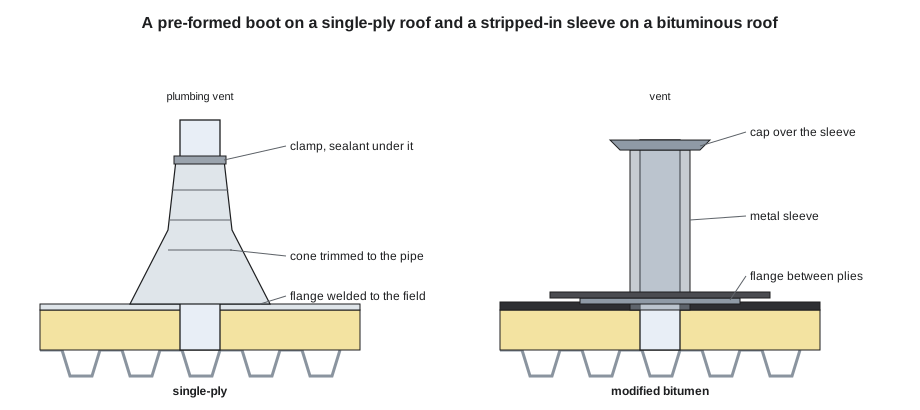
On single-ply roofs, the usual flashing for a round pipe is a pre-molded boot made of the same polymer as the membrane: a cone with stepped rings that are trimmed to the pipe size, a flange that is welded or adhered to the field, and a stainless steel clamp at the top with sealant under it. Boots are quick and reliable, but each size fits only a range of pipe diameters, and they cannot be used on pipes that are not round, are too close to something else, or are hot. Where a boot will not fit, the flashing is field-wrapped: an uncured or unreinforced flashing sheet is wrapped around the pipe and welded or adhered, a target or flange piece is set around its base, and a clamp holds the top.
On modified bitumen and built-up roofs, pipes are usually flashed with a metal sleeve or flange, primed and stripped into the membrane with plies above and below the flange, with a cap or umbrella over the top of the sleeve. Lead, copper or stainless sleeves turned down into the top of a vent pipe are traditional for plumbing vents, and some codes and specifications still call for them. Pre-molded EPDM boots are also made for bituminous roofs.
Worked problem
Choosing boot sizes
At Alum Creek Freight, Crew 3 had 9 vents of 3 in, 6 vents of 4 in, 4 gas pipes of 2 in and 3 conduits of 6 in to flash. The pre-molded boots in the truck come in two sizes: a small boot that fits pipes from 1 to 4 in and a large boot that fits 4 to 8 in. Every pipe must be at least 12 in from any other pipe, wall or curb so a boot can be fitted. How many of each boot are needed, and what should be done if two 3 in vents are 9 in apart?
Show solution
- Small boots: 9 vents of 3 in + 4 gas pipes of 2 in = 13; the 4 in vents are at the top of the small range and the bottom of the large one.
- Use large boots on the 6 vents of 4 in, so the cone is trimmed on a ring rather than at its very end: 6 large boots.
- Large boots for the 3 conduits of 6 in: 3 more, total 9 large.
- The two vents 9 in apart are closer than 12 in: two boot flanges would overlap.
Answer: 13 small boots and 9 large boots. For the close pair, the best fix is for the plumber to join the two vents below the roof into one pipe through the roof. If that cannot be done, they are flashed together in a field-built penetration pocket or a small curb with a cover, never with two overlapping boots.
Hot stacks
Exhaust stacks from boilers, furnaces, ovens and generators can be far too hot for any membrane. Single-ply and bituminous membranes soften, shrink or char at temperatures that flue pipes reach easily. A hot stack is never flashed directly. Instead it passes through an insulated metal sleeve or a curb with a gap around the stack, and the membrane is flashed to the cool sleeve. The stack maker's listing sets the clearance to combustibles and often supplies the roof sleeve and storm collar. A storm collar, a metal band clamped to the stack above the sleeve, sheds rain off the stack and over the top of the sleeve while leaving an air space so the sleeve stays cool.
At Ferncliff, the oven stacks and makeup air units were the reason the crew used cold-applied materials and no torch near them (ROOF-210). They are also a flashing problem. Two of the oven stacks had been flashed years before with a sheet metal collar sealed straight to the hot pipe, and the sealant had cooked and cracked. The repair crew left them alone that week because they were outside the repair area, but Glen put them in the report: new insulated sleeves and storm collars to be installed by the oven maker's service company, with Ridgecap flashing the sleeves.
Pitch pans: the last resort
A pitch pan, also called a pitch pocket, is an open metal box set around a penetration, flashed into the roof, and filled with a pourable sealer. Pitch pans were once the standard answer for anything awkward: steel posts, angle iron, clusters of conduit, guy wires. They are still found on many roofs. But the filler shrinks, cracks and pulls away from the penetration as it ages and as the penetration moves, water then sits in the gap inside the pan, and the pan needs topping up regularly. Most membrane makers and roofing manuals treat pitch pans as a last resort, to be used only where nothing else will work, and many warranties exclude them or require them to be inspected and topped up every year.
- Use a curb, a pre-molded boot or a field-wrapped flashing instead whenever possible.
- If a pan must be used, size it to give at least 2 in of filler all round the penetration, set it on the membrane and strip in its flange, fill it with the pourable sealer the maker specifies, and crown the top so water runs off.
- Clean and prime steel penetrations so the filler bonds, and use a non-shrink grout or the maker's base filler in the bottom of deep pans.
- Put the pan on the maintenance list for inspection and topping up.
Worked problem
Filling a pitch pan
A steel sign post 4 in square needs a pitch pan that gives 2 in of filler all round. The pan is 4 in deep. The bottom 2-1/2 in will be filled with non-shrink grout and the top 1-1/2 in with pourable sealer, crowned an extra 1/2 in in the middle. How big is the pan, and how much sealer is needed?
Show solution
- Pan inside size = 4 + 2 × 2 = 8 in square.
- Area of filler in plan = 8 × 8 − 4 × 4 = 64 − 16 = 48 in².
- Sealer layer = 48 × 1.5 = 72 in³.
- Crown, roughly half the area times the crown height: 48 × 0.5 ÷ 2 = 12 in³. Total 84 in³, about 0.36 gal (231 in³ per gallon).
Answer: An 8 in pan and about 0.4 gal of sealer, so one half-gallon kit. Theo told Rory the better answer was to ask the sign company whether the post could be moved to the parapet, where it would not penetrate the roof at all.
Room around penetrations
A flashing needs space to be built. Pipes that come up too close to each other, to a wall, to a curb or to a drain cannot be flashed properly, however good the roofer. Common guidance is to keep penetrations at least 12 in apart, and at least that far from walls, curbs and edges, with more for large pipes and pitch pans. Drawings often show pipes in plan without their flashing, and the plumber and electrician route them wherever is easiest below the deck. Ridgecap's foreperson checks every penetration location before the trades cut the deck, if the schedule allows it, and marks the problems on the plan.
Clusters of conduit or piping are best brought through the roof in a single penetration housing, a prefabricated box or small curb with a sloped cap and gasketed boots for each pipe, or through the side of a curb. That replaces many small flashings with one large one that can be built properly and inspected.
Moving penetrations: posts, supports and anchors
Steel posts for screens, signs and dunnage are tied to the structure and move with it, while the roof membrane moves with the insulation. A tight flashing around a post will be torn as the two move. Better details bring the post up through a curb with a sloped metal hood or cap fastened to the post and lapping down over the curb flashing, so the post can move inside the hood. Fall arrest anchors and davits come with their own flashing kits from the anchor maker, which must be installed exactly as the kit says, and the anchor must be inspected and certified as part of the fall protection program.
- Use a curb and a hood for posts that move or carry loads.
- Use the anchor maker's flashing kit and installation instructions for every roof anchor.
- Never fasten a pipe support, sign or antenna through the membrane without a designed and flashed penetration.
Penetrations on a re-roof
When a re-roof adds insulation, every penetration gets shorter. A plumbing vent that stood 12 in above the old roof may stand only 5 in above the new one, too short for a boot to reach full height with its clamp, and perhaps shorter than the plumbing code allows. The roofer does not cut or extend plumbing, gas or electrical lines. Before the job, the foreperson lists every penetration with its height above the planned new surface, and the owner or general contractor has the right trade extend the short ones. At Redhill, the plumber came on the second week and extended five vents with couplings and new pipe before Crew 3 reached them.
In cold climates, plumbing vents also have to be kept from closing with frost. Moist air rising through a small vent freezes on the cold pipe above the roof, and a vent can close completely in a hard winter. Plumbing codes in cold regions deal with this in their own way, often by increasing the vent size where it passes through the roof or by limiting how far it extends; the plumber knows the local rule. The roofer's part is to leave the pipe size and height as the plumber set them, and to flash the enlarged pipe with the right boot.
- List every penetration and its new height before the job starts.
- Have the plumber, gas fitter or electrician extend short pipes; do not extend them yourself.
- Check that each pipe is plumb, solid and not loose in the deck before flashing it.
- Seal the air barrier to each pipe where it passes through the deck.
Common mistakes
MistakeFlashing a hot stack directly with membrane or sealant.
InsteadUse an insulated sleeve or curb, with a storm collar on the stack and an air space.
MistakeUsing a pitch pan because it is quick.
InsteadUse a boot, a field-wrapped flashing or a curb; keep pitch pans as a last resort.
MistakeOverlapping two boots on pipes that are too close.
InsteadHave the pipes combined or moved, or flash them together in a penetration housing.
MistakeFlashing a post tight so it cannot move.
InsteadBring it through a curb with a hood fastened to the post.
MistakeRemoving an unknown pipe without asking.
InsteadFind out what it is from the owner and the trades before touching it.
Summary and key terms
- Penetrations include plumbing vents, hot stacks, gas lines, conduits, posts, anchors and abandoned pipes.
- Pre-molded boots are the usual flashing for round pipes on single-ply roofs; field-wrapped flashings and stripped-in metal sleeves are used elsewhere.
- Hot stacks pass through an insulated sleeve or curb with a storm collar and an air space, never flashed directly.
- Pitch pans shrink and crack; use them only as a last resort, sized for at least 2 in of filler, crowned and maintained.
- Penetrations commonly need at least 12 in from each other and from walls, curbs and edges.
- Clusters go through a penetration housing; moving posts go through a curb with a hood.
- Penetration
- Anything that passes through the roof deck and membrane.
- Pre-molded boot
- A factory-made cone of membrane material, trimmed to fit a pipe and clamped at the top.
- Field-wrapped flashing
- A pipe flashing made on site by wrapping flashing membrane around the pipe.
- Storm collar
- A metal band clamped to a stack above its roof sleeve to shed water over the sleeve.
- Pitch pan
- An open metal box around a penetration, filled with pourable sealer.
- Penetration housing
- A prefabricated box or small curb that brings several pipes or conduits through the roof together.
- Hood
- A metal cap fastened to a post that laps over a curb flashing and lets the post move.
Practice problems
Work each problem on paper first, then reveal the answer to check.
Why can a hot flue not be flashed directly?
Show answer
The heat softens, shrinks or chars the membrane and cooks the sealant.
A pitch pan around a 3 in post needs 2 in of filler all round. What size is the pan?
Show answer
3 + 2 × 2 = 7 in square.
What is the usual minimum spacing between penetrations?
Show answer
About 12 in.
How should a cluster of conduits come through the roof?
Show answer
Through a penetration housing or the side of a curb.
What sheds rain off a hot stack over its sleeve?
Show answer
A storm collar.
Lesson quiz · 5 questions
Score 60% or more to complete this lesson.
Create a free account to save your progress, take quizzes and earn a certificate.