
ROOF-320 · Lesson 2 of 12 · 23 min
Perimeter edges and parapets
▶ Video coming soon A video version of this lesson is on the way.
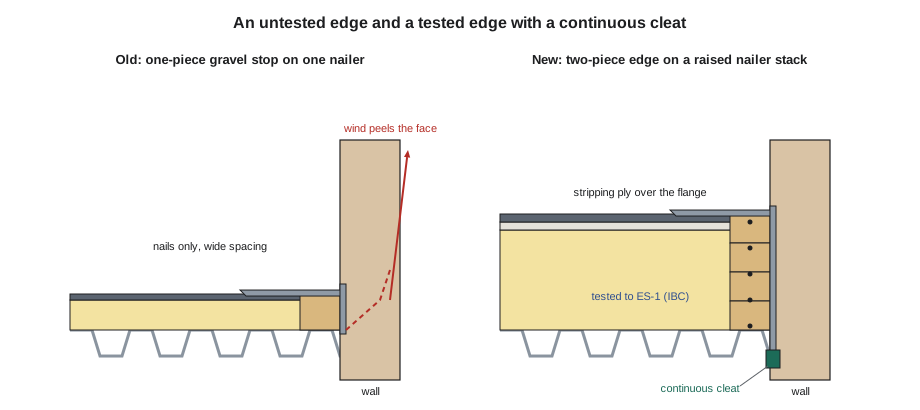
At the second session, on a Thursday evening, Theo had two pieces of edge on the bench. One was a length of the old Northgate fascia, bent gravel stop with a face of about 4 in, nailed to the wood blocking every 16 in and nothing else. The other was a sample of the tested edge system Martin had drawn for the Northgate re-roof: a continuous galvanized cleat, a deeper fascia that hooked over it, and a top flange set in the membrane and stripped in. Theo put a pair of locking pliers on the old fascia's face and pulled. It peeled off the blocking with one hand. Then he tried the new one. It did not move. "In April the wind did what I just did," he said, "and then it peeled the membrane back from the corner like a sardine can."
This lesson covers the edge of a low-slope roof: metal edges and gravel stops, the wood nailers under them, how edges are tested and attached to resist wind, low and high parapets, copings, and how the membrane, air barrier and metal work together at the perimeter. Steep-slope eaves and rakes were covered in ROOF-130 and ROOF-230.
Why the edge is the most important detail
Wind does not press evenly on a roof. As it flows over the edge of a building, it separates and forms swirling vortices that suck upward hardest along the perimeter and harder still at the corners. Wind design methods divide the roof into a field, a perimeter zone and corner zones, and the design uplift in a corner can be two or three times the field value. The edge metal sits right at the start of that zone. If it lets go, the membrane behind it is exposed to the full force of the wind along a free edge, and a roof that would have held in the field can peel back from the edge in minutes.
That is why the edge is often called the most important detail on a low-slope roof, and why building codes treat it separately from the roof covering. A wind-damage survey after almost any major storm finds the same thing: roofs that failed began at the edge.
Types of roof edge
- Gravel stop: a metal edge with a raised lip that holds loose gravel or ballast on the roof. The lip also helps keep water from running over the edge on a dead-level roof. Used with built-up roofs and ballasted roofs.
- Fascia edge or drip edge: a metal edge with a flange on the roof, a vertical face over the wall or blocking, and a drip at the bottom that throws water clear of the wall.
- Two-piece edge with a cleat: a continuous cleat fastened along the bottom of the blocking, with the fascia hooked over it, so the bottom of the face cannot be lifted by the wind. Most tested edge systems work this way.
- Extruded or snap-on edge: a factory-made extrusion fastened to the blocking, with a separate cover that snaps on. Often used where high wind ratings are needed.
- Edge with gutter: the edge flange combined with, or hung from, a gutter. Gutters are treated differently from edge metal in the wind test rules.
- Single-ply membrane-clad edge: metal coated at the factory with the same polymer as a TPO or PVC membrane, so the membrane can be welded straight to it.
Testing and wind resistance
The International Building Code requires metal edge systems on low-slope membrane roofs, except gutters, to be designed for the building's wind loads and tested to the ANSI/SPRI/FM 4435/ES-1 standard, written by SPRI, the single-ply roofing industry's technical body, together with FM Approvals. ES-1 has three tests:
- RE-1 tests how well the edge holds the membrane: the membrane is pulled at an angle from the edge, the way it would be pulled by a billowing mechanically attached or ballasted sheet, until it comes free.
- RE-2 tests how well the fascia stays on: the face of the edge is pulled outward until it disengages or deforms.
- RE-3 tests copings: up and out forces are applied together to a coping until it lets go.
The tested resistance must meet or exceed the design pressure for that location on that building, which the designer calculates from the wind speed, the building's height, exposure, and importance. FM Approvals tests edges the same way for its approved systems. Ridgecap's rule for every low-slope job is that edge metal comes from a tested system, with the test report in the job file, unless the drawings give a custom edge with an engineer's calculation.
Ohio has adopted the International Building Code, so the ES-1 requirement applies to Ridgecap's commercial work in Columbus. For houses under the Residential Code of Ohio, drip edge rules from ROOF-130 apply instead.
Wood nailers and blocking
Most metal edges are fastened to wood nailers, also called blocking, fastened to the deck or the wall. The nailer gives the metal and the membrane something solid to hold onto, brings the edge up to the height of the insulation so the membrane can run flat to it, and resists the wind load. A weak nailer makes even the best edge metal useless.
- Use preservative-treated or naturally durable lumber where codes or the maker require it, and fasteners compatible with treated wood; some preservatives corrode plain steel and aluminum quickly.
- Fasten the bottom nailer to the deck or wall, and each nailer above to the one below, with a pattern that meets the edge system's tested or calculated load. Corners and perimeters usually need closer spacing.
- Stagger the joints in each layer so they do not line up, and keep the top of the nailer stack level with the top of the insulation and cover board.
- Do not shim a short nailer up with insulation scraps; the fascia needs solid wood behind every fastener.
Worked problem
Building a nailer stack to match new insulation
At the north edge of Northgate, the new roof will be 10-3/4 in thick from the deck to the top of the cover board, and the existing nailer is a single 2 × 6 laid flat, 1-1/2 in thick. The new edge needs solid wood to the top of the cover board. How many more layers of 2× lumber are needed, and what gap, if any, is left?
Show solution
- Wood still needed = 10.75 − 1.5 = 9.25 in.
- Layers of 1-1/2 in: 9.25 ÷ 1.5 = 6.17, so 6 layers give 9 in and leave 1/4 in.
- New stack = 7 × 1.5 = 10.5 in, 1/4 in below the cover board.
- Make up the 1/4 in with a strip of plywood fastened to the top layer, not with insulation, or rip the top board to suit.
Answer: Six more layers plus a 1/4 in plywood strip, giving a solid 10-3/4 in stack that matches the roof.
Parapets
A parapet is a wall that rises above the roof at the perimeter. Low parapets, up to roughly 18 in, are common on commercial buildings and are usually flashed with membrane up the inside, over the top and down the outside under a coping. High parapets, often a meter or more, are flashed partway up the inside face, with the wall above protected as a wall, by masonry with a through-wall flashing, by cladding, or by an air barrier and siding.
Parapets protect workers, hide equipment and give a place to terminate the membrane above water, but they also cause problems. They trap snow and water at the edge, they need drainage through scuppers or drains, they are exposed to weather on three sides so they get very wet and very cold, and they are on a different structure from the roof, so they move differently. Ashgrove Plaza's front parapet, only 12 in high, was a good example: it was too low to get a full base flashing up the inside face after the new insulation went on, so Ridgecap ran the membrane over the top and down the outside face under the new coping.
- Flash the inside face with membrane to the height the maker requires, and preferably over the top of a low parapet.
- Keep the air barrier continuous up the inside face and over the top, tied to the wall air barrier (ROOF-310 lesson 5).
- Provide a cant or a reinforced corner where the membrane system needs one, so the base flashing is not bridging an open corner. Bridging was what tore at Parkdale Arena.
- Watch out for wood parapets on steel buildings: the wood shrinks and the steel moves, and fasteners pull out unless the flashing is free to slide.
Copings
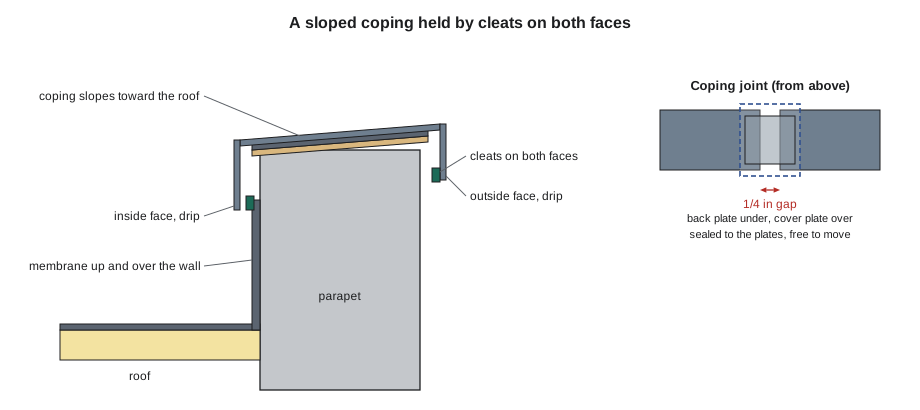
A coping is the cap on top of a parapet. Its jobs are to shed water off the top of the wall, protect the membrane and air barrier underneath, and resist wind. A good coping:
- Slopes toward the roof, so dirty water from the top of the wall runs onto the roof and not down the face of the building. A slope of about 1 in 8 is common in practice.
- Is at least as wide as the wall, with faces that lap down over the top of the wall on both sides, usually by at least 2 to 4 in, with drips at the bottom of each face.
- Is held by continuous cleats on both faces or by anchor clips with a cleat on the outside face, so the wind cannot lift either face.
- Has joints that allow the lengths to expand and contract, with a cover plate or back plate under each joint and sealant set so the metal can still move.
- Sits on a waterproof layer of membrane or self-adhered underlayment, so water that gets past a joint does not enter the wall.
Worked problem
Laying out copings
The east parapet at Parkdale Arena is 100 ft long. Theo will make the new coping in 10 ft lengths with a 1/4 in gap at each joint to allow movement, and 6 in wide joint cover plates. How many lengths and joints are there, and how long is the last piece?
Show solution
- Try 10 lengths: 10 × 10 ft = 100 ft, plus 9 gaps × 1/4 in = 2-1/4 in, which is 2-1/4 in too long.
- So use 9 full lengths and one short piece: 9 × 10 ft + 9 × 1/4 in = 90 ft 2-1/4 in.
- Last piece = 100 ft − 90 ft 2-1/4 in = 9 ft 9-3/4 in.
- Joints = 9, so 9 cover plates and 9 back plates.
Answer: Nine 10 ft lengths, one 9 ft 9-3/4 in length and nine covered joints. Theo puts the short piece in the middle of the run, not at a corner, because corners are fabricated as one piece with legs.
Corners, ends and transitions
The corners of a parapet or edge are the places with the highest wind load and the most complicated sheet metal. Theo fabricates outside and inside corners as single pieces with legs of at least 12 in each way, mitered and soldered or riveted and sealed, so the joint nearest the corner is out in the run where it can move. Where a parapet ends at a lower roof or a metal edge, an end dam or a closure piece is needed to stop water running off the end of the coping into the wall. Where a parapet meets a taller wall, as at a stair tower, the coping must turn up and be counterflashed by the wall above.
Corners are also where the membrane is most at risk. The inside corner of a parapet takes a pre-molded or field-built corner with no bridging; the outside corner of a curb or parapet takes a reinforced patch that is not stretched. Corso's split curb corner and Parkdale's torn inside corner both started with a membrane that was asked to bridge or stretch.
Common mistakes
MistakeNailing a one-piece fascia to a single nailer and calling it done.
InsteadUse a tested edge system with a continuous cleat, fastened at the tested spacing.
MistakeShimming a short nailer with insulation scraps.
InsteadBuild the nailer stack of solid wood to the top of the cover board.
MistakeSloping the coping toward the outside face.
InsteadSlope it toward the roof so dirty water runs onto the roof.
MistakeSealing coping joints tight with no gap.
InsteadLeave a movement gap with back and cover plates; seal so the metal can still slide.
MistakeFastening corners like the field.
InsteadIncrease nailer and edge fastening in perimeter and corner zones as the tested system or design requires.
Summary and key terms
- Wind uplift is highest at the perimeter and corners, so the edge is the most important low-slope detail.
- Edges include gravel stops, fascia and drip edges, two-piece cleated edges, extruded edges and membrane-clad metal.
- US building codes require edge systems, except gutters, to be tested to ES-1 (RE-1, RE-2 and RE-3); many Canadian designs call for the same tests.
- Solid, well-fastened wood nailers built up to the top of the insulation are what the edge holds onto.
- Parapets need flashing up the inside face, a continuous air barrier and a coping that slopes inward, is held by cleats and has movement joints.
- Corners and ends need one-piece fabrications, end dams and membrane corners that do not bridge or stretch.
- Gravel stop
- A metal roof edge with a raised lip that holds gravel or ballast on the roof.
- Fascia
- The vertical face of a metal edge, covering the top of the wall or blocking.
- Cleat
- A continuous strip of metal fastened to the structure that a fascia or coping hooks onto.
- Nailer
- Wood blocking fastened to the deck or wall that edge metal and membrane are fastened to.
- Parapet
- A wall that rises above the roof at its edge.
- Coping
- The metal or masonry cap on top of a parapet.
- ES-1
- The ANSI/SPRI/FM 4435/ES-1 test standard for low-slope roof edge systems.
- End dam
- A closure at the end of a coping or flashing that keeps water from running off the end into the wall.
Practice problems
Work each problem on paper first, then reveal the answer to check.
Where is wind uplift highest on a low-slope roof?
Show answer
At the corners, then along the perimeter.
What do the three ES-1 tests check?
Show answer
RE-1 the membrane hold at the edge, RE-2 the fascia, RE-3 the coping.
A new roof is 7-1/2 in thick and the existing nailer is 1-1/2 in. How many 1-1/2 in layers are needed?
Show answer
(7.5 − 1.5) ÷ 1.5 = 4 more layers.
Which way should a coping slope?
Show answer
Toward the roof.
Why are corners fabricated in one piece with long legs?
Show answer
So joints are away from the highest wind load and the corner can be sealed in the shop.
Lesson quiz · 5 questions
Score 60% or more to complete this lesson.
Create a free account to save your progress, take quizzes and earn a certificate.