
ROOF-320 · Lesson 10 of 12 · 23 min
Sealants and their limits
▶ Video coming soon A video version of this lesson is on the way.
Theo keeps a shelf in the shop that he calls the museum. On it are the sealant tubes that Ridgecap crews have taken off their trucks over the years, each one labeled with a strip of tape: a hardware-store acrylic that turned to powder on a coping joint in two summers, a silicone that would not stick to the paint on a prefinished counterflashing, a can of asphalt roof cement that had been troweled onto a white TPO pipe boot and left a brown stain that never came off, and a polyurethane that had been run into a joint so thin and wide that it tore down the middle the first winter. "Sealant is the most useful thing on the truck," Theo told the apprentices on the Thursday evening after the Eastport leak, "and the most abused. It is a maintenance item. If your detail only works while the sealant is perfect, you've built a detail that will leak."
This lesson covers the sealants and mastics used on roofs: the main types and what they stick to, how sealants are rated for movement, how a sealant joint should be shaped and backed, surface preparation, weather limits, and the jobs sealant should and should not be asked to do.
What sealant is for
A sealant is a material applied as a paste that cures to a flexible solid and closes a joint between two surfaces. On a roof it has a few proper jobs: sealing the top edge of a termination bar or surface-mounted counterflashing, sealing under a pipe boot clamp, closing the joints in a coping cover plate, sealing reglets and the laps in metal flashings, and sealing around fasteners and small gaps. In almost all of these, the sealant is a second line of defense behind a lap, a cover, or a counterflashing that already sheds water by gravity.
What sealant should not do is be the only thing between the rain and the building on a hidden or important joint, bridge a gap that is moving more than it can stretch, or replace a flashing that is missing. A bead of caulking round a chimney with no counterflashing, or along the top of a base flashing with nothing over it, will leak as soon as the sealant ages, cracks or loses its bond, which on a roof can take only a few years.
Kinds of sealant and mastic
| Type | Strengths | Weaknesses and cautions |
|---|---|---|
| Silicone | Excellent UV and temperature resistance, very flexible, long life | Cannot be painted; some do not stick to some paints or membranes; nothing sticks to old silicone |
| Polyurethane | Tough, sticks to many surfaces, paintable | Some types lose life in strong UV; cure is affected by moisture and cold |
| Hybrid (silyl-terminated polyether, STPE or MS polymer) | Sticks to many surfaces including damp ones, paintable, low odor | Check compatibility with the membrane |
| Butyl | Stays soft and tacky; good in laps and under clamps | Poor in exposed joints; low movement; can be dirty |
| Polysulfide | Good chemical and fuel resistance | Less common now on roofs |
| Asphalt roof cement and mastic | Cheap, sticks to bituminous roofs, useful for temporary repairs | Hardens and cracks; must never be used on TPO, PVC or EPDM |
| Membrane maker's sealants and lap sealants | Matched to that membrane and its warranty | Use only with that system |
| Acrylic latex | Cheap, paintable, easy | Low movement, poor outdoors on roofs; avoid |
The membrane maker's list comes first. TPO, PVC and EPDM each have sealants and lap sealants approved for use with them, and using anything else can void the warranty and fail quickly. Asphalt products in particular damage single-ply membranes, and solvents in some sealants soften PVC. On metal, the paint finish matters: some silicones do not bond to some prefinished coatings, and the metal maker or the sealant maker should confirm compatibility.
Movement ratings
Sealants used in building joints in North America are commonly specified to ASTM C920, the standard for elastomeric joint sealants, which Canadian specifications also reference widely. It classifies sealants by:
- Type: single-component (cures from the air) or multi-component (mixed before use).
- Grade: pourable, for horizontal joints, or non-sag, for vertical and overhead joints.
- Class: how much the sealant can stretch and compress, as a share of the joint width, in a standard test. A Class 25 sealant can move plus or minus 25 in 100 of the joint width; Class 50 plus or minus 50 in 100; there are also Classes 12-1/2, 35 and 100/50.
- Use: the surfaces it was tested on and whether it suits joints with foot traffic or that are always wet.
The class is the key to joint design. A sealant joint must be wide enough that the expected movement is no more than the sealant's rated share of the width. A narrow joint in a moving flashing will tear even with a very good sealant.
Worked problem
How wide must the joint be?
A sealant joint between two aluminum flashings must take a total movement of 3/16 in, from the widest to the narrowest. The sealant is Class 25, rated for plus or minus 25 in 100. How wide must the joint be? What if a Class 50 sealant is used?
Show solution
- A Class 25 sealant can move 25 in 100 each way, so a total range of 50 in 100 of the joint width.
- Width needed = 0.1875 ÷ 0.50 = 0.375 in = 3/8 in.
- A Class 50 sealant can move 50 in 100 each way, a total range of 100 in 100.
- Width needed = 0.1875 ÷ 1.00 = 3/16 in; round up to at least 1/4 in, the practical minimum for a tooled joint.
Answer: At least 3/8 in with Class 25, or 1/4 in with Class 50. Designers add a margin for installation tolerance, so Theo would make it 1/2 in with Class 25. An 1/8 in joint would fail in its first winter.
The shape of a good joint
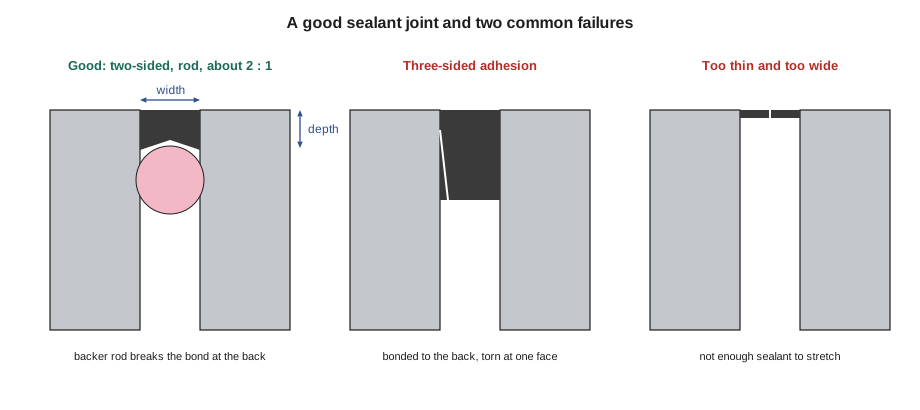
A sealant joint works like a rubber band stretched between two faces. It should stick to the two sides of the joint and nothing else, and it should be thinner in the middle than at the edges, so that when it stretches, the strain is spread through the sealant instead of tearing it off the faces.
- Two-sided adhesion: the sealant bonds to the two faces only. If it also bonds to the back of the joint, three-sided adhesion, it cannot stretch freely and it tears.
- Backer rod: a round, compressible foam rod pushed into the joint to set the depth of the sealant and act as a bond breaker at the back. Closed-cell rod is common; it is sized larger than the joint, typically about 25 to 50 in 100 wider, so it stays put. Do not puncture closed-cell rod, or it can outgas and blister the sealant.
- Bond breaker tape: a plastic tape at the back of a joint too shallow for a rod.
- Width-to-depth ratio: for most joints, the sealant should be about half as deep as it is wide, a 2 to 1 ratio, with a minimum depth of about 1/4 in and a maximum of about 1/2 in. Joint guides from federal facility and sealant maker sources give the same ratio.
- Tooling: the sealant is pressed into the joint and tooled to a slightly concave surface, which forces it against the faces and gives the hourglass shape.
Worked problem
Backer rod and sealant for a joint
A joint is 1/2 in wide and 100 ft long. The sealant is to be half as deep as the joint is wide, over a closed-cell backer rod sized about 25 in 100 larger than the joint. What rod diameter is needed, and how many 10.1 fl oz cartridges of sealant (about 18.2 in³ each)? Allow 10 in 100 extra for waste.
Show solution
- Sealant depth = 1/2 ÷ 2 = 1/4 in.
- Rod diameter = 0.5 × 1.25 = 0.625 in, so 5/8 in rod.
- Sealant volume = 0.5 × 0.25 × 1,200 = 150 in³.
- With waste: 150 × 1.10 = 165 in³. Cartridges = 165 ÷ 18.2 = 9.1, so 10 cartridges.
Answer: 5/8 in rod and 10 cartridges. A concave tooled joint uses a little less, but the allowance covers the ends and the tool.
Surface preparation and weather
Most sealant failures are bond failures: the sealant comes away from one face. Bond depends on what the face is and how it was prepared.
- Clean and dry: remove dust, oil, old sealant, loose paint, rust and the protective film on prefinished metal. Wipe metal with the solvent the sealant maker recommends, using the two-cloth method: wipe wet with one cloth and dry with a second before the solvent evaporates.
- Prime where required: porous surfaces such as concrete and masonry, and some metals and membranes, need the sealant maker's primer.
- Mind the temperature: most sealants have a minimum application temperature, often about 40 °F, and some need the surface to be above the dew point so there is no frost or condensation on it.
- Do not install sealant in a joint at its widest or narrowest: if possible, seal when the joint is near the middle of its range, in mild weather.
- Give it time: sealants cure from the surface inward. A joint stressed or wetted before it cures can fail.
November is a hard month for sealant on roofs in Columbus. Mornings are often below the minimum temperature, metal is wet with dew until late morning, and the days are short. Dana's rule is that sealant work is done in the warmest hours, on dry, wiped surfaces, with a surface thermometer reading taken and written on the daily report.
Sealant as maintenance
Even good sealant in a well-designed joint does not last as long as the roof. Exposed sealant on a roof is typically expected to need inspection every year and renewal some years after installation, and maker warranties often exclude sealant joints or treat them as the owner's maintenance. The roof's maintenance plan should list every exposed sealant joint, and the detail should put them where they can be reached and renewed. ROOF-330 covers maintenance programs.
When an old joint is renewed, all of the old sealant is cut out, the faces are cleaned back to sound material, and the joint is rebuilt with rod and new sealant. Smearing new sealant over old, especially over silicone, gives a joint that looks good for a month.
Theo's museum, labeled
By the end of the evening each apprentice had written a label for one tube on the shelf. Rory took the polyurethane that had torn down the middle. His label read: "Joint 1/8 in wide, metal moving about 3/16 in a year, no rod, sealant 3/8 in deep. Too narrow, too deep, three-sided. Should have been a cover plate." Theo initialed it and put it back on the shelf.
Tapes and preformed sealants
Not every seal comes out of a cartridge. Butyl and other sealant tapes, supplied on rolls in set widths and thicknesses, are laid in the laps of metal flashings, under the flanges of pipe boots and penetration housings, and in the joints of coping back plates before the cover plate goes on. A tape gives a seal of known thickness that does not depend on how steady the installer's hand is, it stays soft for years because it is protected inside the lap, and it does not drip or slump in the heat. Preformed expanding foam tapes, impregnated with a sealant, are used in the joints between metal panels and at wall transitions where a joint must stay sealed as it opens and closes.
Tapes have their own rules. They must go on clean, dry metal, be pressed down firmly along their whole length, and be fully covered by the lap or plate so the sun cannot reach them. They are not a substitute for an exposed sealant joint and should not be left exposed.
Reading the label
Before using any sealant, read the cartridge and the maker's data sheet for five things: the movement class, the surfaces it is approved for and any primer needed, the minimum and maximum application temperatures, the cure time before it can get wet or move, and its compatibility with the roof membrane. If any of those is missing or does not suit the job, it is the wrong tube.
Common mistakes
MistakeUsing sealant in place of a flashing or counterflashing.
InsteadShed water with laps and covers; use sealant as a second line of defense.
MistakeUsing asphalt roof cement on a TPO, PVC or EPDM roof.
InsteadUse only the membrane maker's approved sealants.
MistakeRunning sealant into a narrow joint that moves.
InsteadMake the joint wide enough for the movement and the sealant's class.
MistakeFilling a joint full depth with no backer rod.
InsteadUse backer rod or bond breaker so the sealant sticks to two faces only.
MistakeSealing over old sealant on a cold, damp morning.
InsteadCut out the old sealant, clean, prime if needed, and seal on a dry surface above the minimum temperature.
Summary and key terms
- Sealant closes joints as a second line of defense; it should not replace laps, covers or flashings.
- Silicone, polyurethane, hybrid, butyl, polysulfide and asphalt mastics differ in bond, life and compatibility; the membrane maker's list comes first.
- ASTM C920 rates sealants by type, grade, movement class and use; the joint must be wide enough for the movement and the class.
- A good joint has two-sided adhesion, a backer rod or bond breaker, about a 2 to 1 width-to-depth ratio and a concave tooled surface.
- Most failures are bond failures from dirty, wet, cold or unprimed surfaces.
- Exposed sealant is maintenance: list it, inspect it and renew it by cutting out the old.
- Sealant
- A paste that cures to a flexible solid to close a joint between two surfaces.
- Movement class
- The share of the joint width a sealant can stretch and compress in a standard test.
- Backer rod
- A compressible foam rod that sets sealant depth and stops it bonding to the back of the joint.
- Three-sided adhesion
- A sealant bonded to the back of a joint as well as its sides, so it cannot stretch freely.
- Bond breaker
- A tape or material that stops sealant sticking where it should not.
- Tooling
- Pressing and shaping fresh sealant with a tool so it fills the joint and has a concave surface.
- Primer
- A liquid applied to a surface before sealant to improve its bond.
Practice problems
Work each problem on paper first, then reveal the answer to check.
Which sealant type should never be used on an EPDM or TPO roof?
Show answer
Asphalt roof cement or mastic.
A joint must take 1/4 in of total movement with a Class 50 sealant. How wide must it be?
Show answer
1/4 ÷ 1.00 = 1/4 in.
What width-to-depth ratio is usual for a sealant joint?
Show answer
About 2 to 1.
Why is backer rod used?
Show answer
To set the sealant depth and stop three-sided adhesion.
What is the two-cloth method?
Show answer
Wipe with solvent on one cloth and dry with a second before the solvent evaporates.
Lesson quiz · 5 questions
Score 60% or more to complete this lesson.
Create a free account to save your progress, take quizzes and earn a certificate.