
ROOF-320 · Lesson 3 of 12 · 23 min
Base and counter flashing
▶ Video coming soon A video version of this lesson is on the way.
Rory had built a lot of base flashing by November, but he had never taken one apart to see why it failed. At Carrick Street on the Monday of the tear-off, Dana had him cut out a section of the old north parapet flashing before it went in the bin and lay it on a sheet of plywood. The old smooth APP sheet had been run up the parapet with no cant, folded into the right-angle corner and torched to the wall. Its top edge had never been fastened. Over thirty summers it had slumped, pulled away from the brick and opened a gap behind the old metal coping, and every driving rain from the northwest had run down the inside of the parapet. "It was never held at the top, never supported at the bottom, and the coping above it was too short to cover the gap once it sagged," Dana said. "Three things. Take a picture."
This lesson covers the two layers that protect almost every place where a roof meets a vertical surface. The base flashing is the roofing that turns up the wall, curb or parapet. The counterflashing laps down over its top and keeps water off it. The lesson explains how high and how far each layer must go, how base flashings are supported, reinforced and fastened, the main kinds of counterflashing, and how the two layers allow the wall and the roof to move independently.
What a base flashing must do
A base flashing is the waterproof seal at the bottom of a wall. It has to stay attached to the wall at the top, stay attached to the roof at the bottom, keep its shape in the corner where the two meet, and rise above any water that can stand on the roof. Because it is vertical, it gets more sun and heat than the field, and on a parapet it is exposed to the weather from the inside face. On most modern roofs it is made from the same membrane family as the field: modified bitumen sheets on a modified bitumen roof, a heavier or reinforced sheet on a single-ply roof, or a coated fabric for liquid-applied flashings.
| Requirement | Typical value or rule | Why |
|---|---|---|
| Height above finished roof | At least 8 in; more where snow drifts or water can back up | Stay above ponds, slush and splashing |
| Lap onto the field | At least 3 to 6 in, as the maker specifies | Room for a sound seam to the field membrane |
| Top termination | Mechanically fastened, then counterflashed | Stops slumping and peeling |
| Corner support | Cant strip for built-up and modified bitumen; no bridging for single-ply | Stops cracking and tearing at the corner |
| Vertical laps | Shingled or welded at the maker's width | Continuous seal along the wall |
| Inside and outside corners | Pre-molded pieces or reinforced patches | Corners are where most flashings split |
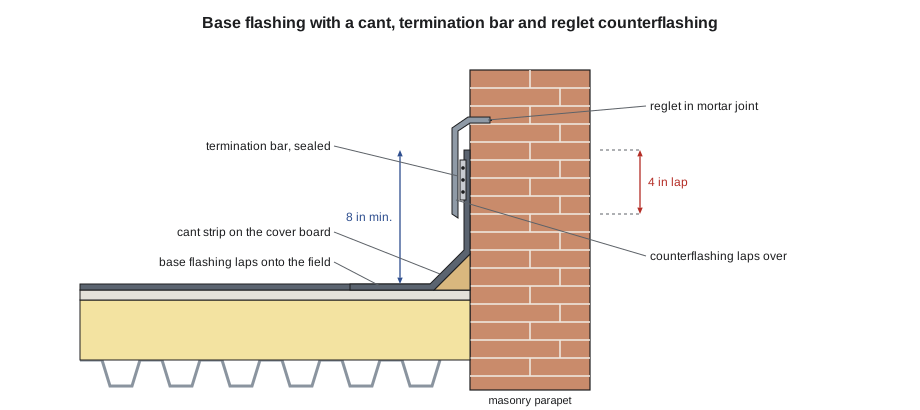
The commonly quoted minimum height, about 8 in above the finished roof, appears in Canadian roofing association guidance and in most maker and US industry detail manuals. It is measured from the top of the finished roof surface next to the wall, not from the deck. On a tapered roof that means the flashing height must be checked at the highest point along the wall, where the roof surface is closest to the top of the parapet, not where it is lowest.
Worked problem
Is the parapet high enough after a re-roof?
Glen is pricing a re-roof option for the Parkdale Arena wing. The east parapet is 12 in above the existing membrane surface. The option adds 5 in of new insulation, cover board and membrane. The maker requires the base flashing to rise at least 8 in above the finished roof, and a wall-mounted counterflashing must cover the top of the base flashing by at least 4 in. Is there room for a base flashing under a counterflashing on the inside face?
Show solution
- Height left above the finished roof = 12 − 5 = 7 in.
- Needed for the base flashing alone = 8 in; 7 in is already 1 in short.
- Needed for a base flashing plus a counterflashing lap above it = 8 + 4 = 12 in.
- The inside face cannot take a base flashing and a separate counterflashing.
Answer: No. The flashing must be carried up the inside face, over the top and down the outside face under a new coping, which becomes the counterflashing. On a low parapet, wrapping it is usually the best answer, and it is what Dana did at Ashgrove and at Carrick Street.
Supporting the corner
Where the roof meets the wall, the base flashing has to turn through a right angle. Built-up and modified bitumen membranes are too stiff to make that turn sharply without cracking, and they bridge any gap behind them. A cant strip, a triangular strip of wood fiber, perlite or treated wood, usually about 4 in on its face, fills the corner and gives the sheet a 45 degree path. Cants are set on top of the insulation and cover board, not on the deck, so they move with the roof rather than with the wall.
Single-ply membranes are flexible enough to turn a right angle and normally go without a cant; most single-ply makers do not want one. But they still must not bridge. A single-ply flashing that spans a gap between the roof and wall will be pulled and stretched each time the two move apart, and will eventually tear, which is what happened on the east parapet at Parkdale Arena. The answer is to fully adhere the flashing to the wall and to the roof, to fasten the field sheet along the base of the wall (usually with a row of plates or a bar at the inside corner, as the maker's details show), and to fill any gap behind it before the flashing goes on.
Fastening the top
Every base flashing must be held at the top by more than adhesive. Common methods are:
- A termination bar: a flat aluminum or stainless bar, pre-punched, fastened through the flashing into the wall at close spacing, usually every 6 to 8 in, with a bead of sealant along its top edge. The bar alone is not a counterflashing: it must be covered.
- A nailer strip at the top of the wall, with the flashing nailed through a metal disc or strip.
- Wrapping the flashing over the top of a low parapet and fastening it on the top or outside face, under the coping.
- For liquid-applied flashings, the maker's termination detail, often a reinforced fabric embedded in the coating and a counterflashing over it.
Worked problem
Termination bar fasteners
The north parapet at Carrick Street is 100 ft long. The termination bar is fastened every 6 in, with a fastener 1 in from each end of every 10 ft bar. How many bars and how many fasteners are needed?
Show solution
- Bars: 100 ÷ 10 = 10 full bars.
- Each bar: holes run from 1 in to 119 in, a span of 118 in; 118 ÷ 6 = 19.7, so 20 spaces and 21 fasteners keep every space at 6 in or less.
- Total = 10 × 21 = 210 fasteners.
- Add 5 in 100 for drops and bad holes: 210 × 1.05 = 221, so order three boxes of 100.
Answer: About 210 fasteners on 10 bars; order three boxes of 100.
Kinds of counterflashing
A counterflashing does three things: it sheds water over the top of the base flashing, it protects the base flashing's top edge from sun and damage, and it lets the wall move without tearing the roof. There are several common kinds.
- Surface-mounted counterflashing: a metal strip fastened to the face of the wall above the base flashing, with a sealant bead along its top. Simple, but the top sealant joint is a maintenance item and water running down the wall face can get behind it.
- Reglet counterflashing: a slot is cut into a masonry or concrete wall, usually in a mortar joint, and the counterflashing is folded into it and wedged or set in sealant. Water running down the wall face passes over the top.
- Two-piece receiver and counterflashing: a receiver is fastened to the wall, or set in a reglet, and a removable counterflashing snaps or screws into it. The counterflashing can be lifted off for re-roofing without damaging the wall.
- Through-wall flashing: in a masonry wall, a flashing built into the wall during construction runs through the wall and out over the base flashing. It also catches water that has entered the wall above, and it needs weeps.
- Wall cladding as counterflashing: siding or metal panels that lap down over the base flashing, with a gap at the bottom so the cladding does not sit in water.
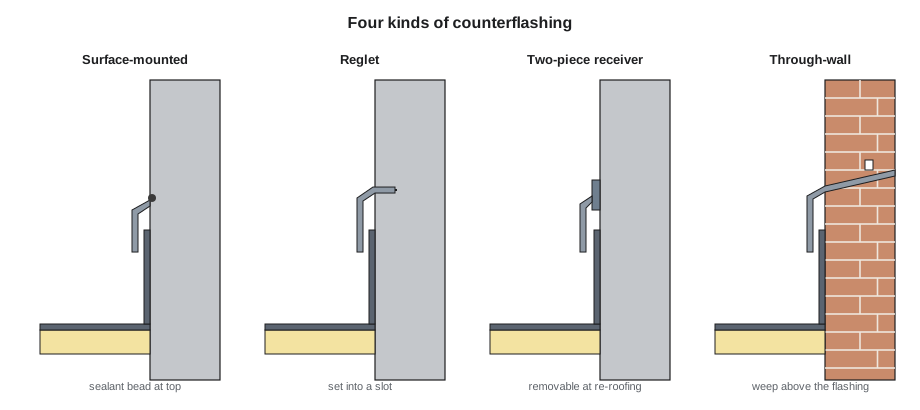
Whatever the type, the counterflashing should lap down over the top of the base flashing by at least about 4 in, end with a hem or drip, stop a little above the roof surface so it does not sit in water, and be fastened at its top, not through the base flashing below it. Joints in the counterflashing lap by at least 4 in or are joined with a cover, and corners are made as one piece.
Letting the wall and roof move
A wall and a roof deck are usually supported differently. A masonry parapet sits on the wall below it; a steel deck spans between joists that deflect under snow and expand in the sun. A wood-framed wall shrinks as it dries. If the base flashing is fastened to the wall at the top and to the roof at the bottom, and the wall and the roof move apart, something has to give. Good details make the counterflashing the part that moves: it is fastened to the wall only, it overlaps the base flashing loosely, and the base flashing can slide under it.
Where large movement is expected, as with a steel deck meeting a masonry wall that is not supported by the same structure, many detail manuals call for the base flashing to be fastened only to a wood curb or nailer attached to the roof deck, with a separate metal counterflashing fastened to the wall and lapping down over it. The two parts can then move past each other.
The new flashing at Carrick Street
Dana's crew built the new parapet flashings at Carrick Street on the Tuesday of the job, once the base sheet was down. The old parapets had been stripped to the masonry and the soft wood on top replaced. Luca ran the self-adhered base ply up the primed inside face, over the new wood top and down 6 in on the outside, rolling every inch, with a gusset at each corner. The self-adhered cap flashing followed the same path, lapping past the base ply onto the field, and was nailed along the outside face every 6 in under where the coping would sit. Theo's new prefinished steel coping, sloped toward the roof, became the counterflashing. On the Thursday afternoon, while Rory was at Westlane, Dana and Luca went round the whole parapet on their knees, pressing the flashing into the angle and probing each lap, and added a second gusset at the northwest corner. Rory saw the photographs on the Friday.
Extra height where water and snow collect
The 8 in figure is a minimum for an ordinary wall on a roof that drains well. Some places need more. Where a parapet or a taller wall faces a lower roof, wind piles snow against it, and the drift melts slowly against the flashing all winter; many designers raise the flashing there, often to 12 in or more. Where water can back up behind a blocked drain to the level of an overflow scupper, the flashing must clear that level with room to spare, which is one reason ROOF-310 set the overflow inlets only 2 in above the low point. Behind rooftop units and other large curbs, crickets are needed so water does not stand against the upslope side (lesson 4). And at doors that open onto a roof, the sill must be high enough for a full base flashing below it, or a raised walkway and drainage must be designed so the door is never below water.
When the space is not there, say so. A flashing that is short by an inch will work for a few years and then leak in the first storm that floods the roof deep enough to reach its top.
Common mistakes
MistakeMeasuring the flashing height from the deck.
InsteadMeasure from the finished roof surface at the highest point along the wall.
MistakeLeaving the top of a base flashing held only by adhesive.
InsteadFasten it with a termination bar or nailing, then counterflash it.
MistakeLetting a single-ply flashing bridge a gap at the base of the wall.
InsteadFill the gap, fasten the field sheet at the base and fully adhere the flashing.
MistakeFastening the counterflashing through the base flashing to the wall.
InsteadFasten the counterflashing at its top only, so the base flashing can slide under it.
MistakeTreating a termination bar as a counterflashing.
InsteadCover every termination bar with a counterflashing or coping.
Summary and key terms
- A base flashing turns the roofing up a vertical surface; a counterflashing laps over its top.
- Base flashings commonly rise at least 8 in above the finished roof, measured at the highest point along the wall.
- Bituminous flashings need a cant; single-ply flashings must not bridge any gap.
- Every base flashing is fastened at the top and then counterflashed.
- Counterflashings may be surface-mounted, set in a reglet, two-piece, through-wall or formed by cladding, and typically lap the base flashing by about 4 in.
- Counterflashings are fastened to the wall only, so the wall and roof can move independently.
- Cant strip
- A triangular strip set in the corner between roof and wall to give a bituminous flashing a 45 degree path.
- Termination bar
- A pre-punched metal bar fastened through the top of a base flashing to hold it to the wall.
- Reglet
- A slot cut or cast into a wall to receive the top of a counterflashing.
- Receiver
- A metal piece fixed to a wall that holds a removable counterflashing.
- Through-wall flashing
- A flashing built through a masonry wall that sheds water out of the wall and over the roof flashing below.
- Bridging
- A flashing spanning an unsupported gap, which stretches and tears as parts move.
- Gusset
- A small reinforcing patch at an inside or outside corner of a flashing.
Practice problems
Work each problem on paper first, then reveal the answer to check.
Where is the base flashing height measured from?
Show answer
The top of the finished roof surface, at the highest point along the wall.
A parapet is 16 in above the old roof and the new roof adds 6 in. How much height is left?
Show answer
16 − 6 = 10 in.
What is a cant strip set on: the deck or the cover board?
Show answer
The insulation and cover board, so it moves with the roof.
How far should a counterflashing typically lap over the base flashing?
Show answer
About 4 in.
Why is a two-piece counterflashing useful at re-roofing time?
Show answer
The counterflashing can be removed and reinstalled without damaging the wall.
Lesson quiz · 5 questions
Score 60% or more to complete this lesson.
Create a free account to save your progress, take quizzes and earn a certificate.