
ROOF-210 · Lesson 10 of 12 · 21 min
Membrane flashings
▶ Video coming soon A video version of this lesson is on the way.
The leak in the Carrick Street physiotherapy waiting room was not in the field of the old roof at all. When the crew stripped the old APP sheet from the north parapet on Monday, November 9, Rory found its flashing had been torched straight up the parapet face with no cant and no fastening at the top. Over thirty summers it had sagged, pulled away from the wall and opened a gap behind the metal coping, and every driving rain from the northwest ran down the inside of the parapet and into the ceiling. "Most leaks are at the edges," Dana said. "The field is easy. Water has a hundred ways into a flashing."
A flashing is the part of a roof that seals the membrane where it meets something else: a wall, a parapet, a curb, a drain, a pipe or an edge. Membrane flashings are made of the same bituminous materials as the roof, carried up and around those features. Metal counterflashings, copings and the full range of details are covered in ROOF-320; this lesson covers the membrane plies of the flashing and how they are installed on a bituminous roof.
What a membrane flashing must do
- Carry the waterproofing up any vertical surface to a height well above the highest water that can stand or splash on the roof.
- Seal to the roof membrane with laps at least as good as the field laps.
- Stay in place on a vertical surface for the life of the roof, without sagging or slipping in summer heat.
- Move with the building: walls and roofs move differently with temperature and load.
- Terminate at the top so water cannot run behind it, under a counterflashing, coping, reglet or termination bar.
The parts of a base flashing
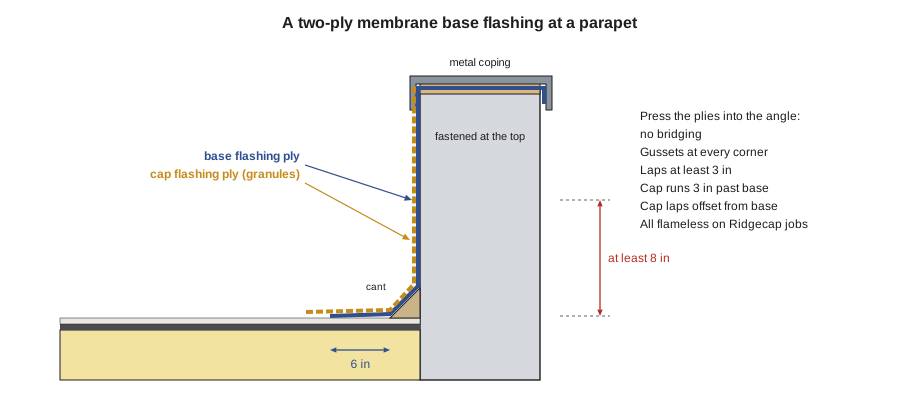
- The roof membrane, base and cap, runs to the base of the wall. On many systems the field base sheet turns up the wall a short distance; on others it stops at the toe.
- A cant strip, a triangular strip of fiberboard, perlite or another approved material, is set at the base of the wall where the system requires it. Cants are standard with built-up roofing, because BUR felts crack if bent at a sharp right angle. Many mod-bit systems do not need a cant, but the maker's details decide.
- The base flashing ply, a modified bitumen sheet, runs from the roof up the wall. It extends at least 6 in onto the roof beyond the toe of the wall or cant, as published maker guides show, and at least 8 in up the wall above the finished roof surface.
- The cap flashing ply, a granule-surfaced sheet, covers the base flashing and extends at least 3 in beyond its edge on the roof, so the two laps do not line up.
- A termination at the top: the flashing runs over the top of a low parapet under the coping, or is held by a termination bar, fastened, sealed and covered by a counterflashing.
Ridgecap's standard, and the usual industry minimum, is a base flashing at least 8 in above the finished roof. The maker's details may require more, for example where snow drifts against a wall, and Ridgecap goes higher at any wall where water ponds. Very tall flashings, more than about 24 in, are fastened at intermediate heights or done in sections as the maker specifies, because a tall sheet can slide.
Preparing the wall
- The wall surface must be sound, clean, dry and smooth. Loose mortar, old flashing cement and peeling paint come off.
- Masonry and concrete are primed; the primer must dry before the flashing goes on.
- Wood nailers and blocking at the top of parapets and at curbs must be securely fastened to the structure, because the flashing and coping are fastened to them and they resist wind on the edge.
- Gaps at the base of the wall, between deck and wall, and around penetrations are closed with approved fillers before flashing. An open gap at the toe is where flame from a torch, and water from a leak, both find their way in.
- On Carrick Street, the old parapets were stripped to the masonry, the wood nailer on top was replaced where it was soft, and the masonry face and nailer were primed for the self-adhered flashing.
Installing the flashing plies
On Ridgecap jobs, membrane flashings are always flameless: self-adhered or set in cold adhesive, or heat-welded with a hot-air tool (lesson 6). The steps on Carrick Street:
- Field base sheet run to the wall, and the field cap held back at least 3 ft so the flameless band could be built first.
- Base flashing pieces cut across the roll, about 39-3/8 in wide, so each piece runs from the roof up and over the parapet in one length, with no horizontal joints.
- Each piece set from the bottom up: laid onto the roof first, pressed into the angle with a rounded tool so it does not bridge the corner, then up the face and over the top, rolled firmly.
- Pieces lapped side to side by at least 3 in, like field side laps.
- The top edge fastened along the outside of the parapet at the spacing the maker gives, under where the coping will sit.
- Cap flashing pieces applied the same way, with their side laps offset from the base flashing laps and their bottom edge 3 in past the base flashing on the roof.
- Inside and outside corners reinforced with corner patches or gussets cut from flashing membrane before the main pieces go on, so the corner is sealed in two layers.
Bridging is the most common fault in a flashing: the sheet spans across the inside corner instead of being pressed into it, leaving a hollow tube behind it. A bridged flashing can be punctured by a boot, splits as it ages and pulls the flashing away from the wall. Pressing the sheet into the angle, or using a cant, prevents it.
Worked problem
Flashing pieces for the Carrick Street parapets
The parapets run all the way round the 100 ft by 82 ft roof. They stand 18 in above the new roof and are 8 in wide on top. The base flashing goes 6 in onto the roof, up the face and across the top. The cap flashing goes 3 in farther onto the roof. Flashing rolls are 39-3/8 in wide and 32 ft 10 in (394 in) long, and pieces are lapped 3 in side to side. How many rolls of each?
Show solution
- Parapet length = 2 × (100 + 82) = 364 ft.
- Each piece covers 39.375 − 3 = 36.375 in = 3.031 ft of wall, so pieces = 364 ÷ 3.031 = 120.1, so 121 pieces.
- Base piece length = 6 + 18 + 8 = 32 in; pieces per roll = 394 ÷ 32 = 12.3, so 12; base rolls = 121 ÷ 12 = 10.1, so 11.
- Cap piece length = 9 + 18 + 8 = 35 in; pieces per roll = 394 ÷ 35 = 11.3, so 11; cap rolls = 121 ÷ 11 = 11.
Answer: 11 rolls of base flashing and 11 of cap flashing for the parapets, before corners and curbs. Corner gussets come from the offcuts.
Curbs and rooftop units
A curb is a raised frame that carries a rooftop unit, hatch, skylight or fan. It is flashed like a small parapet on four sides.
- Curbs must be tall enough that the base flashing reaches at least 8 in above the finished roof, including the new insulation. On a re-roof with thicker insulation, old curbs often end up too short and must be raised, which involves the mechanical contractor and the owner.
- Flash the corners first with gussets, then the sides, working so each lap sheds water: the downslope side first, then the two sides, then the upslope side lapping over them.
- Terminate the flashing under the unit's counterflashing or curb cap; never seal it to the unit housing, which must be removable.
- Keep units isolated and shut down when working close to them; a fan pulling air through a curb draws in solvent vapor and, on torch jobs, flame.
Drains
Roof drains are the low points of the roof, where all the water goes and where any defect is tested first. A typical drain has a bowl set in the deck, a clamping ring bolted over the membrane, and a strainer dome. The flashing sequence:
- Set a sump: taper the insulation down around the drain, often over about 24 in by 24 in or more, so water flows in instead of ponding around it.
- Run the base sheet over the bowl, cut it to the bowl opening and set it under the clamping ring in the maker's sealant.
- Add a target piece, a square or round extra ply of membrane, often 36 in across, centered on the drain, as the maker requires.
- Run the cap over the target, cut it to the opening, and clamp both plies under the ring. Tighten the ring bolts evenly, in a crossing pattern, so it clamps all round.
- Replace any broken bolts and missing clamp parts; a clamping ring that is not tight is not a seal.
- Put the strainer dome back on the same day. An open drain fills with debris and is a fall and trip hazard.
- Keep sealants, adhesives and debris out of the drain line.
Pipes and penetrations
Every pipe, conduit and support through the roof needs its own flashing.
- Plumbing vents and round pipes: a prefabricated pipe flashing, such as a spun aluminum, lead or rubber boot with a deck flange, set onto the base sheet, stripped in with membrane plies and sealed at the top with a clamp, cap or turned-down lead.
- Clusters of pipes or conduits: rather than one flashing per pipe crowded together, they are better run through a curb with a cover, or spaced apart so each can be flashed.
- Pitch pockets or sealant pans, metal pans filled with sealant around odd-shaped penetrations, are a last resort: the sealant shrinks and needs maintenance for the life of the roof.
- Keep at least 12 in between penetrations, and between a penetration and a wall or curb, so there is room to flash each one properly.
On Carrick Street, the crew found three abandoned pipes through the roof. With the property manager's agreement, the plumber cut them off below the deck and capped them, and the crew filled the holes and roofed over them. A pipe that does nothing is still a hole to flash.
Edges
Where the roof ends at an edge without a parapet, a metal edge (gravel stop, fascia or drip edge) finishes it. On a bituminous roof, the metal flange is set on the base sheet in the maker's sealant or adhesive and fastened to the wood nailer, then stripped in with a membrane strip, and the cap is carried over it. Edge systems that hold the membrane are tested to ANSI/SPRI ES-1, which the building code references. Edge metal design and the counterflashings at walls are covered in ROOF-320.
Inspecting flashings
| Check | What to look for |
|---|---|
| Height | base flashing at least 8 in above the finished roof at every wall and curb |
| Corners | gussets or patches installed; no open folds |
| Bond | no bridging at the base of the wall; no hollow areas |
| Laps | side laps at least 3 in; cap offset from base; edges sealed |
| Top | fastened at the specified spacing and covered by coping, counterflashing or termination bar |
| Drains | sump formed, clamping ring tight, dome in place |
| Penetrations | each flashed individually or in a curb; no unsealed openings |
| Flame | no torch marks on flashings; all flashings flameless as required |
On Thursday afternoon, while Rory was at Westlane, Dana and Luca went round the whole Carrick Street parapet on their knees, pressing every inch of the flashing into the angle with their thumbs and probing each lap. At the northwest corner, where the old leak had been, Dana had Luca add a second gusset. She told Rory about it the next morning. "This corner owes that physiotherapist a ceiling tile," she said. "We'll give it two layers of apology."
Common mistakes
MistakeLetting the flashing bridge the inside corner.
InsteadPress the sheet fully into the angle, or use a cant where the system calls for one.
MistakeFlashing too low on a curb that was raised by new insulation.
InsteadMeasure from the finished roof; raise curbs so flashing reaches at least 8 in.
MistakeLeaving the top edge unfastened.
InsteadFasten the top edge at the maker's spacing and cover it with coping or counterflashing.
MistakeTorching flashings.
InsteadDo flashings flameless: self-adhered, cold-applied or hot-air welded.
MistakeCrowding pipes together.
InsteadSpace penetrations at least 12 in apart, or run them through a curb.
Summary and key terms
- Membrane flashings carry the waterproofing up walls, curbs and penetrations and seal it at the top.
- A two-ply flashing has a base ply at least 6 in onto the roof and 8 in up the wall, and a cap ply lapping 3 in farther.
- Walls must be clean, primed and solid, with gaps closed and nailers secure.
- Press flashings into the angle to avoid bridging; reinforce corners with gussets.
- Drains need a sump, a target ply and a tight clamping ring; pipes need proper flashings, not sealant pans.
- All Ridgecap flashings are flameless.
- Flashing
- The part of a roof that seals the membrane where it meets a wall, curb, penetration or edge.
- Base flashing
- The membrane plies that run from the roof up a wall or curb.
- Cant strip
- A triangular strip at the base of a wall that avoids a sharp right-angle bend in the membrane.
- Counterflashing
- Metal fixed to a wall that covers the top of the base flashing.
- Termination bar
- A metal bar fastened along the top edge of a flashing to hold it to the wall.
- Bridging
- A flashing spanning an inside corner instead of being pressed into it.
- Gusset
- A shaped patch of membrane that reinforces an inside or outside corner.
- Clamping ring
- The ring bolted over the membrane at a roof drain to seal it.
- Sump
- A tapered depression around a drain that helps water flow into it.
Practice problems
Work each problem on paper first, then reveal the answer to check.
A curb stands 10 in above the deck. New insulation and cover board add 4-1/2 in. How high is the curb above the finished roof, and is it tall enough?
Show answer
10 − 4-1/2 = 5-1/2 in; no, it must be raised so the flashing reaches at least 8 in.
A wall flashing piece runs 6 in onto the roof and 12 in up the wall. How long is the cap piece if it laps 3 in past the base?
Show answer
9 + 12 = 21 in.
How many 3.031 ft wide pieces flash a 130 ft wall?
Show answer
130 ÷ 3.031 = 42.9, so 43 pieces.
Why are pitch pockets a last resort?
Show answer
The sealant shrinks and needs maintenance for the life of the roof.
In what order are the sides of a curb flashed?
Show answer
Corners first, then the downslope side, the two sides, and the upslope side last.
Lesson quiz · 5 questions
Score 60% or more to complete this lesson.
Create a free account to save your progress, take quizzes and earn a certificate.