
PHOT-211 · Lesson 3 of 12 · 25 min
Low-key lighting and chiaroscuro
Low-key images are dominated by dark tones, with light used selectively to reveal only what matters. They create mood, mystery, drama, intimacy and gravitas, and are used in fine art portraiture, editorial and celebrity portraits, film posters, luxury product advertising, and still life. Low-key lighting is about control: it is far easier to add light than to keep it from going where it is not wanted. This lesson covers what defines low-key, the tradition of chiaroscuro in painting and photography, controlling spill and fall-off, black backgrounds, low-key portrait setups, separation in darkness, low-key still life, exposure for low-key images, and editing.
What defines low-key
Low-key images have a tonal distribution weighted toward the dark end, with large areas of shadow or black and smaller, carefully placed areas of light. They usually have higher lighting ratios, 4:1 to 8:1 or more, little or no fill, dark backgrounds and dark clothing or props, and a single dominant light source. As with high-key, the full tonal range is still present: a low-key portrait needs a few bright highlights, such as a catchlight, a highlight on the cheekbone or a rim of light on the hair, to give the image life. Without them, the image looks merely underexposed and muddy.
Chiaroscuro: light and dark in art
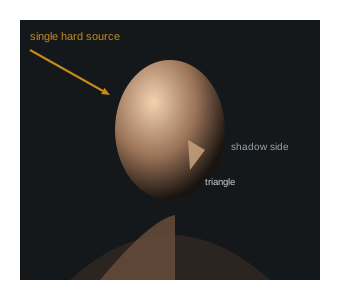
The Italian term chiaroscuro, meaning light-dark, describes the use of strong contrasts between light and shadow to model three-dimensional form. Renaissance painters such as Leonardo da Vinci used soft gradations of light and shadow, called sfumato, to model faces. Caravaggio, around 1600, took the approach further with tenebrism: figures emerging from deep darkness, lit by a single hard, directional source, often from high and to one side, creating intense drama. Rembrandt, Georges de La Tour and Joseph Wright of Derby developed their own versions, the latter famous for candlelit scenes. These painters' work remains a major influence on portrait, still life and cinematic photography; studying how they placed light, how far shadows extend, and how much detail they reveal in the darkness teaches lessons directly applicable in the studio. The Rembrandt lighting pattern itself is named after the painter's characteristic triangle of light on the shadowed cheek.
Controlling spill and fall-off
The essence of low-key lighting is keeping light off everything except the areas you choose. Techniques include:
- Grids on softboxes, strip boxes and reflectors, which narrow the beam and reduce spill onto backgrounds and the floor.
- Feathering the key, aiming it slightly in front of the subject so that the subject is lit by the edge of the beam, which gives softer light on the face and less light on the background.
- Flags and black cards between the light and areas to be kept dark, such as the background, the subject's body or the floor.
- Negative fill: black boards, curtains or V-flats beside the subject on the shadow side, absorbing reflected light that would otherwise lift the shadows.
- Distance from the background: moving the subject well away from the background lets the inverse square law darken it, since a background twice as far from the light as the subject receives about two stops less light.
- Studio surroundings: black walls, ceilings and floors, or black drapes, reduce uncontrolled reflections; many dedicated studios have a black side for low-key work.
Worked problem
Darkening a gray background without changing it
A photographer has only a mid-gray background. With a key light 1 m from the subject, and the subject 1 m in front of the background, the background records as dark gray. The goal is near-black. How can this be achieved?
Show solution
- Currently the background is about 2 m from the light, so it receives a quarter of the subject's light, about 2 stops less.
- Move the subject and light so that the background is 4 m from the light: it now receives 1/16 of the light, about 4 stops less than the subject.
- Add a grid to the key and feather it toward the camera to reduce spill further.
- Place a flag between the key and the background, and expose for the face; the mid-gray background will now record close to black.
Answer: Increase the distance from light to background so it falls about 4 stops below the key, grid and feather the key, and flag the background.
Black backgrounds
Black backgrounds are the classic choice for low-key work. Black seamless paper, black velvet, which absorbs light more completely than paper, and black muslin are common materials. Even black materials reflect some light, typically 2 to 5 % for black paper and less than 1 % for velvet, so keeping light off them remains essential: a black background lit at the same level as the subject records as dark gray. Placing the background several meters behind the subject, using grids and flags, and keeping the background out of the beam make black backgrounds record as true black. Alternatively, dark gray or textured painted backgrounds lit with a faint pool of light create depth while preserving the low-key mood, a common approach in portrait studios.
Low-key portrait setups
Typical low-key portrait setups include:
- A single gridded softbox or strip box to one side and slightly in front of the subject, feathered, with negative fill on the opposite side, giving split or Rembrandt lighting on a black background.
- A hard source, such as a Fresnel or a gridded reflector, high and to one side, imitating the tenebrist style of Caravaggio, with deep shadows and sculpted features.
- A soft key with a rim light from behind on the shadow side, outlining the jaw, hair and shoulder against the dark background.
- Two strip boxes behind the subject on either side as rim lights, with a small, dim key or reflector in front, for a dramatic athletic or fitness portrait that emphasizes muscle definition.
Low-key portraits suit dark clothing, which merges with the background and directs attention to the face and hands. Light skin and dark skin both work well in low-key, but darker skin needs careful exposure and possibly a slightly larger or closer key to reveal texture and tone while keeping the mood; specular highlights from a soft, broad source give dark skin a pleasing sheen.
| Setup | Key modifier | Effect |
|---|---|---|
| Feathered gridded softbox | Softbox with grid | Soft, controlled, painterly |
| High hard source | Fresnel or gridded reflector | Dramatic, sculpted, tenebrist |
| Soft key plus rim | Octabox and strip | Moody with clear separation |
| Twin rims, dim front | Two strip boxes | Athletic, graphic, defined |
Separation in darkness
When dark hair, dark clothing and a dark background meet, the subject can disappear into the background. This can be intentional, creating a floating face, but usually some separation helps. Tools include a rim or kicker light on the shadow side, a hair light from above and behind, a faint pool of light on the background behind the subject, slight differences in tone between clothing and background, and highlights on edges. Separation lights in low-key images should be subtle: a thin line of light along an edge is often enough, and over-bright rims make the image look artificial. Gridded strip boxes, positioned behind and to the side and aimed so that they do not hit the lens, are the standard tool.
Low-key still life
Low-key still life evokes the Dutch and Spanish still life paintings of the seventeenth century, with objects emerging from darkness. A single soft source to the side or slightly behind, often a gridded softbox or a light through a diffusion scrim, reveals the shape and texture of fruit, bread, vessels and flowers, while flags and black cards keep the background dark. Small reflectors or mirrors add accents of light where needed. For products, low-key lighting suggests luxury and exclusivity, used widely for watches, jewelry, perfume, spirits and cars: edge lighting outlines shapes against black, and precise highlights reveal materials (Lesson 9).
Exposure for low-key images
Exposure for low-key images is set for the highlights and the important midtones, not for the overall scene. Meter the key light on the subject, ensure the brightest important highlights, such as cheekbones or a product's label, are well exposed, and let the rest fall to shadow. The camera's meter, if used, will try to brighten the mostly dark scene and overexpose the highlights, so manual exposure based on incident metering or careful histogram reading is essential. The histogram should show most data on the left, with some reaching toward the right for highlights; ensure shadows that must hold detail are not completely clipped, and avoid noise by using low ISO and adequate light on the subject. Exposing slightly brighter than the final look, then darkening in editing, preserves shadow quality.
Editing low-key images
Editing low-key images typically involves deepening blacks and shadows with curves and the blacks slider while keeping detail in the important dark areas; dodging highlights on the face and burning edges to focus attention; controlling noise in shadows; cleaning up any stray light, dust or gray areas on the background; and preserving the subtle gradations from light to shadow that give low-key images their depth. Color grading is often restrained or warm, echoing painted chiaroscuro, or converted to black and white. View the image on a calibrated screen in a dim room, since low-key images can look much darker on bright laptop screens and much lighter in prints if not proofed carefully.
Low-key with continuous light and windows
Low-key images do not require flash. A single window with the rest of the room darkened, by closing other curtains and turning off room lights, can produce beautiful chiaroscuro, especially with the subject close to the window and a dark background farther away. Continuous LED panels with grids or Fresnel lenses give the same control as gridded strobes and allow photographers to see the fall-off directly. Painters such as Vermeer worked with window light in this way, and many contemporary portrait photographers emulate his approach with a single soft side light and a dark interior.
Hard light and shadows in low-key
Hard sources such as bare reflectors, Fresnels and optical spots produce sharply defined shadows that can become part of the composition in low-key images. A gobo or cut-out placed in the beam casts patterns, such as window frames, blinds or leaves, onto the subject or background, creating a film noir atmosphere. The distance between the gobo and the subject controls sharpness: closer gives sharper shadows, farther gives softer ones. Hard light also exaggerates skin texture, which suits character portraits but not beauty work; choose the source to match the subject and mood.
Low-key and the print
Low-key images are particularly sensitive to the output medium. On screens, deep shadows may look rich on a bright, high-contrast display but disappear on dim phones; in prints, shadows can block up, especially on matte papers with limited black density. Soft proofing with the printer's profile, lifting shadow detail slightly for print, and choosing papers with deep blacks, such as glossy, baryta or high-density fine art papers, preserve the subtle tonal transitions that make low-key images compelling.
Practicing low-key control
A useful exercise is to photograph a single object, such as an apple or a mug, against black with one light, trying to keep every surface except the object completely black. Move the light, add a grid, add flags and negative fill, and increase the distance to the background until only the object remains. The exercise teaches spill control more effectively than any explanation.
Low-key color
Color in low-key images is often restrained: warm skin tones against neutral or cool darkness, or a single saturated accent, such as a red garment or a blue rim light, emerging from shadow. Too many colors compete in the small lit areas. Deciding the palette in advance, through wardrobe, props and gels, helps the image feel unified.
Common mistakes
MistakeSimply underexposing the image.
InsteadPlace light selectively and keep some bright highlights.
MistakeLighting the background with spill.
InsteadUse grids, flags and distance to keep it dark.
MistakeLetting white walls fill the shadows.
InsteadUse negative fill and black surroundings.
MistakeUsing the camera meter for exposure.
InsteadMeter the key manually and expose for highlights.
MistakeOver-bright rim lights.
InsteadKeep separation subtle and controlled.
Summary and key terms
- Low-key images are dominated by dark tones with selective highlights.
- Chiaroscuro and tenebrism in painting inform low-key photography.
- Grids, feathering, flags, negative fill and distance control spill.
- Black backgrounds record black only when kept out of the light.
- Single-source, hard-source, rim and twin-rim setups create different moods.
- Subtle rim, hair and background lights provide separation.
- Expose for highlights manually and edit to deepen shadows while keeping detail.
- Low-key
- Image dominated by dark tones.
- Chiaroscuro
- Strong contrast between light and dark to model form.
- Tenebrism
- Dramatic chiaroscuro with figures emerging from darkness.
- Sfumato
- Soft gradation between light and shadow.
- Feathering
- Lighting with the edge of a beam.
- Grid
- Honeycomb that narrows a light's beam.
- Flag
- Opaque panel blocking light.
- Black velvet
- Fabric that absorbs most light.
- Rim light
- Light outlining edges from behind.
- Fall-off
- Reduction of light with distance.
Practice problems
Work each problem on paper first, then reveal the answer to check.
Typical lighting ratio for low-key?
Show answer
4:1 to 8:1 or more.
Why does a low-key image need some highlights?
Show answer
Without them it looks merely underexposed.
What did Caravaggio's tenebrism involve?
Show answer
Figures emerging from darkness under a single hard light.
How much darker is a background at twice the light distance?
Show answer
About 2 stops.
What does feathering the key do?
Show answer
Softens the light and reduces spill onto the background.
Why use black velvet?
Show answer
It absorbs light more completely than paper.
Name two low-key portrait setups.
Show answer
Feathered gridded softbox, high hard source, soft key plus rim, twin rims.
Name two separation tools.
Show answer
Rim light, hair light, background pool, edge highlights.
Why avoid the camera meter for low-key?
Show answer
It will overexpose highlights by brightening the dark scene.
Why proof low-key images carefully?
Show answer
They look very different on bright screens and in print.
Lesson quiz · 5 questions
Score 60% or more to complete this lesson.
Create a free account to save your progress, take quizzes and earn a certificate.