
PHOT-211 · Lesson 1 of 12 · 25 min
Designing light: from idea to lighting plan
Studio Lighting I built the vocabulary of studio photography: qualities of light, modifiers, patterns, ratios, backgrounds and basic multi-light setups. Studio Lighting II uses that vocabulary to design light deliberately for a purpose, whether a moody portrait, a bright beauty image, a glass bottle that glows against black, or a dish of food that looks freshly made. Advanced lighting is less about owning more lights than about knowing why each light is there, what it contributes, and what would happen if it were removed. This first lesson sets out a method for designing light: starting from an idea or brief, analyzing the subject, defining a hierarchy of light, assigning roles to each source, building the setup one light at a time, documenting it with diagrams and notes, and refining it through testing.
Start from the idea, not the equipment
Every lighting setup should begin with a clear idea of the result. Questions to ask include: What should the viewer feel? Where should the viewer look first? What must be clearly visible, and what can fall into shadow? What does the subject's shape, texture and surface require? What will the image be used for, and at what size? A cinematic portrait for a magazine cover, a clean headshot for a company website, and a dramatic still life for a gallery need very different light, even with the same subject. Writing the answers down in a sentence or two, such as "a quiet, low-key portrait with soft directional light, the face emerging from darkness, eyes as the focus", gives a target against which every lighting decision can be judged.
Reference images help enormously. Photographers, art directors and clients often communicate through mood boards: collections of images that show the intended light, color, contrast and mood. Studying a reference closely, noting the direction and quality of the key light, the depth of the shadows, the brightness of the background, the presence of rim light and the catchlights in the eyes, reveals how it was lit and helps you plan your own approach (Lesson 12).
Analyzing the subject
Light must suit the subject as well as the idea. Key characteristics to consider include:
- Shape: round, angular, flat or complex forms each reveal themselves differently. Round forms need gradual transitions from light to shadow; angular forms benefit from planes of different brightness.
- Surface: matte surfaces show the light falling on them; glossy, metallic and glass surfaces show reflections of the light sources and the room, so the shape and placement of sources matter as much as their direction.
- Texture: fabric, skin, wood, bread and stone reveal texture under raking side light and lose it under frontal light.
- Tone and color: dark subjects absorb light and need more exposure and careful separation; light subjects reflect light and are easily overexposed; saturated colors may clip in one channel.
- Scale: small products need small, precise sources or large sources very close; full-length figures and groups need larger, more distant sources for even coverage.
- Movement: subjects that move need even, forgiving light, or fast flash durations (Lesson 6).
A short checklist of these characteristics, made before setting up, prevents choosing a setup that suits the idea but fights the subject.
A hierarchy of light
In a well-designed image, light has a clear hierarchy. One source usually dominates and establishes the direction, quality and mood: the key light. Other sources play supporting roles, each subordinate to the key and each serving a specific purpose. When two lights compete as equals, the image often looks confused, with crossing shadows and no clear sense of where the light comes from. Exceptions exist, such as cross-lighting with two equal rim lights or deliberately flat beauty lighting, but even then the effect is planned. A useful exercise is to describe each light's role in a few words: "key: large octabox camera left, soft, slightly above eye level"; "kicker: strip box behind right, separates jaw and shoulder"; "background: gridded spot, pool of light behind the head". If you cannot describe a light's purpose, it probably does not need to be there.
| Role | Purpose | Typical modifiers |
|---|---|---|
| Key | Main direction, quality and mood | Softbox, octabox, beauty dish, Fresnel |
| Fill | Controls shadow depth | Large umbrella, reflector, on-axis source |
| Kicker | Edge light on the shadow side of the face or body | Strip box, gridded reflector |
| Rim or hair light | Outlines head and shoulders, adds sparkle to hair | Gridded strip, snoot, small softbox |
| Background light | Sets background tone, gradients or pools | Grid, snoot, wide reflector |
| Accent | Highlights a detail or prop | Snoot, small spot, mirror |
Building one light at a time
The most reliable way to build a setup is to add lights one at a time, observing and photographing the effect of each before adding the next. Start in a dark studio with only the key light, and refine its position, height, angle, distance and modifier until it creates the intended shape and mood on its own; many strong photographs need nothing more. Then add fill to control shadow depth, checking the ratio with a meter or test shots. Then add separation lights such as rim, kicker or hair light, each set relative to the key in stops, and finally background lights. After each addition, take a test shot with only that light on, and another with all lights on, so that you can see exactly what each contributes and diagnose problems such as spill, double shadows or flare. Turning lights off one at a time later in the session is an equally useful check.
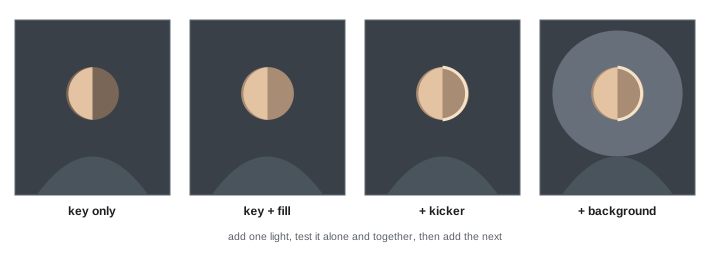
Setting lights relative to the key
Advanced setups are easier to control when each light is set relative to the key in stops, measured with an incident meter pointed at the relevant light, or judged from test shots. A typical portrait might have fill at one to two stops below the key, giving a ratio of 2:1 to 4:1; a kicker at the same level as the key or up to one stop brighter, because it skims a surface at a steep angle and reflects less light toward the camera; a hair light around the key's level, adjusted for hair color, with dark hair needing more and blond hair less; and a background light set to produce the intended background tone, for example the same level as the key for a mid-gray background to read as mid-gray. Recording these values allows a setup to be rebuilt quickly and adjusted precisely: "kicker down a third" is a clear instruction for an assistant.
Worked problem
Setting a three-light portrait
A photographer meters the key light at f/8 at ISO 100. They want a 3:1 key-to-fill ratio, a kicker that reads about two-thirds of a stop brighter than the key, and a hair light equal to the key. What should each light meter at?
Show solution
- A 3:1 ratio is about 1.6 stops (log₂ 3 ≈ 1.58), so fill should meter about f/4.5, roughly a stop and two-thirds below f/8.
- Two-thirds of a stop above f/8 is about f/10.
- The hair light should meter f/8, measured with the meter dome pointed toward the hair light from the top of the head.
- Take test shots with each light alone and together, and adjust by eye for hair color and skin.
Answer: Key f/8, fill about f/4.5, kicker about f/10, hair light about f/8, then refine from test shots.
Lighting diagrams and setup notes
Lighting diagrams record setups from above, showing the subject, camera, lights, modifiers, reflectors and flags, with distances, heights, angles and power settings. They are invaluable for repeating a look, briefing assistants, rebuilding a setup after a break or on another day, and building a personal reference library. Free and commercial diagram tools exist, but a quick sketch on paper or a tablet, photographed and stored with the session, is often enough. Good notes also include the camera settings, focal length and camera height, background material and distance, and any gels or diffusion. A photograph of the set taken from behind the camera position, with the modeling lights on, complements the diagram. Over time, these records become a personal lighting manual.
Controlling spill and contrast
As lights are added, controlling where light does not go becomes as important as where it does. Spill from a rim light may hit the lens and cause flare; light from a background light may wash onto the subject; a large fill source may flatten the background as well as the face. Tools for control include grids, which narrow the beam; flags and black cards, which block light from specific areas; barn doors; feathering a modifier so that the subject is lit by its edge; and negative fill, black surfaces that absorb light and deepen shadows. In a white-walled studio, reflected light from walls and ceiling acts as uncontrolled fill; black flags or curtains near the subject restore contrast. Advanced lighting often involves as many flags as lights.
Testing and refining
Lighting is refined through testing. Use a stand-in, a mannequin head or a similar object while setting up, so that the subject's time is spent on the actual shoot. Shoot tethered where possible, reviewing images on a large, calibrated screen, which reveals details invisible on the camera's screen: catchlight shapes, specular highlights, hot spots, color casts and subtle flare. Check the histogram and highlight warnings for each test. Make one change at a time, so that you know what each adjustment does. When something looks wrong but you cannot identify why, turn all lights off except one and rebuild. A disciplined, methodical approach is faster than random adjustments.
Simplicity and restraint
More lights are not automatically better. Many outstanding portraits and still lifes are lit with a single source and a reflector. Each additional light adds a possibility of conflict, complexity and time. Advanced practitioners add lights only when a specific problem requires them: separating dark hair from a dark background, revealing the shape of a bottle, filling a shadow that a reflector cannot reach. A helpful discipline is to set a limit, such as two lights, for practice sessions, and to see how much variety you can achieve by changing modifiers, positions and flags. The aim is light that serves the image so well that viewers notice the subject, not the lighting.
Light as storytelling
Light tells viewers where they are and how to feel. Hard light from high above suggests midday sun or interrogation; low, warm light suggests sunset or firelight; cool, soft light from one side suggests a window on an overcast morning; light from below feels unnatural and unsettling, because natural light rarely comes from beneath. Motivated lighting, a term from cinematography, means placing studio sources so that they appear to come from a plausible source in the scene, such as a window, a lamp or the sky. Even in abstract studio portraits on plain backgrounds, viewers read light emotionally. Asking what story the light should tell, and what source it might suggest, helps choose direction, quality, color and contrast with purpose rather than habit.
Working with limited equipment
Advanced lighting does not require a large kit. A single strobe with a softbox, a reflector, a black flag and a grid can produce an enormous range of images when positioned thoughtfully, and windows, white walls and household materials extend the possibilities. Many working photographers deliberately travel with small kits for location work and rely on bounce, flags and placement. Learning to solve problems with fewer tools builds understanding that transfers to larger productions, where the same principles apply on a bigger scale.
Light and the lens
Lens choice interacts with lighting design. Longer focal lengths show less background, making background lighting easier to control and keeping light stands out of frame; wider lenses show more of the set, so lights, flags and stands must be placed carefully. Lens flare from backlights is more likely with wide lenses and without hoods. Decide the lens and camera position early, since they determine where lights can go.
Common mistakes
MistakeStarting with all the lights on.
InsteadBuild one light at a time, beginning with the key.
MistakeLights competing as equals.
InsteadEstablish a clear key and subordinate roles.
MistakeAdding lights without a purpose.
InsteadDescribe each light's role or remove it.
MistakeIgnoring spill and reflected fill.
InsteadUse grids, flags and negative fill.
MistakeNot recording setups.
InsteadKeep diagrams, power settings and set photographs.
Summary and key terms
- Design light from a clear idea of the result and reference images.
- Analyze the subject's shape, surface, texture, tone, scale and movement.
- Give light a hierarchy with a dominant key and subordinate roles.
- Build setups one light at a time, testing each addition.
- Set lights relative to the key in stops and record values.
- Control spill and reflected light with grids, flags and negative fill.
- Test methodically and keep setups as simple as the image allows.
- Lighting plan
- Deliberate design of sources and their roles.
- Mood board
- Collection of reference images showing intent.
- Hierarchy of light
- Ranking of sources with one dominant key.
- Kicker
- Edge light on the shadow side of a subject.
- Accent light
- Light that highlights a specific detail.
- Spill
- Light falling outside the intended area.
- Negative fill
- Dark surfaces that deepen shadows.
- Lighting diagram
- Overhead plan of a lighting setup.
- Stand-in
- Person or object used while setting lights.
- Tethered shooting
- Shooting directly to a computer for review.
Practice problems
Work each problem on paper first, then reveal the answer to check.
What should every setup begin with?
Show answer
A clear idea of the intended result.
Name four subject characteristics to analyze.
Show answer
Shape, surface, texture, tone, scale, movement.
Why do glossy subjects need special attention?
Show answer
They reflect the light sources and surroundings.
What problem arises when lights compete equally?
Show answer
Confused direction and crossing shadows.
In what order are lights usually added?
Show answer
Key, fill, separation lights, background.
Stops in a 3:1 ratio?
Show answer
About 1.6.
Why may a kicker be set brighter than the key?
Show answer
It skims at a steep angle and reflects less toward the camera.
What should a lighting diagram record?
Show answer
Positions, distances, heights, modifiers and power.
Name two tools for controlling spill.
Show answer
Grids, flags, barn doors, feathering.
Why change one thing at a time?
Show answer
To know what each adjustment does.
Lesson quiz · 5 questions
Score 60% or more to complete this lesson.
Create a free account to save your progress, take quizzes and earn a certificate.