
PHOT-211 · Lesson 10 of 12 · 25 min
Food and tabletop lighting
Food photography must make people want to eat. Whether for a restaurant menu, a cookbook, packaging, advertising or social media, food images succeed when they look fresh, appetizing, textured and true to the dish. Light is central to this: it reveals the crust of bread, the glisten of sauce, the steam rising from soup, the freshness of herbs and the translucency of fruit. Food also changes quickly under lights, wilting, melting, drying and cooling, so food photography combines technical lighting skill with speed and teamwork. This lesson covers the qualities of appetizing light, backlight and side light for food, angles and dishes, fill and contrast, natural-light looks in the studio, hard-light and editorial styles, steam, moisture and freshness, working with food stylists, and honest representation.
The qualities of appetizing light
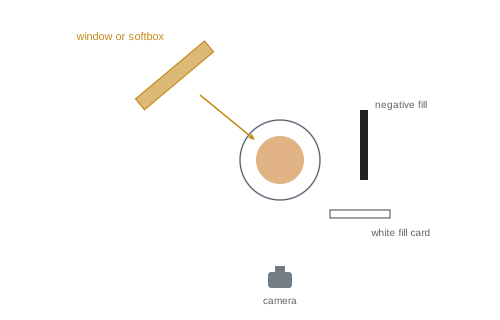
Food usually looks best under directional light that reveals texture and moisture, with gentle shadows that show shape and depth. The most common starting point is a single soft source from behind or behind and to one side of the dish, sometimes called back light or three-quarter back light, often imitating a window. This light creates highlights on moist surfaces such as sauces, glazes and fresh vegetables; makes translucent foods such as fruit, jellies and drinks glow; reveals texture through the shadows of crumbs, grains and crusts; and leaves the front of the dish slightly darker, which is lifted with white cards. Front lighting tends to flatten food and remove texture, while top light from directly overhead suits flat lays but can look clinical if not shaped.
Backlight and side light for food
The position of the main light changes the character of food images:
- Back light: behind the dish, facing the camera. Maximizes texture, steam and translucency, with bright highlights on liquids and sauces, but can make the front of the dish too dark and causes flare if light hits the lens; flags and fill cards are essential.
- Back-side light: behind and to one side, at about ten or two o'clock. The most versatile food light, combining texture and translucency with some light on the side of the dish.
- Side light: from one side. Shows shape and texture strongly, with half the dish in shadow; dramatic, especially with dark backgrounds.
- Front-side light: in front and to one side. Shows the face of the dish and the details of plating, useful for stacked foods such as burgers and sandwiches, though with less texture.
Most food setups use one main light with cards for fill and flags for contrast; additional small lights or mirrors add accents, such as a highlight on a glass or light through a drink.
Angles and dishes
The camera angle should suit the dish. Common angles include:
- Overhead, or flat lay: looking straight down, ideal for flat dishes such as pizza, bowls, salads, tarts and table spreads with many dishes, and for graphic compositions. Light from one side or behind, with cards, creates shape.
- Forty-five degrees: about the angle a diner sees, suitable for most plated meals, showing both the top and some of the side.
- Straight on or low angle: at table height, ideal for tall foods such as burgers, layered cakes, stacked pancakes and drinks, showing layers and height.
Lens choice affects how dishes appear: longer focal lengths, such as 85 to 100 mm or macro lenses, flatten perspective and keep plates round; wide lenses exaggerate the foreground and suit environmental restaurant shots. Shallow depth of field, focused on the most appetizing part of the dish, is popular for editorial work, while advertising and packaging often require more of the dish in focus, sometimes with focus stacking.
| Dish | Typical angle | Lighting notes |
|---|---|---|
| Pizza, bowls, salads | Overhead | Side or back light for texture |
| Plated meals | 30–45 degrees | Back-side light with front fill |
| Burgers, layered cakes | Straight on | Side or front-side light to show layers |
| Drinks | Straight on or slightly above | Backlight through the liquid |
| Soups and stews | 30–45 degrees or overhead | Back light for steam and surface sheen |
| Baked goods | 30–45 degrees | Side or back light for crust texture |
Fill and contrast
With the main light behind or beside the dish, the side facing the camera often falls into shadow. White cards or reflectors in front of the dish, at its height, bounce light back into these shadows; small cards can be placed close to specific areas, such as the front of a burger or a dark sauce. Silver cards give more intense fill and highlights on shiny surfaces. Black cards on the side opposite the light deepen shadows and add contrast and mood, popular in dark, moody food photography. The balance between light and shadow sets the style: bright and airy images with lots of fill for lifestyle and healthy food brands; darker, more contrasty images for rustic, comfort or gourmet food. Shadows should never obscure the food's key features, such as the filling of a pie or the layers of a cake.
Worked problem
Fixing a flat-looking salad
A salad photographed overhead with a softbox directly above the camera looks flat, with no texture in the leaves and no sense of depth. How should the lighting be changed?
Show solution
- Move the softbox from above the camera to one side and slightly behind the bowl, at about ten o'clock.
- Lower it so that light skims across the leaves, revealing their texture and moisture.
- Place a white card opposite the light to soften the shadows inside the bowl.
- Add a light mist of water on the leaves just before shooting to create small highlights, and check that dressing and oil glisten.
Answer: Move the light to the side and behind at a lower angle, add a white fill card, and refresh the leaves with mist for highlights.
Natural-light looks in the studio
Many food photographers work with window light, which gives a soft, natural look. In the studio, or when daylight is unreliable, the look can be recreated with a large softbox or a light behind a large diffusion scrim, placed to the side and behind the set like a window. Adding a window frame shadow, by placing a gobo or frame between a harder light and the diffusion, or a subtle gradient across the background, adds realism. Flash has the advantage of consistency and freezes movement, such as pouring, sprinkling and drips, while continuous LED lights make it easy to see the effect while styling, and allow video. Mixing a flash key with the ambient light of a real window requires balancing the two exposures (Lesson 5).
Hard-light and editorial styles
Contemporary food photography also uses hard, sunlit looks: crisp shadows, bright highlights and saturated color, suggesting summer, outdoor eating or a bold graphic style. A small, hard source, such as a bare reflector, a Fresnel or direct sunlight, placed high and to one side, creates these shadows; props and food are arranged so that shadows form interesting shapes. Hard light reveals texture strongly and can make colors vivid, but it is unforgiving of imperfections and can make some foods look greasy. Editorial food photography for magazines and cookbooks often has a distinctive style for each publication, from soft natural light to dramatic chiaroscuro inspired by still life painting.
Steam, moisture and freshness
Food photographers use many techniques to make dishes look fresh. Steam is most visible against a dark background and when backlit; real steam often dissipates quickly, so it may be enhanced with a steamer, a hot wet cotton ball hidden behind the dish, or added later in compositing. Moisture on fruit, vegetables and drinks is created with sprays of water or a mixture of glycerin and water, which lasts longer. Brushing food with oil keeps it glossy, and undercooking vegetables keeps them bright. Ice cream is often photographed in a cold room or replaced with substitutes in advertising when permitted, although many clients and regulations require real food when the product itself is advertised. Working quickly, with a stand-in dish for setting lights and the hero dish brought in at the last moment, is essential.
Working with food stylists
Professional food photography is a team effort. Food stylists prepare, cook and arrange food to look its best on camera, using techniques and tools such as tweezers, brushes, syringes, sprays and stand-in ingredients; prop stylists select plates, cutlery, linens and surfaces. The photographer designs the light and composition and directs the overall look, often with an art director. Communication is key: agreeing the angle and lighting first with a stand-in, then bringing in the hero food, and shooting quickly while it is at its best. Understanding how foods behave under light, which wilt, melt, separate or dull, helps photographers plan and work efficiently with stylists.
Honest representation
Food advertising is subject to consumer protection and advertising rules in Canada and the United States, which prohibit misleading representations of products. Images of a food product being sold should show what the customer will receive: the actual product, in a representative quantity and size, without additions that are not part of the product. Serving suggestions should be labeled where appropriate on packaging. Styling techniques that make real food look its best are generally acceptable, while replacing the advertised product with a substitute, exaggerating portion sizes or adding ingredients that are not included can mislead consumers. Editorial food photography for recipes has more freedom, but should still reflect what a reader can reasonably make. PHOT-202 Lesson 12 discusses the ethics of image manipulation further.
Drinks and beverages
Drinks are often photographed straight on, backlit to make the liquid glow, with highlights on the glass and condensation for freshness. Coffee and tea look best with a clear surface sheen and visible crema or steam; cocktails with garnishes need attention to color, transparency and garnish freshness; beer needs a stable head of foam, often refreshed with a fresh pour or a stylist's tricks; and wine benefits from gradient backlighting to reveal its color. Clean glassware is essential, since fingerprints and smudges are obvious under backlight.
Food in motion
Pouring sauce, drizzling honey, sprinkling sugar, breaking bread and tossing salad add life to food images. Flash freezes these moments crisply, while slower shutter speeds with continuous light give a softer sense of motion. Motion shots often require many attempts, a stylist or assistant to perform the action consistently, and protection for the set. They are popular in social media video and advertising, where a short clip or a single dramatic frame can capture attention.
Restaurant and location food photography
Restaurant shoots often take place in working kitchens and dining rooms with mixed lighting and limited space. A portable kit with one or two strobes or LED panels, diffusion, cards and a small table set near a window allows studio-quality results on location. Coordinate with the chef and staff on timing, since dishes must be photographed quickly after they are plated, and capture the atmosphere of the restaurant as well as the food for editorial and marketing use.
Consistency for menus and packaging
Menu and packaging photography requires consistent lighting, angles and backgrounds across many dishes, so that a menu or product range looks unified. Fixed setups, marked positions, a standard plate or packaging scale reference, and color charts at the start of each session ensure consistency, much like e-commerce product photography (PHOT-202 Lesson 9).
Props and surfaces for food
Props tell the story around food: rustic boards and linen suggest home cooking; marble and brass suggest luxury; colorful ceramics suggest freshness and fun. Matte props avoid distracting reflections, while a few glossy elements, such as a glass or a spoon, add sparkle. Props should be scaled appropriately, since large plates make portions look small and small plates make them look generous; choose sizes that represent the food honestly. Building a collection of plates, cutlery, linens and surfaces in a consistent palette helps develop a recognizable style for a client or publication.
Common mistakes
MistakeFront-lighting food flatly.
InsteadUse back or back-side light for texture and glow.
MistakeLetting backlight flare into the lens.
InsteadFlag the lens and use a lens hood.
MistakeDark, unfilled fronts on plated dishes.
InsteadUse white cards to fill the camera side.
MistakeSetting lights with the hero dish.
InsteadUse a stand-in and bring the hero dish in last.
MistakeSubstituting or exaggerating an advertised product.
InsteadShow the real product honestly.
Summary and key terms
- Appetizing light is directional, revealing texture and moisture.
- Back and back-side light make food glow; side light adds drama.
- Choose overhead, 45-degree or straight-on angles to suit the dish.
- White cards fill fronts; black cards add mood.
- Window-like softboxes recreate natural light; hard light suits bold styles.
- Steam, moisture and speed keep food looking fresh.
- Food stylists are essential, and advertised products must be represented honestly.
- Back light
- Light from behind the dish toward the camera.
- Back-side light
- Light from behind and to one side.
- Flat lay
- Overhead view of an arrangement.
- Hero dish
- The final dish prepared for the shot.
- Stand-in
- Substitute dish used while setting up.
- Food stylist
- Specialist preparing food for the camera.
- Prop stylist
- Specialist choosing props and surfaces.
- Glycerin spray
- Mixture creating lasting droplets.
- Gobo
- Object casting a shadow pattern.
- Serving suggestion
- Label indicating items not included in a product.
Practice problems
Work each problem on paper first, then reveal the answer to check.
What is the most common starting light for food?
Show answer
A soft source behind or behind and to one side.
What does back light do for drinks?
Show answer
Makes them glow.
Which angle suits pizza?
Show answer
Overhead.
Which angle suits a burger?
Show answer
Straight on.
Why use longer lenses for food?
Show answer
They flatten perspective and keep plates round.
How do you fill the front of a backlit dish?
Show answer
With white cards in front.
How is steam made more visible?
Show answer
Backlight against a dark background.
Why use glycerin and water?
Show answer
Droplets last longer.
Why use a stand-in dish?
Show answer
To set lights before the hero food deteriorates.
What must food advertising show?
Show answer
The real product in representative quantity.
Lesson quiz · 5 questions
Score 60% or more to complete this lesson.
Create a free account to save your progress, take quizzes and earn a certificate.