
PHOT-211 · Lesson 12 of 12 · 25 min
Working to a brief, recreating looks and capstone
Professional studio photographers rarely light only for themselves. They light to a client's brief, an art director's layout, a brand's guidelines or an editor's story, often recreating a look shown in reference images and maintaining it across many images and days. This final lesson draws the course together: reading and interpreting briefs, analyzing reference images, recreating a look, pre-production and test shoots, managing time and budgets on set, communicating with clients and teams, building a personal lighting style, and the capstone project.
Reading a brief
A brief describes what the client needs: the purpose of the images, the audience, the products or people, the number of images, the formats and crops, the deadline, the budget and the intended look. Briefs vary from detailed documents with layouts and mood boards to a few sentences in an email. Reading a brief carefully, and asking questions where it is unclear, prevents misunderstandings. Key questions include: Where will the images appear, and at what size? What crops and aspect ratios are needed, including space for text? What brand guidelines apply, such as colors, styles and restrictions? What must be shown accurately, such as product color or features? What is the mood, and are there references? Who approves the images, and how? Answering these before lighting decisions are made saves time and reshoots.
| Brief element | Lighting implication |
|---|---|
| Use and size (billboard, web, packaging) | Resolution, sharpness, retouching level |
| Crops and text space | Even light in areas for type, framing |
| Brand guidelines | Color, contrast, mood consistency |
| Product accuracy | Color-accurate light, charts, reflections |
| Mood and references | High-key, low-key, hard, soft, color |
| Number of images and time | Setup efficiency, modular lighting |
Analyzing reference images
Reference images are the most common way clients communicate a look. Analyzing them systematically reveals how they were lit:
- Shadows: their direction shows the key light's position; their edge softness shows the source's size and distance; their depth shows the fill level.
- Catchlights: their shape, size and position in the eyes reveal the modifiers and their placement.
- Highlights: specular highlights on skin, glass and metal show the shape and size of sources.
- Background: its tone and gradients show whether it was lit separately, how brightly, and from where.
- Rim and edge light: bright edges show back lights, their side and hardness.
- Color: casts in shadows and highlights reveal gels or mixed light.
- Contrast and processing: overall contrast, saturation and grading show what was done in post-production rather than in light.
Sketching a lighting diagram from a reference, then testing it, is an excellent exercise and a common professional task. Remember that many references are composites or heavily retouched, so some effects cannot be achieved in a single exposure.
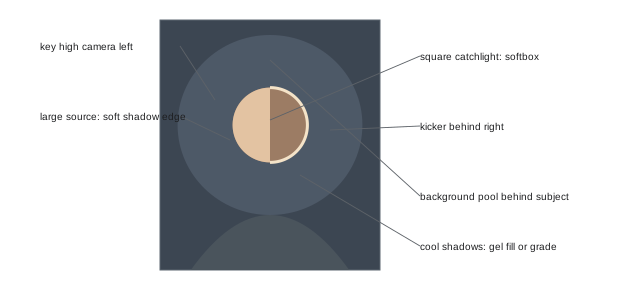
Recreating a look
Recreating a look from a reference follows the method of Lesson 1: start with the key light, matching its direction, height and modifier from the shadow and catchlight evidence; add fill to match shadow depth; add rims, kickers and background lights; then match color, using gels or white balance, and finally contrast and processing. Compare test shots side by side with the reference on a tethered screen. Differences in subject, wardrobe, lens and distance mean that results will rarely be identical; aim for the same feeling and key characteristics rather than an exact copy. When a client's reference is another photographer's work, recreate the general lighting approach while bringing your own interpretation, since copying a distinctive image too closely can raise copyright and ethical concerns.
Pre-production and test shoots
Larger productions involve pre-production: meetings to agree the concept and references; selecting the studio, crew, stylists, hair and makeup, models and props; planning lighting setups and equipment lists; scheduling setups to minimize changes; and confirming deliverables. Test shoots before the main shoot, with stand-ins or the actual products, allow the lighting to be developed and approved, prevent surprises on the day and reduce costly studio time with the full team present. Pre-lighting the studio the day before, or early on the shoot day, is standard for complex setups. A shot list with each image, its lighting setup and the order of shooting helps everyone know what comes next.
Worked problem
Scheduling a product day
A client needs 18 product images in one day: 6 on white, 6 on a dark textured surface with dramatic light, and 6 lifestyle images with props and window-style light. Each setup takes about an hour to build and each image about 15 minutes to shoot and approve. How should the day be organized?
Show solution
- Group the images by setup so each lighting setup is built only once: three setups in total.
- Estimate time: 3 setups × 1 hour = 3 hours; 18 images × 15 minutes = 4.5 hours; total about 7.5 hours plus breaks and contingency.
- Pre-light the white setup before the client arrives, since it is the most standardized.
- Shoot white first, then dark dramatic, then lifestyle, moving from simplest to most complex, with a lunch break during a setup change.
Answer: Group by setup, pre-light the first, shoot from simplest to most complex, and plan about 8 to 9 hours including breaks and contingency.
Managing time and budget on set
Studio days are expensive: studio rental, equipment, crew, models, stylists and client time add up quickly. Efficient lighting saves money. Strategies include modular setups that can be adapted between images rather than rebuilt; keeping a base setup and changing only one or two elements; using assistants to prepare the next setup while the current one is being shot; having backup equipment ready; and knowing when a setup is good enough rather than pursuing marginal improvements. Clear communication about time, such as telling the client how long a change will take, builds trust. Overtime costs and missed images damage relationships, so realistic planning matters.
Communicating with clients and teams
Clients and art directors may not use technical lighting language. Translate their comments into lighting changes: "more dramatic" often means higher contrast, harder light or darker background; "softer" may mean larger sources, more fill or lower contrast; "warmer" may mean CTO gels or white balance; "more premium" for products often means darker backgrounds, controlled highlights and gradients. Show options quickly by changing one element at a time and comparing on a tethered screen. Explain constraints honestly, such as when a request would create unwanted reflections or require compositing. Treat stylists, assistants and models with respect, give clear instructions, and keep the set calm and organized; a good atmosphere shows in the images.
Building a personal lighting style
Beyond meeting briefs, many photographers develop a recognizable lighting style that attracts clients: a particular use of hard sunlit light, painterly low-key portraits, vivid colored gels, or clean luminous beauty. Style develops through practice, study of painters, cinematographers and photographers, experimentation and reflection. Keeping a lighting journal and a library of diagrams from your own work and from analysis of others' helps you understand what you are drawn to. A coherent portfolio that shows a consistent lighting sensibility across subjects is often more persuasive to clients than one that shows every possible technique.
Capstone: lighting to a brief
The capstone asks you to work to a brief, real or simulated, from planning to delivery. Choose or receive a brief requiring at least three distinct lighting setups from this course, such as a high-key or low-key portrait, a colored gel image, a beauty or fashion image, a still life with reflective or transparent objects, a food image, a high-speed image or a multi-pass composite. Your submission should include:
- The brief and your interpretation, with reference images and a mood board.
- Lighting diagrams for each setup, with modifiers, positions, power settings, ratios and gels.
- Test shots showing how each setup was built, one light at a time.
- At least six final images, edited and exported for the stated use.
- For any composite, the individual passes and a description of how they were combined.
- A schedule and equipment list for the shoot.
- A reflection of about 500 words on how you met the brief, what problems you solved and what you would change.
Present the capstone as you would to a client, with clear organization and professional delivery.
Usage rights, deliverables and contracts
Commercial briefs come with business considerations that affect planning. Usage rights define how, where and for how long the client may use the images, such as web only for one year, or worldwide advertising in all media for five years, and they strongly affect fees. Deliverables specify the number of images, file formats, sizes, retouching levels and delivery dates. Contracts should cover fees, usage, cancellation, reshoots, model and property releases, and who supplies props, studio space and crew. Lighting plans should be built around the agreed deliverables, so that time is not spent on images the client has not commissioned. PHOT-410 covers the business of photography in detail.
Feedback and revisions
After delivery, clients may request revisions, such as different crops, color adjustments or retouching changes, and occasionally reshoots. Agreeing the number of revision rounds in advance prevents endless changes. Keeping detailed lighting notes and diagrams makes reshoots or additional images easier to match months later, and clients value photographers who can reproduce a look reliably.
Learning from every job
Every brief is a learning opportunity. After each shoot, review what worked and what did not: which setups took longer than expected, which modifiers produced the best results, where communication broke down, and what the client responded to most strongly. Add the best diagrams and images to your reference library and portfolio, and note equipment you lacked. Over time, these reflections become a personal body of knowledge that makes each subsequent job faster and better.
Collaboration across disciplines
Studio lighting increasingly overlaps with other disciplines: video, where lights must work for both stills and motion; CGI, where photographers provide lighting references and plates; and social media content, where shoots produce vertical and horizontal versions and behind-the-scenes clips. Photographers who understand these neighboring fields, and who can light efficiently for several outputs at once, are well placed in the changing commercial market. PHOT-440 covers video for photographers, and the cinematography courses explore lighting for the moving image.
From student to professional
Moving from coursework to professional practice involves building a portfolio of lit work, assisting experienced photographers to learn on real sets, and developing relationships with stylists, makeup artists, retouchers and studios. Assisting in particular offers invaluable experience of lighting large productions, managing equipment and working with clients. The skills developed in this course, designing light deliberately, controlling it precisely and working to a brief, form the foundation of a professional studio career.
Case study: a cosmetics campaign
Consider a brief for a skincare campaign: three hero images of models with different skin tones, a still life of the product range, and a texture close-up of the cream, for web, social media and in-store posters. The photographer would analyze references for a luminous, soft look; plan a clamshell beauty setup with large sources and individual adjustments for each model's skin tone; plan a high-key still life with gradient reflections on the jars and separate passes for labels; and plan a macro texture shot with raking soft light. Pre-production would include casting, makeup tests and a test shoot of the jars. The schedule would group the three portraits in one setup, then the still life, then the macro work, with retouching time budgeted for the composite still life. Every decision connects to the brief: use, audience, accuracy, mood and consistency.
Common mistakes
MistakeStarting to light before understanding the brief.
InsteadClarify use, crops, brand, accuracy, mood and approval first.
MistakeCopying a reference exactly.
InsteadRecreate the approach and feeling with your own interpretation.
MistakeBuilding each image's setup from scratch.
InsteadGroup images by setup and use modular lighting.
MistakeUsing technical jargon with clients.
InsteadTranslate feedback into lighting changes and show options.
MistakeSkipping test shoots for complex jobs.
InsteadTest and pre-light before the main shoot.
Summary and key terms
- Briefs define use, crops, brand, accuracy, mood and approval.
- Reference images reveal lighting through shadows, catchlights, highlights and color.
- Recreate looks by building from the key and comparing tethered tests.
- Pre-production and test shoots prevent costly surprises.
- Group images by setup and plan realistic schedules.
- Translate client language into lighting changes and communicate clearly.
- Develop a personal style; the capstone integrates the course.
- Brief
- Client's description of requirements.
- Layout
- Sketch showing the intended composition.
- Brand guidelines
- Rules for a brand's visual identity.
- Reference image
- Example showing the intended look.
- Pre-production
- Planning before the shoot.
- Test shoot
- Trial shoot to develop and approve lighting.
- Pre-lighting
- Setting lights before the full team arrives.
- Shot list
- List of images and their setups.
- Modular setup
- Lighting adaptable between images.
- Lighting style
- Recognizable personal approach to light.
Practice problems
Work each problem on paper first, then reveal the answer to check.
Name four questions to ask about a brief.
Show answer
Use and size, crops, brand guidelines, accuracy, mood, approval.
What do shadows in a reference reveal?
Show answer
Key direction, source size and fill level.
What do catchlights reveal?
Show answer
Modifier shapes and positions.
Why are some references impossible in one exposure?
Show answer
They may be composites or retouched.
What is the first step in recreating a look?
Show answer
Match the key light.
Why run a test shoot?
Show answer
To develop and approve lighting before the costly main day.
How should images be scheduled?
Show answer
Grouped by setup, simplest to most complex.
What might "more dramatic" mean in lighting?
Show answer
Higher contrast, harder light, darker background.
What does "more premium" often mean for products?
Show answer
Dark backgrounds, controlled highlights, gradients.
Name three capstone components.
Show answer
Brief, diagrams, tests, final images, passes, schedule, reflection.
Lesson quiz · 5 questions
Score 60% or more to complete this lesson.
Create a free account to save your progress, take quizzes and earn a certificate.