
PHOT-211 · Lesson 2 of 12 · 25 min
High-key lighting
High-key images are bright, airy and optimistic, with mostly light tones, soft or minimal shadows and often a white or very light background. They are used widely in beauty, fashion, children's and family portraiture, advertising, e-commerce, medical and technology imagery, and anywhere a clean, positive, open feeling is wanted. Although high-key images look simple, they are technically demanding: the background must be bright and even without spilling light onto the subject or causing flare, skin and light clothing must retain detail, and the subject must still have shape and separation. This lesson covers what defines high-key, designing high-key lighting, lighting white backgrounds, measuring and controlling background brightness, flare and wrap, soft and shaped high-key portraits, high-key for groups and full-length subjects, high-key still life, and editing high-key images.
What defines high-key
High-key describes the overall tonal distribution of an image, weighted strongly toward the light end, rather than simply overexposure. A high-key image still contains a full tonal range in small amounts: dark eyes, a dark eyebrow line, a few shadows that give shape. Without these, the image looks washed out and flat rather than luminous. High-key lighting usually combines a bright background, soft and broad key light, generous fill and low lighting ratios, typically 2:1 or lower; light-toned clothing, props and sets reinforce the effect. The term comes from the tonal scale, where "key" refers to the dominant tones; low-key images, covered in Lesson 3, are their opposite.
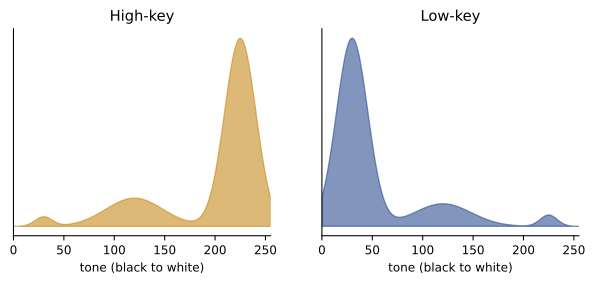
Designing high-key lighting
A typical high-key portrait setup includes:
- A large, soft key light, often positioned close to the camera axis or slightly to one side and above, such as a large octabox, a parabolic umbrella or a beauty dish with a sock.
- Generous fill, such as a large reflector below the face for clamshell lighting, a second softbox, or a large white bounce card, keeping shadows light.
- Background lights, usually two, evenly illuminating a white seamless background, white wall or translucent panel.
- Optionally, white V-flats on either side of the subject to bounce additional fill and wrap light around the subject.
Shadows should be soft and light, but not completely absent, unless a deliberately flat look is wanted. Facial features, the jaw line and the edges of the body need some definition, which comes from placing the key slightly off-axis, controlling fill, and allowing slightly darker edges where the face turns away from the light.
Lighting a white background
A white background photographed under the same light as the subject usually records as light gray, not white, because it receives less light than the subject or because the exposure is set for skin. To make a white background record as pure white, it must be lit separately to about 1 to 1.5 stops brighter than the key light on the subject. Common methods include:
- Two lights aimed at the background from either side, at about 45 degrees, behind the subject, with standard reflectors or umbrellas, placed to give even coverage from edge to edge.
- A light behind the subject aimed back at the background, hidden by the subject, for a bright center with fall-off toward the edges, useful for a halo effect.
- Lights placed on the floor behind a low wall or flag, aimed up at the background.
- Backlit translucent panels or scrims, lit from behind, giving an extremely even, bright background with less spill.
Even illumination is critical: hot spots and dark corners produce uneven gray areas that require retouching. Meter the background at several points, or check with the camera's highlight warnings and a waveform or histogram, aiming for an even reading across the frame.
| Background reading relative to key | Result on a white background |
|---|---|
| −1 stop | Light gray |
| 0 (same as key) | Very light gray, near white |
| +1 stop | Pure white, little spill |
| +1.5 stops | Pure white with safety margin |
| +2 stops or more | Excess flare and wrap around edges |
Flare and wrap
Overlighting a white background causes problems. Light reflects from the background back toward the camera, reducing contrast across the whole image, a veiling flare that makes images look hazy and washed out. Light also wraps around the edges of the subject, eating into hair, shoulders and the outline of the face, so that fine detail disappears and the subject appears to glow at the edges. A small amount of wrap can be attractive in beauty work, but excessive wrap makes subjects look ghostly. Remedies include keeping the background at no more than about 1.5 stops over the key; increasing the distance between the subject and the background, ideally 2 to 3 meters or more; using black flags between the background lights and the subject and camera to block spill; using a lens hood or a flag above the lens; and shooting with a longer focal length, which shows less background and allows the subject to stand farther from it.
Worked problem
Fixing a hazy high-key portrait
A photographer shoots a portrait on white seamless with the subject 1 meter from the background. The background meters 2.5 stops over the key, and the images look hazy with glowing edges around the hair. What changes should be made?
Show solution
- Reduce the background lights so they meter about 1 to 1.5 stops over the key.
- Move the subject forward so they stand at least 2 to 3 meters from the background.
- Place black flags beside the background lights, between them and the subject and camera.
- Add a lens hood or flag above the lens, and check the background with highlight warnings for even, just-clipping white.
Answer: Lower the background to about +1 to +1.5 stops, increase subject-to-background distance, flag the background lights and shade the lens.
Soft and shaped high-key portraits
Within the high-key style, there is room for variety. A clamshell setup, with a beauty dish or octabox above and a reflector or second softbox below, gives a luminous, almost shadowless beauty look. A large octabox to one side with a white V-flat on the other gives soft, directional high-key light with gentle modeling. A large source behind the camera, with the subject close to it, gives very even light with large catchlights. For shape and separation, a subtle kicker or rim light can add definition against white, but it must be controlled carefully because it is easily lost in the bright background. Clothing choices matter: white or pastel clothing reinforces high-key, while dark clothing creates strong contrast and draws attention, which may or may not be desired.
High-key for groups and full-length subjects
Full-length and group images on white require even light across a larger area. The key light must be large and placed farther away to light the whole group evenly, often a large umbrella, a scrim or several softboxes, with the inverse square law in mind: the farther the light, the more even the illumination from front to back. White floors require their own lighting, since the floor beneath the subject records darker than the background wall if it is not lit; lights can be angled down onto the floor, or the subject can stand on a white vinyl or glossy surface that reflects the background light. Shadows on the floor beneath subjects can be kept for grounding or removed in editing. Wider coverage increases the risk of flare, so greater subject-to-background distances and careful flagging are needed. Many e-commerce studios photograph full-length clothing on white with dedicated, fixed setups.
High-key still life and products
High-key still life, with products and objects on white, is common in e-commerce and advertising. Small objects can be lit with large softboxes overhead and to the sides, white cards for fill, and a backlit acrylic sheet or light table beneath for shadowless white. Shadows can be kept soft and short for grounding, or removed completely for a floating look. Shiny objects may reflect the bright environment strongly, losing definition; black cards placed carefully restore edges and shape, a technique developed further in Lesson 9. Light-colored objects on white require particular care, since their edges can merge with the background; slight underexposure of the background, a soft shadow, or a subtle gray edge from a black card can preserve separation.
Exposure and color in high-key
Correct exposure for high-key images keeps skin and important light-toned details below clipping, while the background clips intentionally. Use a flash meter on the subject for the key, check highlights on skin, white clothing and hair with the camera's highlight warnings and histogram, and avoid letting important highlights reach pure white. Color is also important: bright white backgrounds and white surroundings reflect light that can tint the subject if the background is not neutral, and slight color casts are very visible in light tones. Use a gray card at the subject position, and check that white backgrounds are neutral rather than blue, magenta or yellow. Light-toned images can also reveal sensor dust and lens flare more clearly.
Editing high-key images
High-key images often benefit from careful editing. Common steps include ensuring the background reaches pure white, with a local brush or mask raising exposure on any gray corners; preserving detail in skin highlights by reducing highlights or whites slightly on the subject; adding a small amount of contrast in the midtones and darkening the eyes and brows slightly, so that the face has definition; correcting color casts in light tones; and cleaning dust, seams and footprints from the background and floor. High-key retouching should avoid flattening the subject completely: preserve enough midtone and shadow detail to give the image depth.
High-key with a single light
High-key does not always require several lights. A single large light behind the subject, aimed through a translucent scrim or bounced off a white wall or V-flat behind them, can create a bright white background and wrap light around the subject, while a large reflector or white V-flats in front bounce that light back onto the face. Alternatively, a single large source very close to the subject and a white background close behind them, so that both receive similar light, produces a light gray to white background with soft, low-contrast light. These approaches are useful on location and in small studios, though they offer less control over background brightness than separate background lights.
High-key in children's and family portraiture
High-key is popular for children's and family portraits because it feels joyful and timeless and is forgiving of movement within a broad lit area. Use large sources placed to give even coverage across the working area, so that children can move freely without leaving the light; set exposure with some margin for highlights on light clothing; and use fast recycling and moderate power for bursts. Keep cables and stands secured and out of reach, and use sandbags generously, since children move unpredictably. White floors and backgrounds show footprints quickly, so keep a broom and fresh paper ready.
Variations on high-key
High-key can be tinted or textured: pale colored backgrounds lit brightly give pastel high-key images; white backgrounds lit slightly unevenly give a soft vignette; and high-key black-and-white portraits emphasize eyes and features. In fashion, high-key with hard light, using a bare reflector on a white background, creates crisp shadows on a bright field, a graphic look associated with editorial and catalog work.
Checking high-key exposure quickly
A quick way to check a high-key setup is to enable highlight warnings and take a test frame: the background should blink evenly to its edges, while skin, white clothing and hair should not. If areas of the subject blink, reduce the key or move it slightly; if background corners do not blink, adjust the background lights. Repeat whenever the subject moves to a new position.
Common mistakes
MistakeOverexposing the whole image and calling it high-key.
InsteadKeep detail in skin and include some darker accents.
MistakeLighting the white background too brightly.
InsteadKeep it about 1 to 1.5 stops over the key.
MistakePlacing the subject close to the background.
InsteadLeave 2 to 3 meters or more and flag spill.
MistakeUneven background lighting.
InsteadMeter several points and adjust for even white.
MistakeForgetting to light white floors.
InsteadLight floors separately or use reflective surfaces.
Summary and key terms
- High-key images are dominated by light tones but keep small darker accents.
- Large soft keys, generous fill and low ratios create the style.
- White backgrounds need about 1 to 1.5 stops more light than the key.
- Excessive background light causes flare and edge wrap.
- Distance, flags and lens shading control flare.
- Groups, full-length subjects and floors need even, wider coverage.
- Exposure and editing preserve skin detail, neutral color and definition.
- High-key
- Image dominated by light tones.
- Low ratio
- Small difference between key and fill.
- White seamless
- White paper background without a visible join.
- V-flat
- Large hinged board used to bounce or block light.
- Veiling flare
- Stray light that reduces contrast overall.
- Wrap
- Background light spilling around subject edges.
- Halo light
- Background light behind the subject creating a bright center.
- Light table
- Backlit surface for shadowless product images.
- Clamshell
- Key above and fill below the face.
- Highlight warning
- Camera display of clipped areas.
Practice problems
Work each problem on paper first, then reveal the answer to check.
What distinguishes high-key from overexposure?
Show answer
High-key keeps detail and some dark accents.
Typical lighting ratio for high-key?
Show answer
2:1 or lower.
How bright should a white background be?
Show answer
About 1 to 1.5 stops over the key.
Name two ways to light a white background.
Show answer
Two side lights, a hidden light behind the subject, floor lights, backlit panel.
What causes veiling flare?
Show answer
Light reflecting from the background toward the lens.
What is wrap?
Show answer
Background light spilling around subject edges.
Recommended subject-to-background distance?
Show answer
2 to 3 meters or more.
Why do white floors need separate lighting?
Show answer
They record darker than the lit wall.
How can light objects keep separation on white?
Show answer
Soft shadows, slightly lower background, black card edges.
Name two high-key editing steps.
Show answer
Clean background to white, keep skin detail, darken eyes slightly.
Lesson quiz · 5 questions
Score 60% or more to complete this lesson.
Create a free account to save your progress, take quizzes and earn a certificate.