
INS-130 · Lesson 3 of 12 · 22 min
Applying sectional pipe insulation
▶ Video coming soon A video version of this lesson is on the way.
Bernie Valois can insulate a straight run of jacketed pipe covering faster than most people can read about it: open, snap, turn, peel, press, butt the next one, strip, press. Devon's first attempts on the Mountview second floor took four times as long and looked it. Laps ran in every direction, one butt joint showed a line of yellow fiber and a section near the end had its seam facing straight down the corridor, in full view of anyone walking under it. "It's insulated," Bernie said, "but nobody would believe it." Then she showed him the order of the moves, and why each one mattered.
Most commercial piping is insulated with glass fiber pipe covering that comes with a factory-applied all-service jacket (ASJ) and a self-sealing lap (SSL). This lesson describes how to install it on straight pipe so that it performs, lasts and looks right. The same steps, with small changes, apply to plain mineral wool sections that will be jacketed later and to elastomeric tubing. Securing insulation with bands and wire comes in lesson 4, hangers in lesson 5 and fittings in lessons 6 and 7.
Before you start
Good insulation goes on a pipe that is ready for it. Before installing, check that:
- The piping has been pressure tested and accepted, and the mechanical contractor has released the area for insulation. Insulating untested pipe means tearing off insulation if a joint leaks. Most specifications forbid it, and at Mountview the mechanical contractor, Harcourt Mechanical, signs a release sheet for each area.
- The pipe surface is clean, dry and free of oil, rust scale and frost. Moisture trapped under insulation causes corrosion, and on cold lines it never dries out.
- Any required coating or primer on the pipe is complete and cured. Some specifications call for a coating on carbon steel under insulation to resist corrosion.
- Hangers, supports and their shields or inserts are the right size for the insulation, as lesson 5 explains.
- Heat tracing, if any, is installed and tested, and its sensor positions are marked.
- The right material is on hand: size, thickness, jacket and quantity checked against the schedule.
Also check the working space. Ceiling spaces on a building like Mountview are shared with electricians, sprinkler fitters and duct installers. Working from a ladder or a rolling platform in a crowded ceiling needs clear footing and an agreed area; INS-110 covered ladders, platforms and working at heights under OSHA's construction standards in 29 CFR 1926.
Installing a jacketed section
A glass fiber section with ASJ and SSL is hinged on one side and split on the other. The jacket extends past the split as a flap, the lap, with a strip of pressure-sensitive adhesive covered by a release paper. The steps for each section are as follows.
- Open the section along its split by flexing it gently at the hinge, wide enough to pass over the pipe. Do not open it so far that the hinge cracks.
- Place it over the pipe and close it, making sure the bore seats fully on the pipe with no gap at the split.
- Turn the section so the lap is in the right position: on exposed work, at the side or top of the pipe away from the line of sight; on outdoor or wet work under a jacket, facing down so water runs off the lap; and as the specification requires.
- Push the section against the one already installed, so the butt joint is tight with no fiber showing.
- Pull the release paper off the lap, keeping the adhesive clean, and press the lap firmly onto the jacket with a plastic squeegee or the back of a hand, working from the center of the section toward the ends.
- Seal the butt joint with a butt strip, a separate band of jacket material with adhesive, centered on the joint and wrapped all the way round.
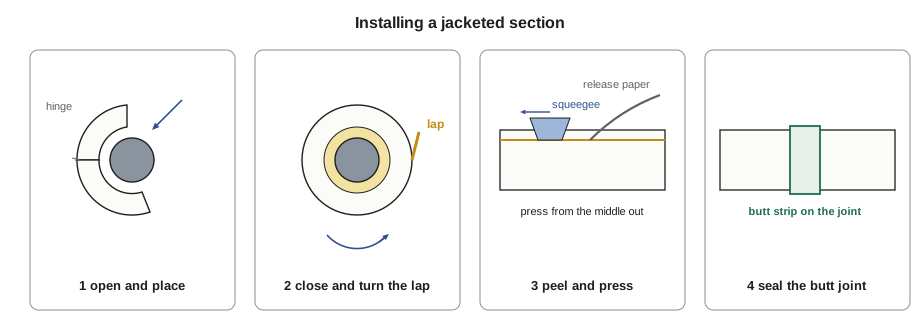
Several details make the difference between work that lasts and work that opens up within a year:
- Pressure-sensitive adhesives need pressure. A lap that is laid down without being firmly pressed sticks at first and then peels as the jacket expands and contracts with temperature.
- Most adhesives on SSL laps and butt strips have a minimum application temperature, often around 50 °F and sometimes lower for cold-weather products, and the surfaces must be clean and dry. INS-120 told the story of foil tape lifting on the Mountview third floor after the temporary heat failed; the same applies to SSL laps.
- Fingers that have been handling glass fiber or dusty sections leave a film that stops adhesive from sticking. Keep the release paper on until the last moment and touch the adhesive as little as possible.
- Do not pull a lap so tight that it puckers the jacket on the other side of the section; let the section close naturally, then press the lap.
Staggering seams and keeping work neat
On a straight run, insulators usually keep the laps lined up along the same side of the pipe, so the work looks neat and every lap faces the same way for water and for view. Where two layers are installed, the joints of the outer layer are staggered from those of the inner layer, both the longitudinal seams and the butt joints. A typical rule is to offset outer butt joints from inner ones by at least a quarter of a section length, and to turn the outer layer so its seam is on the opposite side of the pipe from the inner seam. Staggering stops a gap in one layer from lining up with a gap in the other and letting heat or vapor straight through.
On exposed work in mechanical rooms and corridors, appearance is part of the job. Specifications commonly require exposed insulation to have a neat, uniform finish, with laps in line, butt strips centered and straight and no dirt, tears or tape marks. The owner judges the whole contractor by what can be seen. In ceiling spaces and shafts the same standard applies, because the next person to see the work is often a maintenance worker who has to repair around it for decades.
Worked problem
Butt strips and tape for a run
A run of 3 in heating water, 42 ft long, is to be insulated with 1 1/2 in glass fiber covering with ASJ. Each butt joint gets a 3 in butt strip that wraps the circumference with a 2 in overlap. How many butt joints are there, how long is each strip and how many strips can be cut from a 150 ft roll of matching tape?
Show solution
- Sections: 42 ÷ 3 = 14 full sections and no filler: 14 pieces.
- Butt joints between 14 pieces: 13. The ends at the fittings are covered by the fitting insulation.
- Outside diameter of the insulation: 3.5 + 2 × 1.5 = 6.5 in; circumference 3.1416 × 6.5 ≈ 20.4 in.
- Strip length with overlap: 20.4 + 2 = 22.4 in.
- Strips per roll: 1,800 ÷ 22.4 ≈ 80.
Answer: 13 butt strips of about 22 3/8 in; one roll is enough for this run and several more. Many makers also supply precut butt strips sized for each pipe size.
Plain sections and sections to be jacketed later
Industrial work and mechanical rooms often use plain sections, without a factory jacket, that will be covered later with a metal or PVC jacket or a field-applied finish such as canvas and lagging adhesive. Plain sections are opened and closed over the pipe the same way, with butt joints pushed tight, but they are held closed by wire or bands rather than a lap. Lesson 4 describes the spacing. Because the jacket will hide the seams, insulators still stagger them, keep the butt joints tight and fill any gaps, since a gap under a jacket is just as much a heat leak as a visible one.
On hot work, plain mineral wool is common because it handles higher temperatures and holds its shape under metal jacketing. On the Mountview job, the medium-pressure steam to the sterilizer room and its condensate return were insulated with plain mineral wool pipe covering, wired, then covered with a PVC jacket in the exposed mechanical room and an ASJ wrap in the ceiling spaces, as the specification called for.
Elastomeric tubing on straight pipe
Elastomeric foam tubing is installed differently from fibrous sections:
- On new piping that is not yet connected, slide unslit tubing onto the pipe. Push it on rather than pulling it, because pulling stretches and thins the wall. A little talc or the maker's lubricant helps on long pieces.
- On existing pipe, slit the tubing lengthwise with a sharp knife, place it over the pipe and glue the slit with the manufacturer's contact adhesive, applied thinly to both faces and allowed to become tacky before the faces are pressed together.
- Glue every butt joint to the next piece. Butt joints are made under slight compression, so the pieces are pushed together rather than stretched to meet.
- Do not stretch tubing along the pipe to close a gap. The foam shrinks back over time, and the joints open.
On cold work, which is most elastomeric work, every seam and joint must be glued, because the foam's resistance to water vapor depends on a continuous, sealed layer. Lesson 10 covers vapor retarders in detail. Elastomeric foam outdoors also needs a protective coating or jacket, because sunlight breaks down the surface.
Working on vertical pipe and in tight spaces
Risers, the vertical pipes that run between floors, are insulated from the bottom up. Each section rests on the one below, and the butt joints close under the weight of the section above. On tall risers, the specification may call for insulation supports, such as a collar or support ring at intervals, to stop the column of insulation from sliding down. Laps on risers are turned so they face away from the most likely line of sight, or toward a wall.
Where pipes run close together, or close to a wall or ceiling, there may not be room to open a section over the pipe. Insulators plan the order of work so that the inner pipe of a group is insulated first, and they leave the outer pipes for last. When the clearance is less than the insulation thickness, as Devon found in INS-110 where a line ran only 1 1/2 in from a wall, the problem goes back to the foreperson and the mechanical contractor. The insulation cannot be made thinner without the engineer's agreement, and the pipe may have to be moved.
Protecting finished work
Finished insulation is easily damaged by other trades. Ladders leaned against it dent it; other trades' tools, cables and conduit get laid across it; drywall dust and paint overspray soil the jacket. Insulators protect what they can and report damage they did not cause. Coldstream crews mark each completed area on the floor plan and photograph it with the date, so that later damage can be traced. INS-110 described the ceiling sign-off sheet that Mountview adopted after drywallers closed in an uninsulated chilled water main; the same sheet records when an area's insulation is complete and inspected.
Double-layer work
Thick insulation is often installed in two layers rather than one. Specifications call for double layers on high-temperature lines, where the inner layer may be a material with a higher temperature limit, and on some cold systems, where two staggered layers make it much harder for a single gap to reach the pipe. Coldstream's crews also double-layer when the specified thickness is not made in a single section for a pipe size. The steps are the same as for a single layer, with a few additions:
- Install and secure the inner layer completely first, with tight butt joints and the sections wired or banded closed. On cold work, the inner layer's joints are usually sealed with a joint sealant or tape as the specification says, but the main vapor retarder goes on the outside of the outer layer.
- Choose the outer layer by the outside diameter of the inner layer. Because ASTM C585 sets standard outside diameters, the inner layer's outside diameter matches the bore of a section made for a larger pipe size, and the label or the maker's nesting chart says which size to use.
- Stagger the outer joints from the inner joints: butt joints offset by at least a quarter of a section length, and the longitudinal seam turned to the opposite side of the pipe.
- Secure the outer layer separately. Ties holding the inner layer do not hold the outer one.
Double-layer work takes longer to install, and estimators allow for it. It also uses more securement: two sets of ties or bands, one for each layer. On the Mountview job, the only double-layer work was on a short run of medium-pressure steam in a service tunnel, where the specified 3 in was made of two layers of 1 1/2 in mineral wool, staggered as described.
Common mistakes
MistakeInsulating pipe before it has been tested and released.
InsteadWait for the mechanical contractor's release for the area.
MistakeLaying the SSL lap down without pressing it.
InsteadPress the lap firmly from the center to the ends with a squeegee.
MistakeApplying adhesive laps and strips on a cold, damp or dusty surface.
InsteadCheck the adhesive's minimum temperature and keep surfaces clean and dry.
MistakeLeaving butt joints open with fiber showing.
InsteadPush each section tight to the last and seal every joint with a butt strip.
MistakeTurning laps so they face up on outdoor work or toward the viewer on exposed work.
InsteadTurn laps to shed water and to keep them out of sight.
MistakeStretching elastomeric tubing to close a gap.
InsteadPush tubing together under slight compression and glue every joint.
Summary and key terms
- Install only on tested, released, clean and dry pipe with correctly sized supports.
- Open the section at its hinge, close it over the pipe, turn the lap into position, butt it tight, then peel and press the lap.
- Seal every butt joint with a butt strip; press pressure-sensitive adhesives firmly and respect their temperature limits.
- Stagger joints in double layers and keep laps aligned and out of sight on exposed work.
- Plain sections are wired or banded and jacketed later; gaps under jackets still leak heat.
- Slide elastomeric tubing on where possible; glue slits and joints, and never stretch it to close gaps.
- Insulate risers from the bottom up and plan crowded areas from the back out.
- All-service jacket
- A factory-applied laminate of kraft paper, scrim and foil used as a finish and vapor retarder on pipe covering; ASJ.
- Self-sealing lap
- An extension of the jacket along the seam with pressure-sensitive adhesive under a release paper; SSL.
- Butt strip
- A band of jacket material with adhesive that seals the joint between two sections.
- Release paper
- The backing that protects pressure-sensitive adhesive until the lap or strip is applied.
- Riser
- A vertical run of pipe between floors.
- Staggered joints
- Joints in one layer offset from those in the layer beneath.
- Plain section
- Pipe covering without a factory jacket, finished later with a field-applied jacket or covering.
Practice problems
Work each problem on paper first, then reveal the answer to check.
Name three checks to make before insulating a run.
Show answer
Any three of: pressure tested and released, pipe clean and dry, coating complete, hangers and shields sized, heat trace done, correct material on hand.
Which way should laps face on an outdoor line?
Show answer
Down, so water runs off rather than into the lap.
A 30 ft run of 1 1/2 in covering on 3 in pipe needs how many butt joints?
Show answer
30 ÷ 3 = 10 sections, so 9 butt joints.
Why should two-layer joints be staggered?
Show answer
So a gap in one layer does not line up with a gap in the other and let heat or vapor through.
How is slit elastomeric tubing closed?
Show answer
With the maker's contact adhesive on both faces, allowed to become tacky, then pressed together.
Lesson quiz · 5 questions
Score 60% or more to complete this lesson.
Create a free account to save your progress, take quizzes and earn a certificate.