
INS-130 · Lesson 2 of 12 · 26 min
Measuring and cutting pipe covering
▶ Video coming soon A video version of this lesson is on the way.
By the end of his first week, Devon could tell IPS from CTS at a glance. Measuring and cutting were another matter. His first straight run on the Mountview second floor, a heating water return between two elbows, ended with a 2 in gap at one end and a filler piece so short it fell out when he let go. Tessa watched him tape it in and said nothing until lunch. "You measured the pipe," she said. "You didn't measure the space the insulation has to fill. Tomorrow we'll do it properly."
Pipe covering, also called sectional pipe insulation, is the rigid or semi-rigid insulation made in split cylindrical sections that fit over pipe. Most of an insulator's day on commercial work is spent measuring runs, cutting sections to length and fitting them between elbows, tees, valves and hangers. This lesson covers how to measure a run, how to plan cuts so little material is wasted, which tools to use for each material and how to cut cleanly and safely.
What to measure
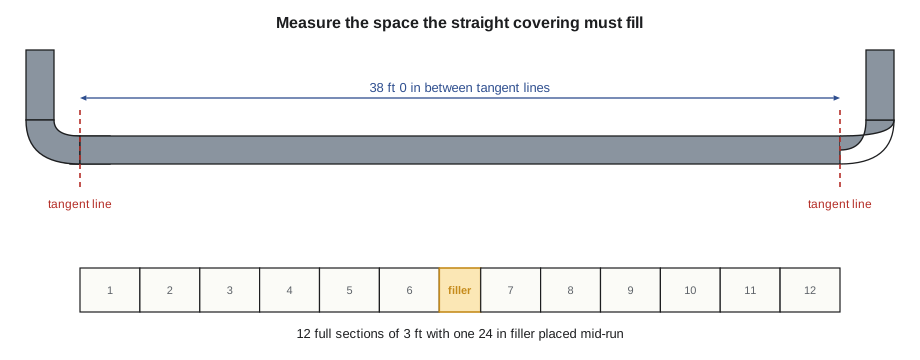
On a straight run, the length to be filled with pipe covering is not the length of the pipe between fittings. It is the distance between the ends of the insulation that will cover the fittings, or between a fitting cover and an obstruction such as a wall, a flange or an equipment connection. Insulators measure the space the covering must fill, and they measure it after deciding how each fitting will be insulated.
On a typical commercial job, the order of work affects what is measured:
- When elbows are to be insulated with preformed fitting covers, such as PVC covers with fibrous inserts, the straight covering usually stops where the fitting meets the straight pipe: at the weld line of a welded elbow, at the end of the socket on a copper fitting or at the edge of the threaded fitting. The fitting insert then fills the elbow and laps onto the straight covering.
- When elbows are to be built from mitered sections of pipe covering, as lesson 6 describes, the straight covering stops at the same point, the tangent line where the curve of the fitting begins.
- At a wall, the covering runs through the wall if the sleeve allows it, or stops at the wall face. A fire separation needs a listed firestop system, which may require the insulation to be continuous through the opening or to be cut back; the firestop listing decides, and INS-330 covers firestopping.
- At valves, flanges and unions, specifications on hot work often require the covering to stop short so the bolts or the union can be reached, with a removable cover or a separate fitting insulation applied later. INS-210 covers these.
With the end points decided, the insulator measures along the pipe from one end point to the other. A steel tape hooked on a fitting edge and read at the other end gives a good measurement on straight runs up to 15 or 20 feet. On longer runs, measuring in stages and adding the stages, or marking the pipe with a crayon at each section length as work progresses, avoids errors from a sagging tape. On vertical risers, a tape held from below is read at eye level and the measurement is checked by a second person or by a mark on the pipe.
Planning the cuts
Sections come in standard lengths, usually 3 ft for rigid pipe covering. A run is filled with as many full sections as fit, plus one cut piece called a filler. Where the filler goes matters. A very short filler is hard to secure and tends to work loose. Experienced insulators place the filler in the middle of a run or next to a hanger rather than at a fitting, and if the remainder is short, they cut two fillers of similar length instead of one tiny piece.
Worked problem
Filling a straight run
Devon's heating water return runs 38 ft 0 in between the tangent lines of two elbows. Pipe covering comes in 3 ft sections. How many full sections are needed, and how long is the filler?
Show solution
- Sections that fit: 38 ÷ 3 ≈ 12.67, so 12 full sections.
- Length of the full sections: 12 × 3 = 36 ft.
- Filler: 38 − 36 = 2 ft, or 24 in.
Answer: 12 full sections and one 24 in filler, which is long enough to place on its own. Cut it about 1/8 in long so the butt joints are tight.
The last line of the example is a common practice with fibrous and elastomeric materials. Cutting a filler slightly long, by about 1/8 in, means it has to be pushed into place, which closes the butt joints. Rigid materials such as calcium silicate and cellular glass do not compress, so fillers in those materials are cut to the measured length and the joints are filled as the specification requires.
Most runs are shorter than a section, and most cuts produce offcuts. A cut list, a written list of the lengths needed in one area, lets an insulator plan which pieces to cut from which sections so that offcuts are used rather than thrown away. The usual method is simple: cut the longest piece first from a fresh section, then fit the next pieces into whatever is left, and start a new section only when no remaining offcut is long enough.
Worked problem
Using a cut list to save material
In a Mountview ceiling space, five short runs of NPS 2 heating water need pieces of 31, 24, 16, 14 and 10 in. Sections are 36 in long. How many sections are needed if the pieces are cut longest first and offcuts are used?
Show solution
- Section 1: cut 31 in; 5 in left, too short for any other piece.
- Section 2: cut 24 in; 12 in left. The 10 in piece fits, leaving 2 in.
- Section 3: cut 16 in; 20 in left. The 14 in piece fits, leaving 6 in.
- All five pieces are cut from three sections.
Answer: 3 sections instead of 5 if each piece came from a new section. The 5 and 6 in offcuts are worth keeping for fillers at hangers.
Waste allowances in estimates assume this kind of planning. Raj Sandhu, Coldstream's project manager, usually allows 5 to 10 in 100 extra for straight pipe covering on commercial work, more for areas with many short runs. A crew that cuts each piece from a fresh section uses up that allowance on the first floor.
Tools for cutting pipe covering
The right tool depends on the material:
- Insulation knife: a long, thin, sharp blade, plain or serrated, for glass fiber, mineral wool and elastomeric foam. A serrated blade cuts fibrous material with a sawing stroke without tearing it; a plain blade gives the cleanest cut on elastomeric foam and on ASJ jackets.
- Utility knife with snap-off or replaceable blades: for trimming, cutting jackets and tape and cutting elastomeric sheet.
- Saw: a fine-toothed handsaw, a hacksaw blade in a handle or a band saw in the shop for calcium silicate, perlite, cellular glass and rigid foams. A dull or coarse saw chips the edges of rigid materials.
- Mitre box: a guide with slots at set angles, such as 90°, 45° and 22.5°, that holds the knife or saw square or at the angle needed. Coldstream's crews make their own from plywood, sized for the larger pipe covering.
- Straight edge, square and marker: for marking cut lines around a section and laying out angled cuts.
- Measuring tape and a flexible tape or strip for marking around a section.
Knives need to be sharp. A dull blade crushes the fibers instead of cutting them, leaves a ragged end that will not butt tightly and takes more force, which is when hands slip. Insulators sharpen their knives with a stone or a sharpening steel at breaks, and replace utility blades as soon as they start to drag. Tomasz Nowicki, the shop lead, keeps a sharpening station by the shop door and expects every knife that comes back from a job to be sharpened before it goes out again.
Cutting cleanly and safely
A square cut, one at right angles to the axis of the section, makes a tight butt joint. To cut square:
- Close the section and hold its seam together, or tape it, so it does not shift during the cut.
- Mark the length on the top of the section, then carry the mark around the section with a square or a strip of material wrapped around it, so the line is square all the way round.
- Use a miter box where possible. Without one, cut around the section in several shallow strokes following the line rather than forcing the blade straight through.
- On sections with an ASJ, cut the jacket with the insulation, then check that the jacket has not torn or lifted at the cut. A torn jacket at a cold-line butt joint is a vapor leak.
Most cuts in the trade are made with long, sharp knives, and knife cuts to the hands and legs are among the most common injuries for insulators. INS-110 covered the safety rules, and they apply every day:
- Cut away from your body and keep your free hand behind the blade, never in front of the stroke.
- Cut on a stable surface, such as a bench, a miter box or a sheet of plywood, not on your knee or across your thigh.
- Wear cut-resistant gloves rated for the task, at least on the hand that holds the work.
- Retract or sheath knives when they are not in your hand, and never leave an open blade in insulation or on a ladder top.
- Use the right tool for rigid materials: forcing a knife through calcium silicate or cellular glass is how blades snap and hands slip.
Cutting also releases dust. Glass fiber and mineral wool fibers irritate skin and eyes; calcium silicate and perlite produce fine dust, and cellular glass produces sharp glassy dust and a short-lived odor. Cut in a well-ventilated spot, wear safety glasses and the dust protection the company's hazard assessment calls for, and clean up with a HEPA vacuum rather than a broom. Power saws on rigid insulation make far more dust than hand saws, so Coldstream does rigid cutting in the shop with dust collection when it can.
Cutting elastomeric tubing and sheet
Elastomeric foam is cut with a sharp plain knife, never a serrated one, which tears the surface and leaves a rough edge that will not glue well. Tubing can be slit lengthwise to fit over existing pipe, and the slit is then glued with the manufacturer's contact adhesive. Where the tubing can be slid onto pipe before the pipe is connected, as on new refrigerant lines, it is not slit at all, which saves a glued seam.
For pipe too large for tubing, elastomeric sheet is cut to fit. The width of the strip that wraps around the pipe equals the circumference at the middle of the insulation wall, not at the pipe surface, because the inside of the sheet compresses a little and the outside stretches when it is bent. Makers give a sizing chart; without one, insulators use the circumference at mid-wall.
Worked problem
Cutting elastomeric sheet for a large pipe
A chilled water line of NPS 6 (6.625 in OD) is to be insulated with 1 in elastomeric sheet. How wide should the strip be cut to wrap the pipe?
Show solution
- Mid-wall diameter: 6.625 + 1 = 7.625 in (the pipe OD plus one thickness, which is half a thickness on each side).
- Circumference at mid-wall: 3.1416 × 7.625 ≈ 23.95 in, about 23 15/16 in.
- Check against the maker's chart if one is available.
Answer: About 23 15/16 in. A strip cut to the pipe circumference alone, 20 13/16 in, would leave a gap at the outside of the seam.
Handling, staging and protecting cut material
Pipe covering is light and easy to damage. Cartons crushed on a pallet, sections left on a wet floor or stacked under a stair where trades walk on them all lead to waste. On a building site, Coldstream stages each day's material close to the work, in its cartons, off the floor and away from water and dust. Opened cartons are closed again at the end of the day. Sections are carried by hand, not dragged, and the ASJ is kept clean, because dirt, drywall mud and fingerprints show on a white jacket and stop the self-sealing lap and tape from sticking.
Cut pieces need the same care. Bernie's crews mark each cut piece with its size and thickness and set cut pieces for an area together, in order, before installing them. On her first day with Devon on the heating water return, Tessa had him cut and lay out every piece for the run on the floor below it, in sequence, before he installed any. "If it doesn't add up on the floor," she said, "it won't add up on the pipe."
Common mistakes
MistakeMeasuring between fittings on the pipe without deciding how the fittings will be insulated.
InsteadDecide the end points first, then measure the space the straight covering must fill.
MistakeLeaving a tiny filler at an elbow where it falls out.
InsteadPlace the filler in the middle of the run or at a hanger, or split a short remainder into two longer fillers.
MistakeCutting each piece from a new section.
InsteadUse a cut list, cut the longest pieces first and fill offcuts with shorter pieces.
MistakeCutting with a dull knife, freehand, against the body.
InsteadUse a sharp knife and a guide box on a stable surface, cutting away from the body with the free hand behind the blade.
MistakeForcing a knife through rigid insulation.
InsteadUse a fine-toothed saw for calcium silicate, perlite, cellular glass and rigid foams.
MistakeCutting elastomeric sheet to the pipe circumference.
InsteadUse the circumference at mid-wall, or the maker's sizing chart.
Summary and key terms
- Measure the space the straight covering must fill, from the decided end points at fittings, walls and equipment.
- Fill runs with full sections and a filler placed away from fittings; cut fibrous and elastomeric fillers slightly long for tight joints.
- A cut list, cutting the longest pieces first, uses offcuts and saves material.
- Use sharp knives for fibrous and elastomeric materials and fine-toothed saws for rigid materials; a guide box keeps cuts square.
- Cut away from the body on a stable surface, wear cut-resistant gloves and sheath blades when not in use.
- Cut elastomeric sheet to the circumference at mid-wall.
- Keep material dry, clean and labeled, and lay out cut pieces in order before installing.
- Pipe covering
- Rigid or semi-rigid insulation made in split cylindrical sections that fit over pipe; also called sectional pipe insulation.
- Tangent line
- The point where the curve of an elbow meets the straight pipe.
- Filler
- A piece of pipe covering cut to fill the remainder of a run after the full sections.
- Cut list
- A list of the lengths needed in an area, used to plan cuts and use offcuts.
- Butt joint
- The joint where the ends of two sections meet.
- Mitre box
- A guide with slots at set angles that holds the blade square or at an angle while cutting.
- Square cut
- A cut at right angles to the length of the section.
Practice problems
Work each problem on paper first, then reveal the answer to check.
A run is 25 ft 6 in between tangent lines. How many 3 ft sections fit, and how long is the filler?
Show answer
25.5 ÷ 3 = 8.5, so 8 sections (24 ft) and a filler of 18 in.
Pieces of 28, 20, 16 and 8 in are needed. How many 36 in sections, cutting longest first?
Show answer
Section 1: 28 + 8 (0 left). Section 2: 20 + 16 (0 left). 2 sections.
Why is a serrated knife wrong for elastomeric foam?
Show answer
It tears the surface, leaving a rough edge that will not glue well.
How wide should 1/2 in elastomeric sheet be cut for a 4.5 in OD pipe?
Show answer
Mid-wall diameter 4.5 + 0.5 = 5.0 in; 3.1416 × 5.0 ≈ 15.7 in, about 15 11/16 in.
Why place a filler at a hanger rather than at an elbow?
Show answer
A filler at an elbow is easily lost or loosened; in the run or at a hanger it is held by neighboring sections and the support insulation.
Lesson quiz · 5 questions
Score 60% or more to complete this lesson.
Create a free account to save your progress, take quizzes and earn a certificate.