
CSCO-101 · Lesson 3 of 12 · 22 min
Installing and replacing hardware safely
▶ Video coming soon A video version of this lesson is on the way.
The parts for the Prairie Paws reception PC arrive on a Tuesday: a 1 TB NVMe SSD and two 4 GB memory modules that match the ones already installed. Jordan is keen to start, but Marisol stops him at the bench. Before he touches a screwdriver she wants three things: a backup of the clinic's local data, a note in the ticket saying when the PC will be out of service, and the bench set up properly. "Most hardware damage I've seen," she tells him, "was done by someone in a hurry, not by a faulty part."
Safety first: people
Hardware work carries real risks to the technician. The first is electricity. Desktop computers run from mains power, and power supplies and monitors contain capacitors that can hold a dangerous charge after the plug is pulled. The rule is to shut down the computer, switch off and unplug the power cable, and then press and hold the power button for a few seconds to drain any remaining charge from the motherboard. Power supplies, older CRT monitors and the inverter boards of some displays are never opened by support staff; they are replaced as units.
The second risk is physical. Computer cases have sharp edges inside; laptop batteries can swell, overheat or catch fire if they are punctured or bent; and servers, printers and large monitors are heavy. Lift with your legs, get help for anything heavy or awkward, and use the correct tools. A swollen battery should be removed carefully, never pressed back into place, and taken to a battery recycling point; a battery that is hot, smoking or hissing should be moved away from anything flammable if it is safe to do so, and the area cleared.
The third risk is chemical and environmental. Toner is a fine powder that should not be breathed in or vacuumed with an ordinary vacuum cleaner, because the particles pass through normal filters and can ignite. Cleaning products should be appropriate for electronics. Workplace safety information sheets, called safety data sheets under the OSHA Hazard Communication Standard, describe how to handle and dispose of chemicals such as toner, cleaning fluids and thermal paste.
Safety first: equipment
Electrostatic discharge, or ESD, is the sudden flow of static electricity between two objects at different charges. A person walking across carpet can build up thousands of volts, enough to damage a memory module or a processor without anyone feeling a spark. Damage from ESD is not always immediate; a part may work for weeks and then fail. ESD protection aims to keep the technician and the parts at the same electrical potential so that no discharge happens.
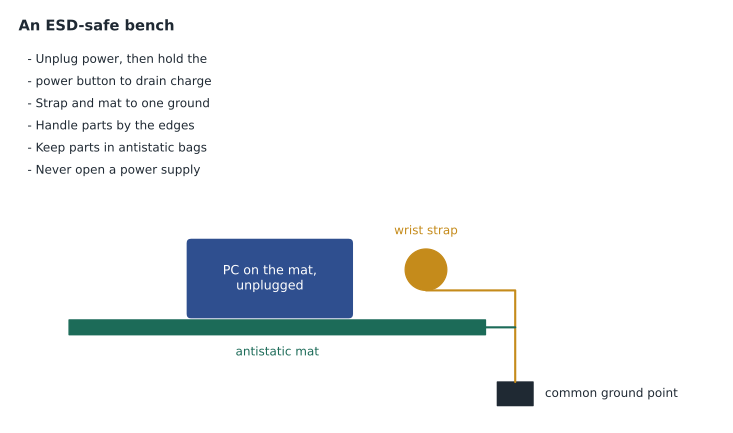
The standard tools are an antistatic wrist strap, an antistatic mat and antistatic bags. The wrist strap is worn snugly against the skin and clipped to a ground point shared with the mat. Parts stay in their antistatic bags until the moment they are installed, and are held by the edges, never by the contacts or chips. Where no strap is available, touching an unpainted metal part of the case frequently while working is better than nothing, but it is not a substitute for proper equipment. Low humidity makes static worse, so technicians in dry winter climates, such as much of the northern Plains, need to be especially careful.
Preparing for a hardware change
Good preparation prevents most problems. Before any hardware change, a technician should confirm the part is correct and compatible, back up important data, record the computer's current configuration, and tell the user when the computer will be unavailable. If the computer uses full-disk encryption such as BitLocker or FileVault, the recovery key must be available before changes to storage or firmware, because the encryption may ask for it after the change. Brightline stores clients' recovery keys in its password manager, and Marisol makes Jordan confirm the key is there before he opens the case.
Take a photo before disconnecting anything. Photos of cable routing, connector positions and jumper settings make reassembly faster and settle arguments about how things were. Keep screws in a magnetic tray or labeled containers; laptop screws in particular come in several lengths, and putting a long screw in a short hole can pierce the motherboard.
Installing memory
Memory installation is one of the simplest upgrades. Open the case, find the slots, and check the motherboard manual for the order in which to fill them; boards with four slots usually pair modules in slots of the same color or in a specific order to enable dual-channel operation, which doubles memory bandwidth. Open the retaining clips, line up the notch in the module with the key in the slot, and press straight down firmly until the clips snap closed. Laptop SO-DIMMs go in at an angle of about 30 degrees and are pressed down until the side clips lock.
After installation, start the computer. Some systems take longer to start the first time after a memory change while the firmware trains the new memory. Confirm in the firmware or in the operating system that the full amount is recognized. If the computer does not start, beeps or shows a memory error, reseat the modules, try one module at a time, and confirm they match the board's specifications. Mixing modules of different speeds usually works, but all modules then run at the speed of the slowest one.
Installing storage
Installing an M.2 NVMe drive means finding the M.2 slot, removing the small standoff screw, inserting the drive at a slight angle into the slot, pressing it flat and securing it with the screw. Some boards provide a heat sink plate that goes over the drive. A SATA drive needs two cables: a SATA data cable to the motherboard and a SATA power cable from the power supply. Laptops typically have a single M.2 slot or a 2.5-inch bay.
Replacing the drive that holds the operating system means either cloning the old drive to the new one or installing a fresh operating system and restoring the user's data. Cloning copies everything, including the operating system, applications and settings, and is fast when the old drive is healthy. A clean installation takes longer but removes accumulated problems. Lesson 6 covers Windows installation and lesson 11 covers imaging and backups. After either method, confirm the computer boots from the new drive and that the firmware's boot order is correct.
Replacing other parts
Other common replacements follow the same pattern. A failing power supply is replaced with one of the same form factor and at least the same wattage, with all the cables reconnected as in the photos. A graphics card is installed in the top x16 PCIe slot and connected to its power cables if it needs them; the monitor must then be plugged into the card, not the motherboard. A keyboard, mouse or webcam is usually a simple swap. Laptop repairs are more delicate, and many modern laptops have soldered memory and storage that cannot be replaced; check the manufacturer's service manual before promising an upgrade.
Warranty matters. Opening a computer under warranty may be permitted for some upgrades and not for others, and some parts must be replaced by the manufacturer. Check the warranty status with the service tag before work, and when a part is covered, arrange a warranty repair instead of a paid one. Record replaced parts in the ticket and in the client's asset list.
| Change | Before you start | After you finish |
|---|---|---|
| Add or replace RAM | Confirm generation, form and speed; back up | Check full capacity is recognized; run a memory test if unsure |
| Replace the system drive | Back up; have the encryption recovery key; decide clone or clean install | Check boot order; confirm data and apps; check drive health |
| Add a graphics card | Check slot, length, power connectors and power supply capacity | Connect monitor to the card; install drivers |
| Replace a power supply | Match form factor and wattage; photograph cables | Check all devices power on; listen for fans |
| Replace a laptop battery | Check model number and whether it is user-replaceable | Calibrate by charging fully; recycle the old one |
Disposal and recycling
Old parts do not go in the garbage. Electronics contain lead, mercury, cadmium and other materials that must be recycled, and batteries can start fires in garbage trucks. Many states have electronics recycling laws, and battery recycling drop-offs are common at hardware and electronics stores. Storage drives need extra care because they hold data. Before a drive leaves the client's control, it should be wiped with a tool that overwrites it or uses the drive's secure erase command, or physically destroyed, and the method recorded. Lesson 7 of CSCO-102 returns to data disposal.
Tools for the bench
A support technician's kit is modest but should be complete. It includes a set of Phillips and Torx screwdrivers in small sizes, plastic pry tools for opening laptop cases without scratching them, a magnetic or compartment tray for screws, an antistatic wrist strap and mat, a flashlight, cable ties, a can of compressed air or an electric duster, and a USB drive with diagnostic and installation tools. A spare known-good set of cables, a USB keyboard and mouse, and a small monitor are invaluable for substitution tests. Brightline gives each technician a kit and checks it once a quarter, because a missing screwdriver can turn a fifteen-minute job into a second visit.
Diagnostic tools are worth knowing too. Most manufacturers include hardware diagnostics in the firmware or on a hidden partition, reached with a key at start-up, which test memory, storage, the battery and fans without the operating system. Windows includes a memory diagnostic tool that runs at the next restart. Drive makers supply utilities that read SMART data and run surface tests. Running a diagnostic before and after a repair gives evidence for the ticket that the fault was real and is now gone.
Worked problem
Planning the Prairie Paws upgrade
Jordan must install an NVMe SSD and two RAM modules in the reception PC, which uses BitLocker. List, in order, the steps he should take from preparation to handing the computer back.
Show solution
- Confirm the parts match the board (M.2 NVMe support, DDR4 type and speed).
- Confirm the BitLocker recovery key is stored and accessible; back up local data.
- Tell the clinic when the PC will be unavailable and note it in the ticket.
- Shut down, unplug, hold the power button, set up the mat and wrist strap, photograph the inside.
- Install the RAM in the slots the manual specifies, then the SSD in the M.2 slot.
- Start the computer; check RAM is recognized; clone or install the operating system onto the SSD; set the boot order.
- Test sign-in and the practice-management app; record parts and times in the ticket; wipe or store the old disk as the client prefers.
Answer: Preparation, safe installation, verification and documentation, in that order. The computer goes back to the clinic only after the user confirms it works.
The upgrade takes Jordan ninety minutes, half of it spent on preparation and cloning. The reception PC now reaches the sign-in screen in under thirty seconds. The clinic manager asks whether the other seventeen PCs can have the same treatment.
Common mistakes
MistakeWorking on a computer that is still plugged in.
InsteadUnplug it, then hold the power button to drain residual charge.
MistakeTaking parts out of antistatic bags early.
InsteadKeep parts bagged until installation and handle them by the edges.
MistakeChanging storage on an encrypted computer without the recovery key.
InsteadConfirm the BitLocker or FileVault key is stored before you start.
MistakeVacuuming spilled toner with a household vacuum.
InsteadUse a toner vacuum or follow the safety data sheet.
MistakeThrowing old drives in the recycling bin.
InsteadWipe or destroy drives and record the method before disposal.
Summary and key terms
- Unplug the computer and drain residual charge before opening it; never open power supplies.
- ESD can damage parts invisibly; use a wrist strap, mat and antistatic bags.
- Prepare with compatibility checks, backups, recovery keys, photos and user notice.
- Install memory by matching notches and filling slots in the order the manual gives.
- After a storage change, check the boot order, data and drive health.
- Check warranty before work and record replaced parts.
- Recycle electronics and batteries properly, and wipe or destroy drives first.
- ESD
- Electrostatic discharge, a sudden static spark that can damage components.
- Wrist strap
- A grounded band that keeps the technician at the same potential as the work.
- Dual channel
- Paired memory modules working together to double bandwidth.
- Cloning
- Copying an entire drive, including the operating system, to another drive.
- Recovery key
- The code needed to unlock an encrypted drive when normal unlocking fails.
- Safety data sheet
- A document describing the hazards and safe handling of a product.
Practice problems
Work each problem on paper first, then reveal the answer to check.
What should you do after unplugging a desktop and before opening it?
Show answer
Press and hold the power button to drain residual charge.
Why is ESD damage hard to diagnose?
Show answer
It may not cause an immediate failure; the part can fail weeks later.
What must you have before replacing the drive in a BitLocker-protected computer?
Show answer
The BitLocker recovery key.
A laptop battery is swollen. What should you do?
Show answer
Remove it carefully without pressing on it, do not reuse it, and take it to battery recycling.
Why photograph the inside of a computer before work?
Show answer
To record cable routing and connections for reassembly.
How should a drive be handled before disposal?
Show answer
Wipe it with an overwrite or secure erase tool, or physically destroy it, and record the method.
Mixed RAM speeds are installed. At what speed does the memory run?
Show answer
At the speed of the slowest module.
Lesson quiz · 5 questions
Score 60% or more to complete this lesson.
Create a free account to save your progress, take quizzes and earn a certificate.