
CRE-210 · Lesson 5 of 12 · 25 min
Shooting for the edit
Fast, engaging short videos are built in the edit, but the edit can only use what was shot. Creators who plan their footage around the cuts they will make produce tighter, more dynamic videos in less time than those who record long takes and hope to find something usable. CRE-130 covered phone camera technique, light, sound and stabilization; this lesson applies those skills specifically to short-form production. It covers planning shots from the beat sheet, shot variety for fast cutting, filming talking segments in pieces, B-roll packs, capturing transitions in camera, filming the hook and payoff with special care, performance and energy, efficient shooting sessions, and organizing footage for editing.
From beat sheet to shot list
A beat sheet (Lesson 4) describes what happens in each beat; a shot list describes how each beat will be filmed. For each beat, decide the shot size, angle, movement and any special requirements, such as slow motion, a particular light or a prop. A 30-second video with ten beats might need fifteen to twenty-five shots, because some beats are covered by two or three quick cuts. Group shots by location and setup to minimize changes: film all overhead shots together, all talking shots together, all outdoor shots together, even if they appear in a different order in the final video. Mark the shots that are essential, such as the hook and payoff, so that they receive the most care and multiple takes.
| Beat | Shot | Notes |
|---|---|---|
| Hook: finished dish | Overhead close-up, slow push in | Best light, steam visible, several takes |
| Creator line | Medium shot to camera | Energy high, two or three line readings |
| Step 1 | Overhead, hands | Lock exposure, consistent framing |
| Step 2 | Side angle close-up | Show texture of mixture |
| Payoff | Slow motion, 120 fps | Cut through or pour, clean background |
| Ending | Creator bite and reaction | Natural, short |
Shot variety for fast cutting
Short-form edits often change shot every one to three seconds. Cutting between near-identical shots creates jarring jump cuts, while cutting between shots of different sizes and angles feels smooth and dynamic. Plan variety deliberately: alternate wide, medium and close shots; change angle by at least 30 degrees between consecutive shots of the same subject; include overhead, side and point-of-view perspectives; and capture both the action and reactions. The five-shot sequence from CRE-130 (hands, face, wide, over the shoulder, unusual angle) remains a reliable way to cover any action. Movement within shots, such as a hand entering, an object turning or the camera pushing in, gives editors natural cut points.
Filming talking segments in pieces
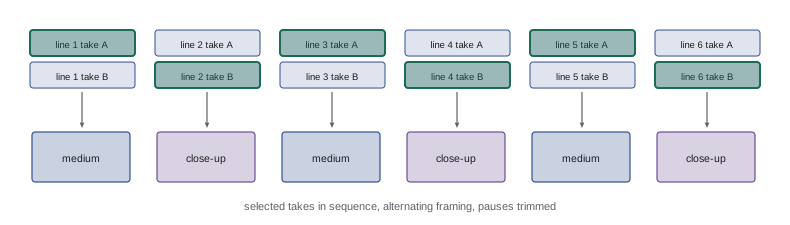
Many short videos combine talking to camera with demonstrations. Filming talking segments line by line, rather than in one continuous take, makes delivery sharper and editing easier. Techniques include recording each sentence or beat separately, with two or three readings at slightly different energy or phrasing; leaving a beat of silence before and after each line for clean cuts; changing framing between some lines, such as a medium shot and a close-up, so that cuts between them look intentional; using a teleprompter app or cue cards for precise wording; and keeping eye line, light and audio consistent across takes. Some creators film the same line from two angles at once, using two phones, to allow seamless cutting. Jump cuts between lines, a signature of short-form speech, work best when the creator's position stays roughly constant and energy is consistent.
B-roll packs
B-roll, supporting footage that illustrates what is said (CRE-130 Lesson 7), is essential in short form, where visuals must change constantly. Many creators build B-roll packs: libraries of short clips filmed in batches, such as their workspace, hands typing, coffee being poured, walking outdoors, products in use, city scenes or seasonal details, that can be reused across many videos. A good B-roll pack includes clips of five to ten seconds each, with movement, in several shot sizes and angles, filmed at the same frame rate and in good light, in both vertical and horizontal orientation if needed. Tagging clips by subject in an album or folder makes them easy to find. Fresh B-roll filmed for each video keeps content from feeling repetitive, so packs supplement rather than replace specific footage.
In-camera transitions
Transitions filmed deliberately, rather than added in editing, are a hallmark of short-form video. Common techniques include:
- Whip pan: a fast pan at the end of one shot and the start of the next, in the same direction, joined in the middle of the blur.
- Cover transition: the camera or a hand, object or body covers the lens at the end of one shot and uncovers it at the start of the next, often revealing a new outfit, location or result.
- Match cut: matching a shape, movement or position between two shots, such as a ball thrown in one location caught in another.
- Jump transition: the creator jumps, snaps, claps or turns, and the cut happens at the peak of the movement, with something changed.
- Zoom or push transition: pushing toward an object until it fills the frame, then pulling back from a similar object elsewhere.
Planning the transition matters: both shots need the same direction and speed of movement, similar framing at the cut point and consistent position of the subject. Rehearse, and film several takes. Transitions should serve the content, such as revealing a transformation, rather than being used constantly for their own sake.
Worked problem
Planning a cover transition for an outfit video
A fashion creator wants to change from casual clothes to an evening outfit with a cover transition in a 15-second video. How should the two shots be filmed?
Show solution
- Fix the phone on a tripod so that framing is identical in both shots.
- Shot 1: in casual clothes, the creator walks toward the camera and covers the lens with their hand, holding it there for a second.
- Shot 2: in the evening outfit, standing in the same position, the creator starts with the hand covering the lens and pulls it away.
- Match the hand position, lighting and exposure; lock focus and exposure so they do not change.
- In editing, cut where the lens is fully covered in both shots, and add a sound effect or a beat in the music at the cut.
Answer: Lock the framing, cover the lens at the end of the first shot and uncover it at the start of the second, matching hand position, and cut on the fully covered frames.
Filming the hook and payoff
The hook and payoff deserve disproportionate attention because they determine whether viewers stay and whether they feel rewarded. Film multiple versions of the hook: different first frames, different spoken lines, different energy levels. Film the payoff in the best possible light, with clean framing, slow motion where appropriate, and several takes. If the payoff is a result, such as a finished dish or a transformed room, consider filming it first, when the result is freshest and the light is best, then filming the process. Some creators also film a short teaser shot of the payoff specifically for use in the hook.
Performance and energy
On camera, energy reads lower than in person, so creators often speak with more animation, expression and pace than in normal conversation (CRE-220 covers on-camera presence). In short form, energy should match the content: a calm ASMR or explainer video needs a different delivery from a comedy sketch. Consistency across takes matters for editing, since cutting between a high-energy line and a low-energy one feels uneven. Warming up before filming, standing rather than sitting for energetic content, and reviewing the first takes to calibrate help. Authenticity matters too: overacted energy can feel forced, and audiences respond to genuine enthusiasm.
Efficient shooting sessions
Batch filming, recording several videos in one session, saves time on setup and keeps quality consistent (Lesson 12). Efficient sessions start with a plan: shot lists for each video, props and outfits prepared, batteries charged, storage cleared and the space set up. Film all shots in one setup before moving to the next. Review key shots on the phone immediately, checking focus, exposure, framing and audio. Keep a simple log of which takes are good, either in notes or by saying "good take" at the end of a clip. Allow time for unexpected problems, and stop before fatigue reduces quality.
Organizing footage for editing
Short-form projects generate many short clips, and finding the right one quickly speeds editing. Delete obvious failures immediately; mark favorites; create an album or folder for each video; and transfer footage to a computer or editing app with consistent naming if you edit on a larger screen. Some creators shoot each video in the order of the beat sheet even if it means more setup changes, so that clips are already in sequence. Others rely on timestamps and shot lists to assemble clips. Whatever the method, footage should be organized before editing begins.
Shooting for multiple aspect ratios
Short videos are vertical, but creators often need horizontal or square versions for other uses, such as YouTube long-form, websites, presentations or advertising. If you plan to use footage in several formats, frame with extra space around the subject, or shoot in 4K horizontal and crop vertical frames in editing (CRE-130 Lesson 3). Some creators shoot key scenes twice, once vertical and once horizontal, or use two phones. Deciding this before filming avoids discovering later that the footage cannot be reframed without cutting off heads or hands.
Filming hands, products and processes
Many short videos show hands doing something: cooking, crafting, applying makeup, building or repairing. Hands should be clean and well lit, movements slow and deliberate enough to follow, and the action framed so that the hands do not hide what they are doing. Overhead shots show the overall process; close-ups show detail; side angles show texture and depth. For products, film them in use rather than only on display, show scale with hands or familiar objects, and capture details such as textures, buttons and packaging. Slow motion at 60 or 120 fps makes pours, splashes and moments of impact satisfying.
Filming in public
Short-form creators often film in public places: streets, parks, cafés, shops, transit. Practical considerations include minimizing disruption to others, keeping equipment compact, being aware of people in the background, especially children, and respecting requests not to be filmed. Some places, including private businesses, transit systems and some parks, restrict filming or require permits for commercial work. Laws on filming and recording people differ between Canada and the United States and between provinces and states (CRE-130 Lesson 12). When in doubt, ask, and blur or remove identifiable people who have not agreed to appear prominently.
Continuity in short-form shoots
Even very short videos need continuity. When the same action is shown in several shots, clothing, props, lighting and positions should match, or viewers notice. Taking a quick photo of the setup before changing anything, keeping props in the same positions between takes, and filming each sequence in one session reduce continuity errors. For series, consistent sets, lighting and framing across episodes build recognition, so photographing or marking the setup helps rebuild it each time.
Safety on short-form shoots
Short-form shoots can involve risks that creators underestimate: filming near traffic, at heights or near water; stunts and physical challenges; cooking with hot oil; and working alone in remote places. Plan risky shots carefully, have someone with you, never put yourself or others in danger for a video, and avoid encouraging viewers to copy dangerous actions.
Reviewing footage before leaving
Before leaving a location, play back the key shots, especially the hook and payoff, at full screen with sound to confirm focus, exposure, framing and audio.
Common mistakes
MistakeRecording long continuous takes for everything.
InsteadPlan shots for the cuts you will make.
MistakeCutting between near-identical shots.
InsteadChange size or angle by at least 30 degrees.
MistakeFilming talking segments in one take.
InsteadFilm line by line with clean pauses.
MistakeUnplanned transitions with mismatched movement.
InsteadMatch direction, speed and framing at the cut.
MistakeGiving the hook and payoff the same care as everything else.
InsteadFilm them with extra takes and the best light.
Summary and key terms
- Shot lists turn beat sheets into filmable plans grouped by setup.
- Shot variety enables fast, smooth cutting.
- Film talking segments line by line with alternating framing.
- B-roll packs provide reusable supporting footage.
- In-camera transitions need matched movement and framing.
- Hooks and payoffs deserve extra takes and the best light.
- Efficient sessions and organized footage speed editing.
- Shot list
- Plan of each shot for a video.
- Setup
- A camera, light and location arrangement.
- Jump cut
- Cut within similar shots that makes the subject jump.
- 30-degree rule
- Change angle at least 30 degrees between similar shots.
- B-roll pack
- Library of reusable supporting clips.
- Whip pan
- Very fast pan used as a transition.
- Cover transition
- Transition hidden by covering the lens.
- Match cut
- Cut linking matching shapes or movements.
- Line reading
- A take of a spoken line with particular delivery.
- Batch filming
- Recording several videos in one session.
Practice problems
Work each problem on paper first, then reveal the answer to check.
How many shots might a 30-second, ten-beat video need?
Show answer
About 15–25.
Why group shots by setup?
Show answer
To minimize changes and save time.
How much should the angle change between similar shots?
Show answer
At least 30 degrees.
Why film talking lines separately?
Show answer
Sharper delivery and easier editing.
What makes a good B-roll clip?
Show answer
5–10 seconds, movement, varied sizes, good light.
Name three in-camera transitions.
Show answer
Whip pan, cover, match cut, jump, zoom.
What must match in a whip pan transition?
Show answer
Direction and speed of movement.
Why film the payoff first sometimes?
Show answer
The result is freshest and light is best.
Why keep energy consistent across takes?
Show answer
Cuts between takes feel even.
Name one way to log good takes.
Show answer
Notes or saying "good take" at the end.
Lesson quiz · 5 questions
Score 60% or more to complete this lesson.
Create a free account to save your progress, take quizzes and earn a certificate.