
ROOF-230 · Lesson 6 of 12 · 25 min
Wood shakes and shingles
▶ Video coming soon A video version of this lesson is on the way.
Iris Penhallow's 1912 house in Dundas has a carriage house at the back of the lot, which she uses as a pottery studio. Its cedar shake roof dated from 1998 and had reached the end of its life: the north slope was green with moss, many shakes had split or curled, the butts along the eave were soft with rot, and the ridge had blown open in a winter storm. Iris wanted cedar again, to match the shingled gables of the house. Crew 6 had the job from Wednesday, September 30, to Friday, October 2, with Callum leading and Rory on a shingling hatchet for the first time.
This lesson covers wood shakes and wood shingles: how they are made and graded, decks and underlayments for wood, interlayment for shakes, spacing, nailing and exposure, hips and ridges, treatments and fire, and care. It follows the Penhallow re-roof from tear-off to ridge.
Shakes and shingles
Wood roofing in North America is almost always cedar: western red cedar from British Columbia and the Pacific Northwest, and eastern white cedar from Quebec, the Maritimes and New England. Cedar resists rot and insects better than most woods, is light, and splits cleanly.
- Shingles are sawn on both faces, thin at the top and thicker at the butt, with a smooth surface. Common lengths are 400, 450 and 600 mm (16, 18 and 24 in).
- Shakes are split from the block on at least one face, giving a rough, textured surface, and are thicker than shingles. Hand-split-and-resawn shakes are split on the face and sawn on the back; tapersawn shakes are sawn on both faces but thicker than shingles. Common lengths are 450 and 600 mm (18 and 24 in).
Grades describe how clear the wood is (free of knots and defects) and how the grain runs. In Canada, western red cedar shakes and shingles are graded under CSA O118.1 and eastern white cedar shingles under CSA O118.2, and the Ontario code requires at least No. 2 grade for western cedar shingles, B grade for eastern white cedar shingles, and No. 1 or hand-split for shakes. The best grades are edge-grain heartwood, which shrinks and swells less and lasts longest.
For the Penhallow roof, Callum had ordered No. 1 hand-split-and-resawn western red cedar shakes, 600 mm (24 in) long, matching what was there, with factory-made hip and ridge units and 375 mm (15 in) starter shakes.
Slope, deck and underlayment
The Ontario code's minimum slopes are 1 in 4 for wood shingles and 1 in 3 for cedar shakes. The carriage house was 10 in 12, steep enough that water would run off fast and the shakes could dry.
Wood roofs need to dry. A wet shake that cannot dry rots from the back. Traditionally, shakes and shingles were laid over spaced boards, called skip sheathing, so air could reach the back of each piece. The codes still allow spaced decks for wood in many cases, but a solid deck is usual where an ice barrier is needed at the eaves, in high-wind areas, and where the maker or the roof assembly requires it. When a solid deck is used, many roofers add a three-dimensional plastic mesh mat between the underlayment and the wood, so air can move behind the shakes or shingles.
At the tear-off on Wednesday morning, Callum found the 1998 shakes on old 19 by 140 mm (1 by 6) skip boards, three of which were rotted at the eave. Because Iris wanted an ice barrier at the eaves and the boards were tired, Bram had quoted a new solid deck of 15.5 mm (5/8 in) plywood over the boards, an ice barrier membrane at the eaves, a breathable synthetic underlayment over the rest, and a breather mat under the shakes. By 2:00 on Wednesday the old roof was in the bin, the rotted boards were replaced, and the plywood, ice barrier and underlayment were on.
Interlayment for shakes
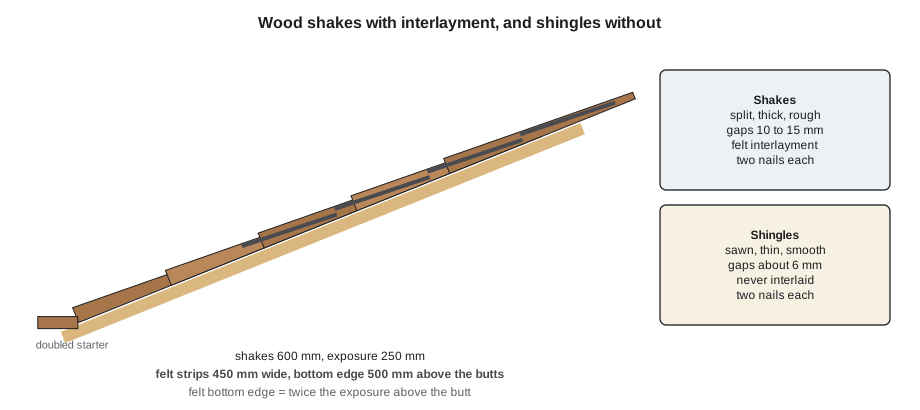
Shakes are thick and rough, so the gaps between courses are wide, and wind can drive snow and rain through them. To stop it, shakes are laid with an interlayment: strips of No. 30 felt, 450 mm (18 in) wide, laid over the top part of each course. The bottom edge of each strip sits above the butts of the course by twice the exposure, so it is hidden under the next course and the felt runs up onto the deck beyond the tops of the shakes. Water that gets past the shakes runs down the felt and out onto the face of the course below.
Wood shingles, being thin, tight and smooth, are not interlaid. The Cedar Shake and Shingle Bureau's manual says plainly: never interlay shingles with felt, because it traps moisture against the wood.
Worked problem
Where the felt goes
The shakes are 600 mm long, laid at 250 mm exposure, with 450 mm felt strips. How far above the shake butts is the bottom of each strip, how far above the butts is its top, and how much of the strip lies on the deck above the shake tops?
Show solution
- Bottom edge = 2 × 250 = 500 mm above the butts.
- Top edge = 500 + 450 = 950 mm above the butts.
- On the deck = 950 − 600 = 350 mm above the shake tops.
Answer: The felt covers the top part of each shake and runs onto the deck, where the next courses cover it. Callum snapped a chalk line for each strip so the bottom edge stayed at the right height across the whole slope.
Exposure, spacing and nailing
Exposure for wood is limited by the code tables and the grading rules according to the length, grade and slope. For shakes at least 600 mm long, the Ontario code limits exposure to 250 mm, and for shakes at least 450 mm long to 190 mm; for shingles, it sets the range by grade and slope. Wider exposure saves material but leaves less wood over each joint.
- Gaps: wood swells when wet, so pieces are laid with gaps between them: about 6 mm (1/4 in) for shingles and 10 to 15 mm (3/8 to 5/8 in) for shakes. Without gaps, they buckle.
- Side lap: joints in each course must be offset at least 40 mm (1-1/2 in) from the joints in the course below, and for shingles, joints should not line up in any three courses.
- Nails: two per piece, of stainless steel or hot-dip galvanized steel (stainless near salt water and with treated wood), about 20 mm (3/4 in) in from each side and about 40 mm (1-1/2 in) above the exposure line, so the next course covers them. Long enough to penetrate the deck. One nail lets the piece pivot and split; three or more split it.
- Drive the nail head flush with the wood, not into it. A crushed head crushes the fibres and starts a split.
- Wide pieces, over about 250 mm (10 in), should be split into two before nailing, or they will split on their own.
Callum showed Rory the shingling hatchet: a small hatchet with a sharp blade for splitting and trimming, a serrated face for driving nails, and an adjustable gauge pin on the blade for setting the exposure. Laying a course, Rory set the gauge to 250 mm (10 in), hooked it on the butt of the course below, and set each shake's butt to the gauge, a quarter of the roof's width at a time. Every third course, Callum checked the line with a straightedge.
Worked problem
Courses and bundles
Each slope is 7.3 m along the eave and 4.0 m from eave to ridge. At 250 mm exposure, how many courses does each slope need? A bundle of these shakes covers about 1.86 m² at this exposure. How many bundles for both slopes, adding 5 in 100 for waste? Starter and ridge units are ordered separately.
Show solution
- Courses = 4,000 ÷ 250 = 16.
- Area = 2 × 7.3 × 4.0 = 58.4 m².
- Bundles = 58.4 ÷ 1.86 = 31.4; with waste, 31.4 × 1.05 = 33.0, so 33 bundles.
Answer: Callum had ordered 34 bundles, rounding up once more for the splits and culls that every bundle of hand-split shakes contains. Two were left over, and went into Iris's shed for future repairs.
Worked problem
Interlayment rolls
One strip of felt runs the full eave length on every course. A roll of No. 30 felt is 914 mm wide and 21.9 m long, and Callum cuts each roll in half lengthwise into two 450 mm strips. How many rolls does the roof need?
Show solution
- Strip length = 16 courses × 2 slopes × 7.3 m = 233.6 m.
- Each roll gives 2 × 21.9 = 43.8 m of strip.
- Rolls = 233.6 ÷ 43.8 = 5.33, so 6 rolls.
Answer: Six rolls, with enough left for the hip and ridge strips. Felt laps at the ends should be at least 150 mm (6 in); on this short roof, most courses needed no end lap at all.
Starter, hips and ridges
- The starter course is doubled: 375 mm (15 in) starter shakes or a course of shingles under the first course, so every joint at the eave is covered. The butts overhang the fascia by about 40 mm (1-1/2 in) so water drips clear, and the rake by about 25 mm (1 in).
- A strip of felt at least 900 mm (36 in) wide runs along the eave under the starter where there is no ice barrier, and the code and the Bureau's manual show how it laps.
- Hips and ridges are capped with factory-made units, two pieces nailed together at the angle, laid in alternating overlap (each unit's joint on the opposite side from the one below), with a strip of felt or membrane under them. Nails are longer than for the field, to pass through two layers of wood.
- The last field course at the ridge is trimmed so the ridge units cover it at the same exposure as the field.
By Friday at 3:00, the last ridge units were on. Callum added a narrow strip of copper under the first ridge course on the north slope, exposed about 25 mm (1 in), a traditional trick: rain washes traces of copper down the slope, which slows moss growth. Then he and Rory swept the roof and cleaned the gutters of splinters and chips.
Treatments, fire and care
Untreated cedar is a combustible roof covering. It has no fire classification on its own and is not allowed in some areas and on some buildings, and insurers may charge more or refuse it near wildland. Shakes and shingles can be pressure-impregnated at the factory with fire-retardant chemicals, which, in a tested roof assembly, can reach Class B or Class A. Coatings brushed on after installation are not the same and do not give a rating. Preservative-treated cedar, also pressure-treated at the factory, resists moss and rot in damp, shaded locations. Treated wood can attack some metals, so its fasteners must be stainless steel.
Iris's insurer accepted untreated No. 1 shakes on the studio, which is detached and well away from other buildings; Bram had priced fire-retardant shakes as an option, and noted her choice in the file.
A wood roof lasts as long as it can dry. The care that keeps it going:
- Keep trees trimmed back so sun and wind reach the roof.
- Clear leaves, needles and moss from the surface and the gaps, gently, with a brush or a blower.
- Keep gutters clean so water does not back up into the eave courses.
- Never pressure-wash cedar; it tears the fibres. Cleaning and treatments follow the Bureau's guidance.
- Do not paint or seal a wood roof with a coating that stops it breathing.
- Replace split or missing pieces promptly (lesson 11).
Cutting wood at valleys, hips and walls
Wood roofs meet valleys, hips and walls in the same way as slate. Along an open valley, the shakes are cut on a snapped line parallel to the valley, with the cut edges kept straight and the valley width widening toward the eave as on slate. Pieces along the valley are chosen wide, so that each still gets two nails clear of the metal, and no nail passes through the valley lining. At walls, each course gets its own step flashing (lesson 9). At hips, the field courses are trimmed to the hip line before the hip units go on, and the hip units' joints alternate from side to side so no joint runs straight down the hip.
A sharp hatchet and a small saw do most of the cutting. Callum cut every valley piece with the saw rather than the hatchet blade, because a clean saw cut sheds water better than a split edge.
Common mistakes
MistakeInterlaying shingles with felt.
InsteadInterlay shakes only; shingles go without felt so they can dry.
MistakeLaying shakes or shingles tight against each other.
InsteadLeave the gaps the code and the Bureau's manual call for, so the wood can swell.
MistakeUsing one nail, or three, per piece.
InsteadUse two nails per piece, placed above the exposure line and in from the sides.
MistakeExceeding the exposure in the code table.
InsteadLook up the exposure for the length, grade and slope, and set the hatchet gauge to it.
MistakeUsing ordinary galvanized nails with treated cedar.
InsteadUse stainless steel fasteners with treated wood and near salt water.
Summary and key terms
- Shakes are split and thick; shingles are sawn and thin; both are usually cedar.
- Grades describe how clear the wood is; edge-grain heartwood lasts longest.
- Wood roofs need to dry: spaced decks, or solid decks with breather mats, help.
- Shakes are interlaid with felt strips whose bottom edge sits above the butts by twice the exposure; shingles are never interlaid.
- Pieces are laid with gaps, offset joints and two nails each, at the exposure the code tables allow.
- Untreated cedar is combustible; factory fire-retardant treatment can reach Class B or A in tested assemblies.
- Shake
- A wood roofing piece split on at least one face, with a rough texture.
- Shingle (wood)
- A wood roofing piece sawn on both faces, tapered from butt to top.
- Skip sheathing
- Spaced boards used as a deck under wood roofs so air reaches the wood.
- Interlayment
- Felt strips laid between courses of shakes.
- Butt
- The thick lower end of a shake or shingle.
- Edge grain
- Wood cut so the growth rings run across the thickness, which shrinks and swells less.
- Shingling hatchet
- A roofer's hatchet with a blade, a nailing face and an exposure gauge.
- Breather mat
- A plastic mesh laid under wood roofing to let air move behind it.
Practice problems
Work each problem on paper first, then reveal the answer to check.
Shakes are laid at 190 mm exposure. Where is the bottom of the felt strip?
Show answer
2 × 190 = 380 mm above the butts.
How many nails per shake?
Show answer
Two.
A slope is 3.8 m from eave to ridge at 250 mm exposure. How many courses?
Show answer
3,800 ÷ 250 = 15.2, so 16 courses.
Why are wood shingles never interlaid with felt?
Show answer
The felt traps moisture against the wood.
A roof is 46 m² and bundles cover 1.86 m². How many bundles with 5 in 100 waste?
Show answer
46 ÷ 1.86 × 1.05 = 26.0, so 26 bundles.
Lesson quiz · 5 questions
Score 60% or more to complete this lesson.
Create a free account to save your progress, take quizzes and earn a certificate.