
ROOF-110 · Lesson 8 of 12 · 25 min
Ladders, hoists and material handling
▶ Video coming soon A video version of this lesson is on the way.
A roofing crew moves a staggering amount of material. A single house re-roof can mean tearing off two or three tonnes of old shingles and carrying up a similar weight of new ones. The Ashgrove Plaza re-roof will take off several truckloads of old built-up roofing and gravel and bring up insulation, cover board, membrane rolls, metal, adhesives and propane. All of it moves between the ground and the roof by ladder, hoist, conveyor or crane, and all of it has to be stored on a roof that was designed to keep out weather, not to act as a warehouse. Injuries from this side of the work are common: falls from ladders, strains from lifting, crushed hands at hoists, materials falling on people below and roofs damaged by overloading.
"Most roofers I've known who got hurt badly weren't hurt doing roofing," Dana told Rory on his first loading day. "They were hurt getting up there, or getting stuff up there."
Choosing and inspecting ladders
Ladders are the most common way onto low roofs and the most common source of falls on residential jobs. Roofers mainly use extension ladders to reach eaves, and stepladders for low work on the ground or inside. Choose the ladder for the job:
- Long enough to reach the landing and extend the required distance above it, without using the top sections that the manufacturer says not to stand on.
- Rated for the load: the worker plus tools and materials. Use heavy-duty ladders certified to CSA Z11 (Grade 1 or better) for construction.
- Non-conductive (fibreglass) side rails wherever the ladder could come near overhead power lines or other electrical equipment.
- In good condition: no cracked or bent rails, missing or loose rungs, damaged feet, broken locks or frayed rope.
Inspect the ladder before each use. A ladder with a defect is tagged "do not use" and taken out of service. Never paint a wooden ladder, which hides cracks, and never splice two short ladders together to make a long one.
Setting up an extension ladder
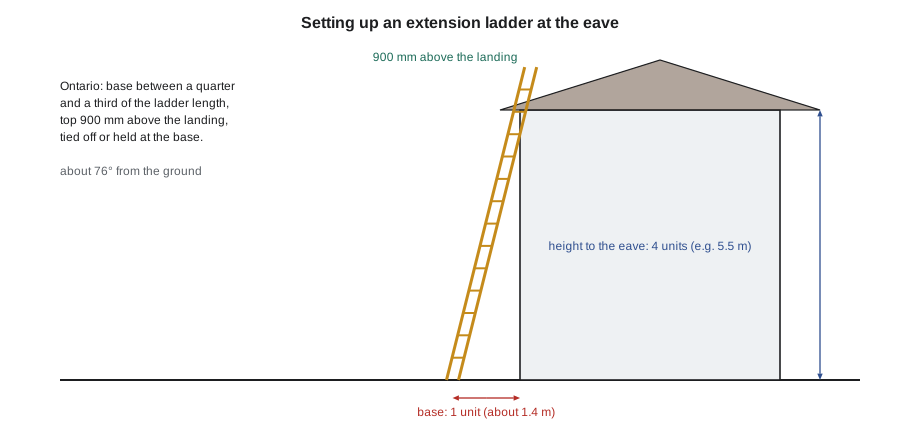
The angle matters. Too steep, and the ladder can tip backward when the worker leans out; too shallow, and the feet can slide out. Ontario's construction regulation requires a portable ladder to be placed so that the horizontal distance from the base to the wall is not less than one-quarter and not more than one-third of the length of the ladder to its support point. In the field, roofers use the 4 to 1 rule: one unit out for every four units up to the support point, which gives an angle of about 76 degrees and sits at the steep end of Ontario's range. The ladder must also extend at least 900 mm above the landing so that the worker has something to hold when stepping on and off, and it must be secured at the top or held by another worker at the bottom so it cannot slip.
Worked problem
Setting up a ladder at the 4 to 1 angle
The eave of a Linden Street house is 5.5 m above level ground. How far out should the ladder base be using the 4 to 1 rule? What length of ladder is needed to the eave, and in total if it must extend 900 mm above the eave? Check the base distance against Ontario's one-quarter to one-third rule.
Show solution
- Base distance: 5.5 ÷ 4 = 1.375 m, about 1.4 m.
- Length to the eave: √(5.5² + 1.375²) = √(30.25 + 1.89) = √32.14 ≈ 5.67 m.
- Total length: 5.67 + 0.9 ≈ 6.57 m of ladder in use.
- Ontario range for the base: 5.67 ÷ 4 ≈ 1.42 m up to 5.67 ÷ 3 ≈ 1.89 m.
- The 4 to 1 base of 1.375 m is just a few centimetres inside the steep end, so set the base at about 1.4 m.
Answer: Set the base about 1.4 m out. About 6.6 m of ladder is needed in use, so with the section overlap a 7.3 m (24-foot nominal) extension ladder is the shortest that works.
A quick field check for the angle is to stand at the base with your toes against the ladder feet and stretch your arms straight out: your palms should just reach the rung at shoulder height. Other set-up rules:
- Set the feet on firm, level ground; use levellers or a stable base on slopes, and never set the ladder on boxes, bricks or loose material.
- Rest the ladder on a solid surface at the top, not on a gutter, which can bend or break. Use a standoff or a ladder stabilizer that spans the gutter.
- Tie the top of the ladder off to the structure, or have another worker hold the base until it is tied off.
- Keep the area around the base clear and, near traffic or doors, barricade it.
- Look up before raising a ladder, and stay well clear of overhead power lines.
Climbing and working from ladders
Face the ladder when climbing, keep three points of contact (two hands and a foot, or two feet and a hand) and keep your belt buckle between the rails. Do not carry materials in your hands while climbing; Ontario's construction regulation requires workers on ladders to be able to maintain three-point contact. Bundles of shingles, rolls of membrane and buckets of asphalt never go up a ladder on someone's shoulder. Use a hoist, a ladder hoist or a conveyor instead.
Stepping from a ladder to a roof is the riskiest moment. The extension above the eave gives you something to hold onto; step sideways onto the roof through the rails or beside the ladder, not over the top. Where a roof edge has a guardrail, the ladder should land at a gate or opening in the guardrail, never outside it. On steep roofs, the fall protection for the first worker must be set up so they are protected from the moment they leave the ladder.
Overhead power lines
Overhead power lines kill roofers every year, most often when an aluminum ladder, a metal flashing, a length of gutter or a hoist touches or comes close to a line. Electricity can arc across a gap to a conductive object without touching the line. Ontario's construction regulation sets minimum distances between any part of a worker, tool, equipment or material and an energized overhead conductor: 3 m for lines of 750 volts to 150,000 volts, 4.5 m for 150,001 to 250,000 volts and 6 m for higher voltages. Lines that run to houses (service drops) also carry dangerous voltage. Before setting up, look up, identify every line near the work, keep metal ladders well away, use fibreglass ladders, and call the utility to have lines de-energized, moved or covered if the work cannot stay clear.
Getting materials onto the roof
The best way to get materials onto a roof is to have them delivered there. Many roofing suppliers deliver shingles and other materials with a boom truck or a truck-mounted conveyor that places them directly on the roof. This removes most of the manual lifting and the trips up and down ladders. On commercial jobs, cranes lift pallets of insulation, membrane and equipment onto the roof, under a lift plan with a qualified operator, rigger and signaller, as you learned in TRD-105.
When delivery to the roof is not possible, roofers use:
- Ladder hoists: a powered platform that runs up a track ladder to the roof. Never ride a ladder hoist, never stand under it, and load it within its rated capacity.
- Roof hoists: a hoisting arm mounted at the roof edge with a winch or power unit, used to lift buckets, rolls and bundles.
- Conveyors: belt conveyors that carry bundles and rolls up at an angle to the roof.
- Material lifts and forklifts: telescopic handlers can place pallets on low roofs.
Ontario's construction regulation has specific rules for roof hoists. A roof hoist must have a guardrail on each side of the landing area at the roof edge. Its hoisting cable must hang vertically, so the load is not dragged against the building. It must be operated by a competent worker. Its counterweights must be secured and must not be made of roofing materials such as bundles or rolls, and the counterweighting must give a safety factor of at least three against overturning. Follow the manufacturer's instructions for assembly and capacity.
At the bottom of every hoist, the area under the load is barricaded so that nobody walks under it. Loads are rigged so nothing can slide out: bundles stacked in a bucket or cradle, rolls tied, metal tied in bundles with tag lines. Workers at the top stay behind the guardrail and pull the load in only after it has stopped.
Storing materials on the roof
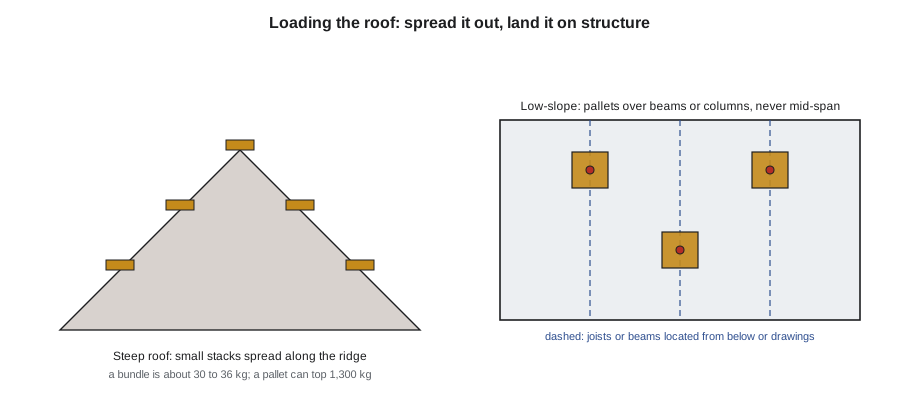
A roof is designed to carry certain loads, such as snow, rain, the roof's own weight and maintenance workers. A pallet of roofing material can weigh more than a tonne sitting on an area not much bigger than a kitchen table, which is many times the load per square metre the roof was designed for. Overloaded roofs can sag, crack or, in the worst cases, collapse. Ridgecap's rules for roof loading are:
- Spread loads out. On steep roofs, set small stacks of bundles along both sides of the ridge, never a whole pallet in one place, and lay bundles flat over the ridge or on a level bracket so they cannot slide.
- On low-slope roofs, place pallets and heavy items over beams, girders, columns or walls, as the owner's engineer or drawings direct, never in the middle of a span.
- Keep materials well away from roof edges and openings, and never inside the barrier zone.
- Secure light materials such as insulation boards and membrane rolls against wind with weights or tie-downs, and keep wrappers bagged.
- Never store materials on a roof that shows signs of sag, ponding or deck damage until it has been checked.
Worked problem
Checking a roof load
A pallet holds 25 rolls of base sheet at 40 kg each, plus a 20 kg pallet, on a footprint of 1.2 m by 1.2 m. Many low-slope roofs are designed for a specified load on the order of 1 kPa, about 100 kg per square metre spread evenly. What load per square metre does the pallet put on the roof, and roughly how many times the design figure is that?
Show solution
- Total weight: 25 × 40 + 20 = 1,020 kg.
- Footprint area: 1.2 × 1.2 = 1.44 m².
- Load per area: 1,020 ÷ 1.44 ≈ 708 kg per m² (about 6.9 kPa).
- Compared with 100 kg per m²: 708 ÷ 100 ≈ 7 times.
Answer: About seven times the evenly spread design figure. A concentrated load like this must sit over a beam or column, as the engineer directs, or be broken down and spread out. Design loads vary by building, so check the drawings or ask the owner.
Worked problem
Spreading bundles on a steep roof
A Linden Street roof needs 90 bundles of laminated shingles at 32 kg each. Dana allows no more than 6 bundles in any one stack along the ridge. How many stacks are needed, and how much does each stack weigh?
Show solution
- Stacks: 90 ÷ 6 = 15 stacks.
- Weight per stack: 6 × 32 = 192 kg.
- Total load: 90 × 32 = 2,880 kg, spread along both sides of the ridge.
Answer: 15 stacks of about 192 kg each, placed alternately on each side of the ridge over the rafters.
Manual handling
Even with hoists and conveyors, roofers lift, carry, push and pull all day. Back, shoulder and knee injuries are among the most common in the trade, and many of them build up over years. Good habits reduce the strain:
- Plan the lift: check the weight, the path and where the load will go. Clear the path of trip hazards.
- Get close to the load, bend your knees, keep your back straight and lift with your legs, keeping the load close to your body.
- Turn with your feet, not by twisting your back.
- Share heavy or awkward loads, such as membrane rolls and long metal, with a partner, and agree who calls the lift.
- Use carts, dollies and roll carriers on low-slope roofs instead of carrying.
- Watch the wind: an insulation board or a sheet of metal acts like a sail, and a gust can pull you off balance or off the roof.
Many safety organizations treat about 23 kg as the most a worker should lift in ideal conditions, close to the body and at waist height, and much less when the lift is far from the body, high, low, twisted or repeated often. A bundle of laminated shingles often weighs more than that, which is one more reason to let machines do the lifting.
Common mistakes
MistakeCarrying bundles up a ladder on your shoulder.
InsteadUse a hoist, conveyor or rooftop delivery; keep three points of contact on ladders.
MistakeLeaning the ladder on the gutter.
InsteadRest it on a solid surface or use a standoff that spans the gutter.
MistakeUsing an aluminum ladder near a service drop.
InsteadUse fibreglass ladders and keep everything well clear of power lines.
MistakeUsing bundles of shingles as hoist counterweights.
InsteadUse only the counterweights designed for the hoist, secured as the manufacturer directs.
MistakeLanding a full pallet in the middle of a roof span.
InsteadPlace heavy loads over beams or columns, or spread them out.
Summary and key terms
- Set extension ladders at about 4 to 1, with the base between a quarter and a third of the length, extending 900 mm above the landing and secured.
- Inspect ladders before use, use the right duty rating and non-conductive rails near power, and keep three points of contact.
- Keep at least 3 m from overhead lines up to 150,000 volts, and more for higher voltages.
- Roof hoists need guardrails at the landing, a vertical cable, a competent operator and proper counterweights with a safety factor of at least three.
- Spread loads on steep roofs and place concentrated loads over structure on low-slope roofs.
- Plan lifts, share heavy loads and use mechanical help to prevent strains.
- 4 to 1 rule
- Setting a ladder base one unit out for every four units of height to the support point.
- Ladder hoist
- A powered platform that carries materials up a track ladder.
- Roof hoist
- A hoisting arm mounted at the roof edge for lifting materials.
- Service drop
- The overhead power line that runs from a utility pole to a building.
- Point load
- A heavy load concentrated on a small area of a roof.
- Counterweight
- A weight that keeps a hoist from overturning under load.
Practice problems
Work each problem on paper first, then reveal the answer to check.
A support point is 4.0 m high. Where should the ladder base be using 4 to 1?
Show answer
4.0 ÷ 4 = 1.0 m from the wall.
How far must a ladder extend above a roof landing in Ontario?
Show answer
At least 900 mm.
What is the minimum distance from a 27,600-volt line in Ontario?
Show answer
3 m (750 to 150,000 volts).
What safety factor must roof hoist counterweights give in Ontario?
Show answer
At least three against overturning.
A pallet weighs 900 kg on 1.44 m². What is the load per square metre?
Show answer
900 ÷ 1.44 = 625 kg per m².
Lesson quiz · 5 questions
Score 60% or more to complete this lesson.
Create a free account to save your progress, take quizzes and earn a certificate.