
ROOF-110 · Lesson 12 of 12 · 25 min
Case study: setting up a safe roofing job
▶ Video coming soon A video version of this lesson is on the way.
This lesson pulls the course together by following one job from the first site visit to the final cleanup: Ridgecap's re-roof of Ashgrove Plaza in May and June 2026. The plaza is a one-storey strip of five stores built in the 1970s, with a low-slope roof of about 2,600 m². The old built-up roof was leaking in several places and the insulation under it was wet. The job was to tear off the old roof down to the steel deck, install new tapered insulation and cover board, and install a two-ply modified bitumen roof with a torch-applied cap sheet, with cold-applied and self-adhered details at the parapets, curbs and rooftop units. Rory was on the crew from the first day to the last, and Dana asked him to keep notes on how the job was set up. This lesson is built from those notes.
As you read, notice how many decisions were made before anyone climbed onto the roof. That is what Dana means by "Plan the roof before you climb it."
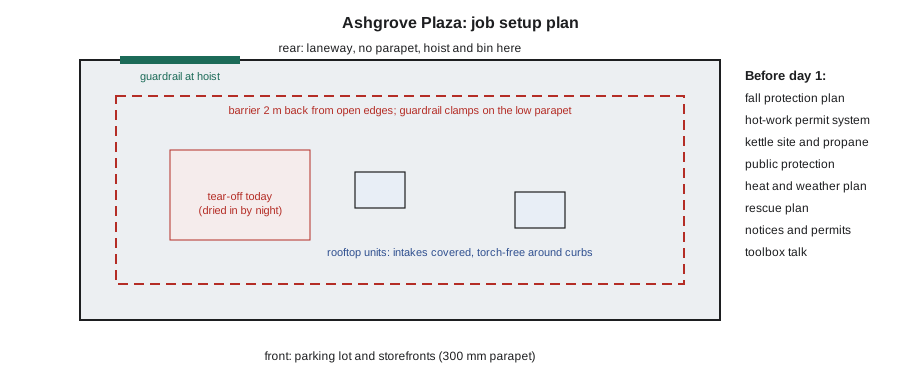
Step 1: the site visit and the owner's information
Glen Pelham, the owner of Ridgecap, priced the job, but Dana and Anjali walked the roof with him before the contract was signed. Their notes from that visit became the backbone of the safety plan:
- Roof height: about 5.2 m to the roof surface at the front and 5.8 m at the rear laneway, so fall protection was required at every edge.
- Edges: a 300 mm parapet with metal coping along the 110 m front, no parapet along the 110 m rear, and two side edges of about 24 m each, one against a neighbouring building.
- Openings: three plastic skylight domes over the dry cleaner and two roof hatches, one with a fixed ladder.
- Equipment: two rooftop units serving the pharmacy and the dental office, with fresh-air intakes, plus exhaust fans for the coffee shop.
- Deck: steel deck, in fair condition from the inside, with some rust at two old leak locations.
- Below: a busy parking lot and sidewalk at the front, a laneway used by delivery trucks at the rear, and overhead power lines crossing the laneway at the north end.
- Occupants: five businesses open six or seven days a week, including a dental office that cannot tolerate odours and a pharmacy that must not lose ventilation.
The owner's designated substances report, required under the Occupational Health and Safety Act, listed the old built-up roof felts and the flashing mastics as tested and free of asbestos, and noted possible silica in the old gravel surfacing. Dana asked for the test results in writing and kept a copy in the site file.
Step 2: permits, notices and coordination
Before the job started, Ridgecap's office handled the paperwork. The city issued a permit to use part of the sidewalk on two Sunday mornings for the front edge metal. Anjali checked whether the project needed a notice of project to the Ministry of Labour, Immigration, Training and Skills Development based on the project's cost and scope, filed it, and posted the required information on site. The fire department was told about the kettle and torch work, and the owner's insurer confirmed its hot-work requirements, including the fire watch time. The property manager sent notices to every tenant with the schedule, the closed parking spaces and a phone number for complaints.
Dana met the property manager and the owner's mechanical contractor to agree when each rooftop unit could be shut down or switched to recirculation, and how the dental office's ventilation would be kept running. The answer was that the dental office's unit would be handled on a Sunday and the work near it would use cold-applied methods only, with no torching within a set distance of its intake.
Step 3: the written plans
Anjali and Dana wrote the job's safety plan in the week before mobilization. It had several parts, each covering a topic from this course:
| Plan | Key decisions for Ashgrove Plaza |
|---|---|
| Fall protection | guardrail at the hoist landing and clamped to the front parapet; 2 m barrier from the rear and side edges; travel restraint anchors for edge work; skylights covered with secured, rated screens |
| Rescue | ladder or aerial lift from the laneway for a worker caught at the rear edge; rescue kit on the roof; emergency services called at once |
| Hot work | daily hot-work permit; torch-free details at parapets, curbs and the dental intake; extinguisher with each torch; two-hour fire watch; no new torching after 1:30 pm |
| Kettle and propane | kettle in the rear laneway inside a barricade, upwind of intakes, attended at all times; propane cylinders secured, leak-tested and limited on the roof |
| Material handling | crane delivery of insulation and rolls on day 3 with a lift plan; pallets over beam lines; roof hoist with guardrails for daily use; debris down an enclosed chute |
| Public protection | front sidewalk kept open with guardrails and toe boards and materials kept back; bin and hoist barricaded; magnetic sweeps daily |
| Heat and weather | humidex or heat index checked twice daily; water on the roof; early starts on hot days; tear-off sized to the forecast; night seals daily |
| Silica and dust | gravel wetted before removal; HEPA vacuum at drains; no dry sweeping near intakes |
| Emergency | address and access for responders; muster point in the front lot; first aid kit and burn kit on the roof and at the kettle |
Anjali also checked the crew's training records. Every worker who would use fall protection had current training, both torch operators had current torch-safety certification, Marco and his helper had kettle training, and two workers had current first aid. Rory's training was current, but he had never been a fire watch, so Anjali paired him with Marco for his first two watches.
Worked problem
Sizing the fall protection equipment
Using the dimensions from the site visit, how much barrier line is needed for the rear edge and the two side edges if it is set 2 m back from each, and how many guardrail clamps are needed along the 110 m front parapet if they go no more than 2.4 m apart?
Show solution
- Rear barrier run: 110 − 2 − 2 = 106 m (it turns the corners 2 m in from each side).
- Side barrier runs: each side is 24 m deep; the barrier runs from the rear line to the front guardrail, about 24 − 2 = 22 m each, so 2 × 22 = 44 m.
- Total barrier line: 106 + 44 = 150 m, plus extra for ties.
- Guardrail clamps: 110 ÷ 2.4 ≈ 45.8, so 46 spaces and 47 clamps for a straight run with a post at each end.
Answer: About 150 m of barrier line and 47 guardrail clamps, plus posts and weights for the barrier and the hoist guardrail.
Step 4: day one, setting up
The first day was all setup. No roofing material was torn off until the afternoon. Rory's notes list the order:
- 6:30 am: toolbox talk at the yard covering the plan, the weather (dry, light wind, warm), the hazards and who does what.
- 7:30 am: barricades and signs at the rear laneway and the bin location; the bin delivered and positioned under the planned chute.
- 8:00 am: first worker up the fixed ladder at the roof hatch, which had a guardrail around its opening, with Dana. They walked the roof and marked every skylight, drain, intake and soft spot on the plan.
- 8:30 am: skylight covers installed and secured; roof hatch guardrail checked.
- 9:00 am: roof hoist assembled at the rear with guardrails on both sides of the landing and its own counterweights; the hoist operator checked it against the manufacturer's checklist.
- 10:00 am: guardrail clamps installed along the front parapet, with toe boards; barrier or warning line set along the rear and sides; travel restraint anchors installed in the field of the roof.
- 11:00 am: chute installed and secured from the roof to the bin; kettle set up in the laneway barricade, away from the overhead lines at the north end; propane cylinders secured.
- 1:00 pm: Dana walked the whole setup with Anjali and signed the daily checklist; tear-off of the first section began.
Rory noticed that the overhead power lines in the laneway shaped the whole rear setup. The hoist, the chute and the kettle were all placed at the south end, well clear of the lines, and the crane lift on day 3 was planned from the front parking lot instead of the laneway for the same reason.
Step 5: the daily routine
Once the job was running, every day followed the same pattern. Each morning began with a toolbox talk on that day's tasks and weather, then a check of the fall protection, guardrails, barricades, covers, extinguishers and hoist. The kettle attendant lit the kettle only after the hot-work permit for the day was signed. Tear-off was sized to the forecast. The crew dried in each section the same day and installed a night seal at its edge. Torching stopped early enough for the full fire watch. At the end of the day, materials were weighted or tied down, debris was cleared, the bin was covered, the parking lot was swept for nails and the setup was checked again before the crew left.
Worked problem
Planning a hot day
The forecast for a June Thursday calls for a humidex of 42 by 1:00 pm. Under Ridgecap's plan, heavy work and torching move to the early hours on great-discomfort days. The crew starts at 6:00 am, torching can begin at 6:30 am once the permit is signed, and the insurer requires a two-hour fire watch after the last flame. Torching takes about 4.5 hours of work that day. When does the fire watch end, and is torching finished before the heat peaks?
Show solution
- Torching: 6:30 am + 4.5 h = 11:00 am.
- Fire watch: 11:00 am + 2 h = 1:00 pm.
- Heat peak forecast at 1:00 pm, after torching ends at 11:00 am.
- The fire watch runs through midday, so the watch is rotated between two workers with shaded breaks and water.
Answer: Torching ends by 11:00 am and the fire watch ends at 1:00 pm. Heavy work is done before the peak heat, and the afternoon is used for lighter tasks and cleanup.
Step 6: what went wrong, and what went right
No job goes exactly to plan. Three events from Rory's notes show how a good setup and a good crew handle surprises.
The hidden skylight. On day 5, during tear-off over the convenience store, the power tear-off machine operator felt the old roof flex. The crew stopped and probed the area. Under two layers of old roofing, someone had covered an abandoned skylight opening with a thin sheet of plywood years earlier. It was not on any drawing and had been invisible from above. If someone had stepped on it, they would have fallen into the store. The crew marked it off, Dana had it covered with a secured, rated cover, and the owner's contractor framed it in properly the next day. Dana added a line to Ridgecap's tear-off procedure: probe any soft or flexing area before standing on it, and assume old roofs hide openings.
The gust. On day 9, a sudden gust lifted a stack of loose insulation boards that had been unbanded for cutting and carried two of them toward the rear edge. One stopped against the barrier line; the other went over the edge into the laneway, which was barricaded, and landed inside the bin enclosure. Nobody was hurt. At the next morning's toolbox talk, the crew agreed that unbanded boards would be weighted at all times and cut only in the lee of the rooftop units, and that the crew would stop handling boards when gusts passed the plan's limit.
The smoke smell. On day 12, about an hour into the fire watch, Rory smelled something like burning paper near a curb. He did not see smoke. He did exactly what he had been taught: he called Marco, kept the extinguisher in hand and scanned the area with the infrared thermometer. The curb flashing was warm but not rising, and the smell turned out to be from the coffee shop's exhaust fan. Marco told him he had done the right thing. "You check every smell," he said. "Ninety-nine times it's nothing. You check because of the hundredth."
The job finished on schedule, with no lost-time injuries, no fire and no leaks into the stores. The dental office never had an odour complaint.
Step 7: closing out the job
Closing out is part of setting up a safe job, because it is when temporary protection comes down and people relax. Ridgecap's closeout followed the reverse of the setup: guardrail and barriers stayed up until the last edge metal was installed, the fire watch for the final torching was completed and signed off before any setup was removed, the hoist came down last, and the final cleanup included a magnetic sweep of the whole parking lot and laneway. Dana walked the finished roof with the property manager, and Anjali held a short review with the crew: what worked, what nearly went wrong and what Ridgecap should change for the next job. The hidden skylight and the gust both became new lines in Ridgecap's procedures.
A checklist for setting up any roofing job
Rory turned his notes into a one-page checklist that Dana now hands to every new apprentice. It works for a house as well as a plaza:
- Know the roof: height, slope, edges, parapets, openings, skylights, deck, equipment and what is under the old roof.
- Know the people: occupants, public, neighbours and other trades, and how the work will affect each of them.
- Know the rules: the fall protection, ladder, hoist, fire, hazardous materials and permit requirements for this job and place.
- Plan the access: how workers get up and down, and how materials go up and debris comes down.
- Plan the fall protection: guardrails first, then barriers or warning lines, then personal systems, and the rescue plan.
- Plan the hot work: permits, torch-free details, kettle location, propane, extinguishers and fire watch.
- Plan for weather: heat, cold, wind, rain and lightning, and how much roof to open each day.
- Plan for the public and the building: barricades, signs, chutes, intakes, drains and protection inside.
- Check the people: training, PPE, fitness for the conditions and who does what.
- Talk it through: a toolbox talk every morning, and anyone can stop the work.
"If you can tick every line on that list," Dana told Rory when he showed it to her, "then you've planned the roof before you climbed it. That's the job."
Common mistakes
MistakeStarting tear-off on the first morning before the setup is complete.
InsteadFinish and check all protection first; on Ashgrove Plaza, setup took most of day one.
MistakeAssuming the drawings show every opening.
InsteadProbe soft or flexing areas and assume old roofs can hide openings.
MistakeLeaving unbanded insulation boards loose on the roof.
InsteadWeight or secure light materials at all times and stop handling them in strong gusts.
MistakeIgnoring a smell during the fire watch because there is no smoke.
InsteadCheck every smell and every warm spot; call for help when unsure.
MistakeRemoving guardrails as soon as the last membrane is down.
InsteadKeep edge protection until the last edge work is finished and remove it in a planned order.
Summary and key terms
- Most safety decisions on a roofing job are made before anyone climbs onto the roof.
- A site visit gathers the facts: height, edges, openings, deck, equipment, power lines, occupants and hazardous materials.
- Permits, notices and coordination with the owner, tenants, fire department and insurer come before mobilization.
- The written plan covers fall protection, rescue, hot work, kettle and propane, material handling, public protection, weather, dust and emergencies.
- Day one is for setup; every day starts with a toolbox talk and ends with the roof secured.
- Surprises are handled by stopping, protecting the hazard and updating the procedure so it does not happen again.
- Mobilization
- Moving the crew, equipment and materials onto a site and setting up to start work.
- Site visit
- A walk of the roof and site before the job to gather facts for pricing and planning.
- Safety plan
- The written set of plans that describes how each hazard on a job will be controlled.
- Closeout
- Finishing a job, removing temporary protection in order and reviewing what was learned.
- Near miss
- An event that could have caused injury or damage but did not.
- Lift plan
- A written plan for a crane lift covering the load, equipment, rigging, people and setup.
Practice problems
Work each problem on paper first, then reveal the answer to check.
Why was the Ashgrove Plaza kettle placed at the south end of the laneway?
Show answer
To keep it, the hoist and the chute well clear of the overhead power lines at the north end, and upwind of intakes.
What did the crew do when the roof flexed during tear-off?
Show answer
Stopped, probed the area, found a hidden opening, marked it off and had it covered with a secured, rated cover.
Name four parts of a roofing job's safety plan.
Show answer
Any four of: fall protection, rescue, hot work, kettle and propane, material handling, public protection, heat and weather, silica and dust, emergency.
Torching takes 3.5 hours starting at 6:30 am. When does a two-hour fire watch end?
Show answer
Torching ends at 10:00 am, so the watch ends at 12:00 noon.
Why does closeout need planning?
Show answer
Temporary protection comes down and people relax, so edge protection must stay until the last edge work is done and be removed in order.
Lesson quiz · 5 questions
Score 60% or more to complete this lesson.
Create a free account to save your progress, take quizzes and earn a certificate.