
IRW-130 · Lesson 1 of 12 · 23 min
What reinforcing steel does in concrete
▶ Video coming soon A video version of this lesson is on the way.
On Monday evening, September 28, Tobias Reyes held the first of his rod school nights in the Crossbeam yard. Tobias runs Crossbeam's rod gang, the crew that places reinforcing steel, and he had invited the new structural apprentices to learn the other half of the company's work. On the table in the shop he laid a small concrete beam, about the size of a loaf of bread, cast with no steel in it, and a second beam the same size with two short bars near the bottom. He set the first beam across two blocks and stepped on the middle. It cracked from the bottom up and broke in two with almost no warning. He set the second beam on the blocks and stood on it with his whole weight. A hairline crack opened along the bottom face, and the beam held. "That," he said to Shay Donnelly, "is the whole trade in one minute. The concrete holds up the squeeze. The steel holds the stretch. Our job is to put the steel exactly where the stretch is going to be."
This course is about reinforcing steel, called rebar, and the ironworkers who place it, sometimes called rodbusters or rodmen. Crossbeam erects structural steel, and it also places rebar for foundations, walls, slabs and parking structures. Many ironworkers spend their whole careers in reinforcing; others move between steel and rebar as the work comes and goes. This first lesson explains why concrete needs steel at all, so that every later decision about size, spacing, cover, laps and ties makes sense.
Concrete: strong in compression, weak in tension
Concrete is a mixture of cement, water, sand and stone that hardens into an artificial rock. Like natural rock, it is very good at resisting being crushed. A typical structural concrete might be specified at 30 MPa, meaning a test cylinder must carry at least that much pressure before it crushes at 28 days.
Concrete is poor at resisting being pulled apart. Its tensile strength is only about one tenth of its compressive strength, and it is unreliable: a small crack from shrinkage, a cold night or a bump during construction can reduce it to nearly nothing. Designers therefore assume that concrete carries no tension at all and that every pulling force must be carried by steel.
Steel is strong in both tension and compression. A reinforcing bar of the common grade has a minimum yield strength of 400 MPa, more than ten times the compressive strength of ordinary concrete and around a hundred times its tensile strength. Combining the two materials gives a composite that uses each where it works best: concrete for compression, mass, fire resistance and shape, and steel for tension.
Worked problem
How much concrete one bar replaces
A 15M bar has a cross-sectional area of about 200 mm² and a yield strength of 400 MPa. How much tension can it carry at yield, and how much concrete area would be needed to carry the same tension at a tensile strength of 3 MPa?
Show solution
- Tension at yield = 200 mm² × 400 MPa = 80,000 N = 80 kN.
- Concrete area needed = 80,000 N ÷ 3 MPa ≈ 26,700 mm².
- That is a square of concrete about 163 mm on a side, and it would crack and lose that strength without warning.
Answer: About 80 kN, equal to more than 130 times the bar's own area of uncracked concrete. One bar the thickness of a finger does the work of a block of concrete, and does it reliably after the concrete cracks.
Where the tension is: beams and slabs
When a beam or a slab carries load, it bends. In a beam supported at its two ends, the top fibres are squeezed together and the bottom fibres are stretched. The line between the two, where there is neither squeeze nor stretch, is called the neutral axis. The bottom of the beam is in tension, so the main bars go near the bottom.
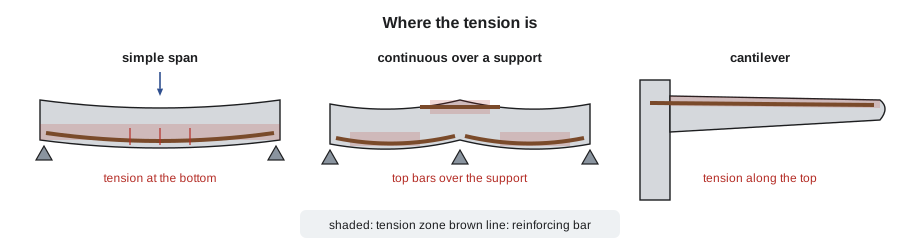
Most real buildings are not made of simple spans. Beams and slabs run continuously over many supports. Between supports they sag, so the bottom is in tension. Over each support they hog, bending the other way, so the top is in tension. That is why a slab has bottom bars through the middle of each span and top bars over the beams, columns and walls, extending some distance into each span. A cantilever, such as a balcony or a slab that projects past its last support, is in tension along its whole top, and its main steel is in the top. Put that steel at the bottom by mistake, and a cantilever can fail the day the forms are stripped.
This is why an ironworker reads every bar callout for its position as well as its size and spacing. "T" and "B" on a drawing mean top and bottom, and swapping them is one of the most serious mistakes in the trade. The bars may be the right size, the right count and the right spacing and still be useless if they are on the wrong face.
Worked problem
Tension in a simple beam
A beam has three 25M bottom bars, each with an area of about 500 mm², of 400 MPa steel. What total tension can the bottom steel carry at yield?
Show solution
- Total steel area = 3 × 500 = 1,500 mm².
- Tension = 1,500 mm² × 400 MPa = 600,000 N = 600 kN.
Answer: About 600 kN, roughly the weight of 60 tonnes. The designer has matched that number to the load the beam must carry, with safety factors. A missing bar removes a third of the capacity, which is why bar counts are checked before every pour.
Shear: why beams have stirrups
Near the supports of a beam, the load also tries to slide one part of the beam past the next, a force called shear. Shear produces diagonal cracks that run at roughly 45 degrees from the bottom near the support toward the top. Plain concrete can resist some shear, but beyond that the diagonal cracks can open suddenly and the beam can fail with little warning.
Stirrups are the closed or open loops of bar that wrap around the main bars of a beam. They cross the diagonal cracks and hold the two sides together. Stirrups are usually closer together near the supports, where shear is highest, and farther apart near mid-span. When a bar list shows stirrups at two or three different spacings along a beam, that is why, and a placer who spreads them evenly to save time has removed steel from where it is needed most.
Columns and walls: compression and confinement
Columns carry mostly compression, which concrete handles well. They still need steel. Vertical bars add strength, carry the tension that bending and wind put into the column, and tie each floor to the next. Ties, the closed loops of smaller bar around the vertical bars, have a different job: they keep the vertical bars from buckling outward under load and confine the concrete core, so that the column bulges and cracks slowly before failing instead of exploding. In earthquake design, that confinement is critical, and tie spacing and hook details are some of the most closely inspected items in a building.
Walls carry vertical loads, resist soil or water pressure, and brace a building against wind. Their vertical and horizontal bars, often in two layers called mats, one near each face, control cracking and carry the tension from bending.
Temperature and shrinkage steel
Concrete shrinks as it dries and expands and contracts with temperature. A large slab or wall that is restrained at its edges, by the ground, by columns or by the next pour, will crack as it shrinks. Steel cannot stop the cracking entirely, but well-distributed bars keep the cracks small and close together instead of letting a few cracks open wide. This steel is called temperature and shrinkage steel, and every slab and wall has a minimum amount of it, even where the loads alone would not need any.
Crack control is not cosmetic. A wide crack lets water, and in a parking structure road salt, reach the bars. Rusting steel expands, cracks the concrete over it, and starts the spalling that ends with concrete falling off the underside of a deck. Much of the care in this course, from cover to tie wire tails to clean bars, is about keeping water away from the steel for the life of the structure.
Bond: how steel and concrete work together
Steel can only help the concrete if the two act together, without the bar sliding through the concrete when it is pulled. That grip is called bond. Modern rebar is rolled with raised ribs, called deformations, along its length. The concrete hardens around the ribs and locks onto them, like a bolt in a threaded hole.
A bar needs a certain length embedded in concrete beyond any point where it is needed, so that the bond along that length can develop the full strength of the bar. This is called the development length, and it explains why bars run past supports, why bars end in hooks where there is no room for a straight length, and why bars are overlapped at splices (lesson 4). Anything that weakens bond, such as oil, mud, form release agent, thick loose scale or a bar that has been moved after the concrete has started to set, weakens the structure.
Steel and concrete also expand with temperature at almost the same rate. If they did not, every hot day and cold night would pull the bars loose from the concrete. That lucky match is one reason reinforced concrete has worked so well for more than a century.
The rodbuster's responsibility
The engineer designs the reinforcing, the detailer draws it bar by bar, and the fabricator cuts and bends it. The ironworker is the last person to touch it before the concrete covers it forever. Once the concrete is placed, a missing bar, a bar on the wrong face, a short lap or bars sitting on the form with no cover cannot be seen and are very hard to fix. The engineer's inspection catches many errors, but not all of them. A good rod gang places every bar as if no one will ever check it.
In Ontario, reinforcing work is part of the Ironworker (Generalist) trade and has its own trade, Reinforcing Rodworker (452A). Apprentices like Shay, registered as Ironworker (Structural and Ornamental), learn to read placing drawings and place bars because steel erectors often place rebar too, and because the two trades meet at every anchor bolt, embed plate and composite deck.
Where this course goes
The lessons that follow move from the bar to the building. Lesson 2 covers bar sizes, grades and markings, and lesson 3 explains how to read placing drawings and bar lists. Lesson 4 covers bends, hooks and laps; lesson 5 covers the supports and cover that hold bars in the right place; and lesson 6 covers tying. Lessons 7 to 10 cover placing in footings, walls and columns, slabs and beams, and welded wire reinforcement. Lesson 11 covers inspection before the pour, and lesson 12 follows Crossbeam's rod gang through a parkade. Post-tensioning, mechanical splices, coated bars and complex structures are covered in IRW-220.
Reading a member for its steel
Before opening a drawing, Tobias asks apprentices to look at a member and say where they think the tension is. A footing pushed up by the soil has tension at the bottom. A basement wall pushed in by soil has tension on its inside face between floors and on its soil face where it is held at the floors. A slab between beams has tension at the bottom in the middle of each span and at the top over each beam. A column bent by wind has tension on one face, then the other as the wind changes. The answer is not always simple, but the habit of asking makes drawings easier to read, and it makes a wrong-looking drawing stand out. When the steel on a drawing is not where the tension should be, it is worth a question to the foreperson; sometimes there is a reason, and sometimes there is a mistake.
The same habit helps with the cracks that appear in every concrete structure. Fine cracks on the bottom of a slab near mid-span, or on top over a support, are normal; they show the steel is doing its job. Wide cracks, cracks with rust stains, or cracks where no tension should be, are signs of a problem, and an ironworker who understands the steel is often the first to notice them.
Common mistakes
MistakeThinking the concrete carries tension once it has cured.
InsteadDesigners assume concrete carries no tension; the steel must be where the tension is.
MistakePlacing cantilever or support steel at the bottom.
InsteadRead every callout for top or bottom; cantilevers and supports need top steel.
MistakeSpreading stirrups evenly along a beam to save time.
InsteadPlace stirrups at the spacings shown; they are closest where shear is highest.
MistakeTreating oily or muddy bars as harmless.
InsteadAnything on the bar that weakens bond weakens the structure; clean it or report it.
MistakeAssuming the inspector will catch any mistake.
InsteadPlace every bar as if no one will check it; errors are buried for good once the concrete is in.
Summary and key terms
- Concrete is strong in compression and weak and unreliable in tension; designers assume steel carries all the tension.
- Simple spans are in tension at the bottom, continuous members at the top over supports, and cantilevers along the top.
- Stirrups resist shear near beam supports; ties confine column cores and keep vertical bars from buckling.
- Temperature and shrinkage steel keeps cracks small and protects the bars from water and salt.
- Deformations give bond; development length lets a bar reach its full strength.
- The rodbuster is the last check before the concrete hides the steel forever.
- Rebar
- Reinforcing bar: a deformed steel bar placed in concrete to carry tension.
- Neutral axis
- The line in a bending member where there is neither tension nor compression.
- Stirrup
- A loop of bar around the main bars of a beam that resists shear.
- Tie
- A closed loop of bar around the vertical bars of a column that confines the core and braces the bars.
- Temperature and shrinkage steel
- Distributed bars that control cracking from drying and temperature change.
- Bond
- The grip between concrete and a bar, provided mainly by the bar's deformations.
- Development length
- The embedded length a bar needs to reach its full strength through bond.
- Cantilever
- A member that projects past its last support and is in tension along its top.
Practice problems
Work each problem on paper first, then reveal the answer to check.
A 10M bar has an area of about 100 mm² and a yield strength of 400 MPa. What tension can it carry at yield?
Show answer
100 × 400 = 40,000 N = 40 kN.
Where is the tension in a slab over an interior beam?
Show answer
At the top.
Why are stirrups closer together near the supports?
Show answer
Shear is highest there.
What does temperature and shrinkage steel do?
Show answer
It keeps cracks from drying and temperature change small and closely spaced.
What gives a bar its grip on the concrete?
Show answer
Its deformations, the raised ribs rolled onto the bar.
Lesson quiz · 5 questions
Score 60% or more to complete this lesson.
Create a free account to save your progress, take quizzes and earn a certificate.