
INS-220 · Lesson 7 of 12 · 21 min
Tee and branch jacketing
▶ Video coming soon A video version of this lesson is on the way.
During the Kellerton rack job in October, Tomasz's crew found that most of the wet insulation on the steam line was next to branches. At one NPS 3 drip leg branch, someone had cut a rough hole in the header jacket, pushed the branch jacket down into it and run a bead of caulking around the gap. The caulking had cracked, and every rainstorm for years had run down the branch and straight into the header insulation. When Tomasz showed the apprentices the photographs, he drew a branch on the whiteboard and asked a simple question: "Rain hits the branch. Where does it go next?" The answer decided everything else about how a branch is jacketed.
Branches and tees are among the hardest details in jacketing, because two cylinders meet along a curved line and water runs from one onto the other. This lesson covers how branch jackets are laid out from a pattern, how the hole in the header jacket is laid out, how the two are joined so water runs over the joint and not into it, and how pre-formed tee covers and small branches are handled.
How two cylinders meet
Where a branch joins a header at right angles, the branch jacket and the header jacket meet along a curve called the line of intersection. Looked at from the side of the header, the branch jacket's bottom edge is not straight: it is highest where it is in line with the header and lowest at its sides, where it wraps down around the curve of the header. The difference depends on the sizes: a branch nearly as large as the header wraps far down the header's sides; a small branch on a large header sits almost on a flat surface.
SMW-120 showed how to develop a pattern for one cylinder meeting another by parallel line development. The jacket version is the same, with the insulation outside diameters used for both cylinders instead of the pipe diameters, and with laps added. Two pieces have to be laid out: the branch jacket, whose bottom edge is cut to the curve, and the hole in the header jacket, which is the same curve seen from the header.
In this formula, R is the outside radius of the header insulation, r is the outside radius of the branch insulation and φ is the angle around the branch measured from the line of the header. The result d is how far the branch jacket's edge drops below the top of the header at that angle. At φ = 0°, in line with the header, d is zero. At φ = 90°, at the side of the branch, d is largest.
Laying out the branch pattern
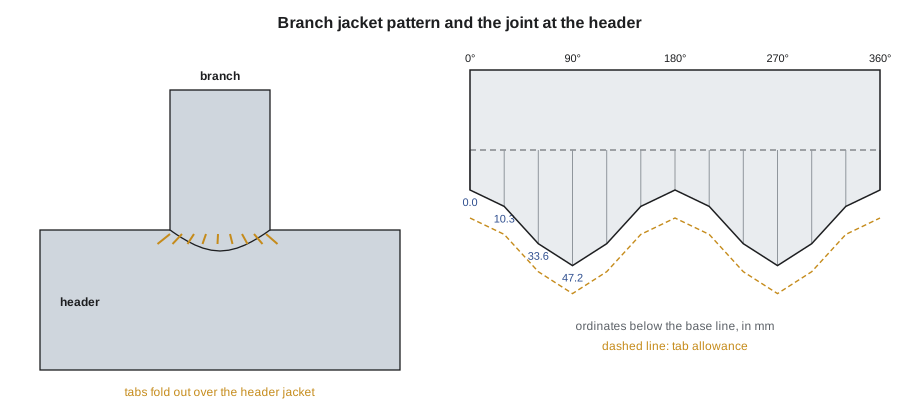
Draw a straight base line equal to the girth of the branch insulation, plus the longitudinal lap. Divide it into 12 or 16 equal parts and draw perpendicular lines at each division. Mark the division at the start as 0°, in line with the header, and number the rest around the branch: 30°, 60°, 90°, 120° and so on to 360°. Above the base line, measure up the length of the branch jacket to its top end. Below the base line, measure down the value of d for each angle. Join the bottom points with a smooth curve. The curve rises to the base line at 0° and 180°, which are the two points in line with the header, and falls to its lowest at 90° and 270°, at the sides.
Then add a lap allowance below the curve: a band of extra metal, often about 25 mm (1 in), that will be notched into tabs and folded out over the header jacket. Cut the tabs about 12 to 20 mm wide, close enough that they lie flat around the curve.
Worked problem
A drip leg branch on the Kellerton rack
A vertical NPS 3 branch drops from the bottom of an NPS 6 steam header on the Kellerton rack. Both have 64 mm insulation: the header to an outside diameter of 296.3 mm and the branch to 216.9 mm. Find the branch girth and division spacing for 12 divisions, and the branch pattern ordinates at 0°, 30°, 60° and 90°.
Show solution
- R = 296.3 ÷ 2 = 148.15 mm; r = 216.9 ÷ 2 = 108.45 mm.
- Branch girth = π × 216.9 = 681.4 mm; spacing = 681.4 ÷ 12 = 56.8 mm.
- 0°: sin 0° = 0, so d = 148.15 − 148.15 = 0 mm.
- 30°: r sin 30° = 54.2; d = 148.15 − √(148.15² − 54.2²) = 148.15 − 137.87 = 10.3 mm.
- 60°: r sin 60° = 93.9; d = 148.15 − √(148.15² − 93.9²) = 148.15 − 114.58 = 33.6 mm.
- 90°: r sin 90° = 108.45; d = 148.15 − √(148.15² − 108.45²) = 148.15 − 100.93 = 47.2 mm.
- The values repeat in mirror image from 90° to 180°, and again around the other side.
Answer: Girth 681 mm at 56.8 mm spacing; ordinates 0, 10.3, 33.6 and 47.2 mm at 0°, 30°, 60° and 90°.
Laying out the hole in the header jacket
The hole in the header jacket is the same line of intersection seen from the header. Its length along the header is the outside diameter of the branch insulation. Its width around the header is largest at its middle. At the middle, the half-width measured around the header's curved surface is R × the angle whose sine is r ÷ R, with the angle in radians. In practice, most jacketers lay out the hole by setting the finished branch jacket in place on the header jacket and scribing around it with a marker, or by making a template from the branch pattern. Cut the hole slightly smaller than the line, by about the width of the tabs, so the tabs land on solid header jacket.
For the Kellerton drip leg, the hole is 216.9 mm long along the header, and its full width around the header at the middle works out to 2 × 148.15 × 0.8215 = 243.3 mm, because the angle whose sine is 108.45 ÷ 148.15 = 0.732 is 0.8215 radians. That is longer than the branch diameter because it is measured around the curve of the header.
Which piece goes on top
This is the key question at every branch. Follow the water.
- A branch rising from the top of a header: rain runs down the branch onto the header. The branch jacket must lap over the header jacket, so its tabs fold out on top of the header jacket. The header jacket is cut to fit around the branch, and the branch is jacketed after the header.
- A branch dropping from the bottom of a header: water runs around the header and down onto the branch. The header jacket must lap over the branch jacket, so the branch tabs fold out under the header jacket, and the branch is jacketed before the header around it.
- A branch coming out of the side of a header: water runs down the header's side past the branch. The upper half of the joint follows the top-branch rule and the lower half the bottom-branch rule. Many jacketers make the branch piece with tabs folded out over the header on the upper half and under it on the lower half.
In every case, the joint is sealed with sealant under the tabs, and the tabs are fastened down. On hot service, rivets or screws through the tabs into the header jacket are common; on cold service, use the specified sealant and bands and keep fasteners clear of the vapour retarder. A collar or a band around the branch just above the tabs presses them down and closes the top edge.
Back at the drip leg on the rack, the branch dropped from the bottom of the header, so the new header jacket had to lap over the branch jacket tabs. The old work had the branch jacket stuffed into a hole from above, so water running round the header found the gap at the bottom of the hole and ran into the header insulation. The crew replaced it with a branch piece whose tabs went under a properly cut header hole, sealed and riveted.
Pre-formed tee covers and fabricated tees
PVC tee covers, as INS-210 showed, are common on indoor work and fit standard tees with insulation inserts. Metal tee covers are less common than elbow covers because tees come in so many combinations of run and branch sizes. On metal-jacketed work, tees are usually fabricated in the shop or in the field: a header piece with a hole, and a branch piece with tabs, as above, or a two-piece tee jacket split along the header with the branch formed as part of one half.
Where the branch is a reducing tee with a very small branch on a large header, the branch piece hardly curves at all, and a flat collar or a simple boot is often enough. Where the branch and header are the same size, the branch curve drops all the way to the header's centreline at the sides, and the pattern is deep. For equal tees, many shops make the tee in two halves split along the header, which is easier to fit.
Small branches and penetrations
Small branches, drains, vents, thermowells and instrument connections are treated as penetrations: a neat round hole in the header jacket, a short sleeve or boot on the branch with a turned-out collar, and sealant. On the top of a header, the boot laps over the header jacket; on the bottom, under it. On hot lines, the boot should not touch hot metal directly through the insulation; on cold lines, the vapour retarder must be sealed to the branch inside before the boot goes on. Lesson 4's penetration rules apply.
Planning the header piece
The header jacket around a branch should be one piece with the hole near its middle, not a hole cut across a circumferential lap. A hole across a lap leaves two half-holes in two pieces whose edges move separately, and it is almost impossible to seal. When laying out the straight run, place the laps so that each branch falls in the middle third of a piece; a short piece on each side may be needed. Keep the header's longitudinal seam on the side away from the branch, so the seam does not run into the hole.
Cut the hole in the header piece before the piece goes on the pipe, on the bench where you can cut accurately, using the template or the scribed outline. Check its position by measuring from the end of the piece to the branch centre and from the seam to the branch, then mark the branch centre on the flat piece before cutting.
Laterals and angled branches
Not every branch leaves at 90°. Laterals, such as 45° branches, and branches that come out at an angle to the header need patterns in which the cut curve is different on the two sides of the branch: shallow on the side that leans away from the header and deep on the side that leans towards it. These patterns are developed by the same parallel line method, with the branch drawn at its real angle, as SMW-120 showed for angled intersections. Most jacketers make a paper or thin-sheet trial piece for an unusual lateral before cutting metal. The lapping rule is the same: follow the water.
Tees and branches on cold service
On cold service, the vapour retarder must be continuous from the header to the branch before any jacket goes on, as INS-210 covered. The jacket joint at the branch protects it. Tabs are held with sealant or adhesive and by a band or clip around the branch, not by rivets or screws into the header jacket. PVC tee covers on cold lines are sealed at every seam and end with adhesive. If a tee is too crowded for bands and tabs, ask how the specification wants it finished rather than reaching for a screw.
| Branch position | Jacket first | At the joint | Common fastening on hot service |
|---|---|---|---|
| Rising from the top | Header | Branch tabs over the header jacket | Rivets through tabs, band on branch |
| Dropping from the bottom | Branch | Header jacket over the branch tabs | Rivets or screws through header edge into tabs |
| Leaving the side | Branch tabs both ways | Upper tabs over, lower tabs under the header jacket | Rivets through tabs, band on branch |
| Small branch or instrument | Header | Boot with collar, lapped to suit | Sealant and a small band or clamp |
Common mistakes
MistakeCutting a rough hole and pushing the branch jacket into it.
InsteadLay out the branch curve and the hole, and lap the joint so water runs over it.
MistakeMaking every branch lap the same way regardless of where it is.
InsteadBranch on top laps over the header; branch on the bottom laps under it.
MistakeUsing pipe diameters instead of insulation diameters in the pattern.
InsteadUse the insulation outside diameters of both header and branch.
MistakeRelying on a bead of caulking around the joint.
InsteadUse tabs, sealant under the tabs and fasteners or a collar.
MistakeRiveting tee tabs through a cold-service vapour retarder.
InsteadUse sealant and bands on cold service and keep fasteners clear of the retarder.
Summary and key terms
- A branch jacket meets the header jacket along a curved line of intersection, lowest at the sides of the branch.
- Branch ordinates are d = R − √(R² − (r sin φ)²), measured down from a base line equal to the branch girth.
- The hole in the header is as long as the branch insulation diameter and wider around the header's curve; scribe it from the branch or a template.
- Follow the water: top branches lap over the header jacket, bottom branches under it, side branches both.
- Seal under tabs, fasten them, and close the top edge with a band or collar.
- Small branches and instruments are treated as sealed penetrations with boots and collars.
- Line of intersection
- The curve along which a branch jacket meets a header jacket.
- Header
- The main pipe in a tee or branch connection.
- Branch
- The pipe that leaves the header at a tee.
- Tabs
- Notched strips along a branch jacket edge that fold out over or under the header jacket.
- Boot
- A short sleeve with a turned-out collar used to jacket a small branch or penetration.
- Parallel line development
- A pattern method using parallel lines along a cylinder.
- Template
- A pattern made once and used to mark repeated cuts.
- Drip leg
- A short branch at a low point of a steam line where condensate collects.
Practice problems
Work each problem on paper first, then reveal the answer to check.
Where is the branch ordinate largest?
Show answer
At the sides of the branch, at 90° and 270°.
R = 148 mm, r = 74 mm. What is d at 90°?
Show answer
148 − √(148² − 74²) = 148 − 128.2 ≈ 19.8 mm.
A branch rises from the top of a header. Which jacket goes on top at the joint?
Show answer
The branch jacket's tabs go over the header jacket.
A branch drops from the bottom of a header. Which is jacketed first?
Show answer
The branch, so the header jacket can lap over its tabs.
Why use the insulation diameters in the pattern?
Show answer
The jackets fit around the insulation, not the pipe.
Lesson quiz · 5 questions
Score 60% or more to complete this lesson.
Create a free account to save your progress, take quizzes and earn a certificate.