
INS-220 · Lesson 3 of 12 · 22 min
Measuring and cutting jacketing
▶ Video coming soon A video version of this lesson is on the way.
On the third jacketing night, Tomasz handed each apprentice a length of insulated NPS 4 pipe on a pair of sawhorses and a roll of aluminum. "Cut me one piece that fits," he said. Devon looked up the insulation outside diameter on the chart taped to the wall, multiplied by π, added the lap, cut the piece and wrapped it. The lap was 12 mm short of what it should have been. Tessa, beside him, had wrapped a thin strip of scrap jacket around her pipe, marked where it met, flattened it and measured the strip. Her piece lapped exactly. "The chart is what the insulation should be," Tomasz said. "The strip is what it is."
Every jacket piece starts as a measurement and a cut. A piece that is too short cannot lap properly and leaves a seam that leaks; a piece that is too long buckles or leaves an ugly, loose lap. This lesson covers the tools used to measure, cut and form jacketing; how to measure the true circumference of insulated pipe; how to work out the cut size of a piece, including laps; how to plan cuts from a roll; and how to work safely with sheet metal and PVC.
Tools for jacketing
Jacketing uses a small set of hand tools and, in the shop, a few machines. The hand tools travel in every jacketer's bag:
- Aviation snips. Compound-leverage snips are made in three patterns, usually marked by handle colour: one cuts straight and wide curves, one cuts curves to the left and one curves to the right. Use the pattern that keeps the waste piece curling away from the work.
- Tape measures, a flexible tape, and a circumference tape that reads diameter directly from the girth. A strip of scrap jacket or a paper band does the same job and is often more accurate on soft insulation.
- A straightedge, a square and a marker or pencil. Mark aluminum and stainless with a marker or pencil, not a sharp scriber, on surfaces that will be exposed: a deep scratch can start corrosion and cracks.
- Hand seamers (wide-jaw pliers) for folding and flattening edges, and a hand crimper for crimping the end of a piece so it slides into the next.
- A drill driver with a hex driver for sheet metal screws, a hand riveter, a punch, and a banding tensioner with a crimper for seals.
- A sharp knife and PVC shears for PVC jacket; a fine-toothed saw or knife for PVC fitting covers.
In the shop, Coldstream's jacketing shop has a foot shear for cutting sheets square, a box and pan brake for bending, a slip roll for curving sheets to a radius, a rotary beader that rolls a stiffening bead or a lap bead into the sheet, a crimper that shrinks the end of a piece so it slides into the next one, and a power roll former for pipe jacket. Machines are covered in shop training. Never operate one until you have been shown how, its guards are in place and you know where its stop is.
Measure the real circumference
The cut width of a pipe jacket piece is the circumference of the insulation plus a lap. The circumference can be worked out from the insulation outside diameter, but it is better to measure it. Pipe insulation is made to standard sizes, and charts give its nominal outside diameter, but real insulation varies. Soft insulation compresses under a band; rigid insulation may be slightly oversize; two layers of insulation are rarely exactly the chart size; and insulation that has been applied a little loose or with gaps at its joints is larger than the chart. A jacket cut to the chart may come up short or long.
To measure the girth, wrap a strip of thin scrap jacket, a paper band or a flexible tape snugly around the insulation at right angles to the pipe, without pulling it so tight that it sinks into soft insulation. Mark where the strip meets itself, then flatten it and measure. On a long run, measure in several places and use the largest reading that is not caused by a local bulge. Write the girth on your cut list along with the pipe size and insulation thickness.
Then add the longitudinal lap. A common lap is about 50 mm (2 in); specifications may call for more on large pipe or outdoors. On jacket with a factory-formed longitudinal seam, such as a Z-lock or a pre-rolled overlap, the factory has already allowed for the lap, and the piece is ordered by insulation outside diameter. On roll jacket cut in the field, you add the lap yourself.
| Pipe and insulation | Insulation outside diameter (chart) | Calculated girth | Cut width with lap |
|---|---|---|---|
| NPS 2, 38 mm | 136.3 mm | 428 mm | 478 mm |
| NPS 3, 51 mm | 190.9 mm | 600 mm | 650 mm |
| NPS 4, 51 mm | 216.3 mm | 680 mm | 730 mm |
| NPS 6, 64 mm | 296.3 mm | 931 mm | 981 mm |
| NPS 8, 76 mm | 371.1 mm | 1,166 mm | 1,216 mm |
Planning the cuts from a roll
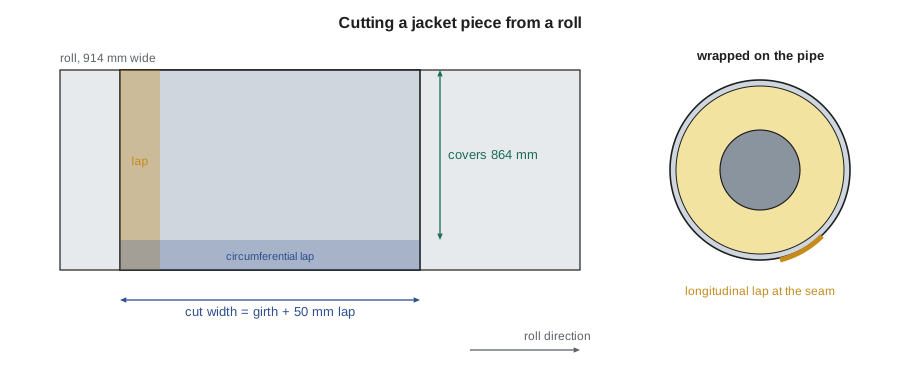
Roll jacketing is usually cut across the roll. The cut width, girth plus lap, is measured along the roll, and the roll width becomes the length of the piece along the pipe. Each piece overlaps the next by the circumferential lap, often also about 50 mm (2 in), so each piece covers the roll width less one lap. On a 914 mm roll with a 50 mm lap, each piece covers 864 mm of pipe.
To find the number of pieces for a run, divide the run length by the coverage per piece and round up. To find how much roll you need, multiply the number of pieces by the cut width. Add pieces for waste, short pieces at fittings and supports, and mistakes. Tomasz's rule for apprentices is to add one piece in ten for a straight run and more for a run broken up by many fittings.
Worked problem
Cut list for the Mountview roof run
On the Mountview penthouse roof, Tessa measured the girth of a 24 m outdoor run of NPS 4 heating hot water line to a rooftop air-handling unit, insulated with 51 mm mineral wool, at three places and got 681, 682 and 680 mm. The specified longitudinal and circumferential laps are each 50 mm, and the jacket is from a 914 mm roll. Find the cut width, the number of pieces and the length of roll needed before waste. A roll holds about 30 m.
Show solution
- Use the largest reading: 682 mm. Cut width = 682 + 50 = 732 mm.
- Check against the chart: π × 216.3 = 680 mm, so the real insulation is 2 mm larger in girth than the chart.
- Coverage per piece = 914 − 50 = 864 mm.
- Pieces = 24,000 ÷ 864 = 27.8, so 28 pieces.
- Roll length = 28 × 0.732 = 20.5 m, which fits on one roll with about 9.5 m left for waste and fittings.
Answer: Cut 28 pieces 732 mm wide; they use about 20.5 m of one roll.
A fraction of a piece always rounds up, because a run cannot be finished with part of a lap missing. On a real job the last piece is usually cut to length to finish at a fitting, a flange or an insulation end, and its cut edge is the one that needs the most care: it is the edge most often left square and sharp, and it is often the one at eye level beside a valve.
Cutting square and clean
A jacket piece must be cut square, or its laps will wander as it is wrapped and the joints along a run will not line up. On roll stock, mark the cut line with a square from the roll edge, not by eye. Cut along the line with long, full strokes of the straight snips, keeping the waste side free to curl. Do not close the snips fully at the end of each stroke, which leaves a jagged notch; open them and continue from just short of the end of the last cut. In the shop, cut stacks of pieces on the shear to a stop set at the cut width.
After cutting, check every edge. Remove burrs with a file or deburring tool, especially on edges that will be exposed or that people will touch. A burr on an exposed lap will cut someone sooner or later, and on stainless jacket it can tear a glove at the first touch.
PVC cuts with a sharp knife against a straightedge or with PVC shears. Score it and snap it if it is thick; cut it in one pass if it is thin. Cold PVC cracks along a cut, so let it warm to room temperature first. Cut PVC fitting covers with a fine saw or knife to fit around branch lines and hangers.
Forming laps and beads
Plain cut pieces can be lapped and banded as they are, but most metal jacket pieces are formed at the edges first. Forming makes laps tighter, stronger and more weathertight.
- Lap bead: a small bead rolled in near the edge of a piece. The bead on the outer piece fits over the next piece and helps hold the lap tight and line it up. A bead also stiffens the edge.
- Crimp: a series of small corrugations pressed into one end of a piece so it is slightly smaller in diameter and slides inside the next piece, giving a neat circumferential lap on elbows and cones.
- Hem or safety edge: a folded edge that removes the sharp cut edge on exposed laps, used on some equipment jacketing and in areas where people touch the jacket.
- Curved or rolled pieces: on large pipe and equipment, the shop rolls pieces to the right radius so they sit tight without springing open.
Keep the moisture barrier on the inside when forming, and do not form beads or crimps so tight that they tear it. On stainless steel, form each bead once; reworking it can crack the metal.
Working safely with jacketing
Sheet metal cuts are the most common injury in jacketing work. Wear cut-resistant gloves rated for sheet metal, and sleeves or a long-sleeved shirt; Coldstream issues gloves rated for high cut resistance for all jacketing work. Wear safety glasses: snips throw small slivers, and drilling and riveting throw chips. Keep fingers out of the line of the snips and away from the shear blade and the brake. Carry sheets by their edges with both gloved hands and watch where the corners go. Pick up offcuts and slivers as you go; on a rack or a roof, put them in a bag or bin, because a sliver dropped from height can cut someone below and a sheet blown off a roof can kill.
In Ontario, the Occupational Health and Safety Act and the construction regulation require the protective equipment for the hazard to be provided and used, and they set the rules for ladders, scaffolds, guardrails and fall protection on the jacketing work that is done at height. Coldstream's hazard assessment for jacketing names cut-resistant gloves, eye protection and fall protection where a fall hazard exists.
Measuring at fittings and awkward places
Straight runs are easy to measure. Fittings, supports and crowded racks are not. At every place where the run changes, measure and record what the jacket must do there: the distance from the last full piece to the face of a flange or the start of an elbow's insulation, the insulation diameter on each side of a reducer, the centre-to-centre distance between branches, and the clearance to walls, steel and other lines. Where pipes run close together on a rack, check that there is room to get snips, a tensioner and a hand around the jacket; if there is not, pieces may have to be pre-formed in the shop and slid on, or the seam placed where it can be reached and recorded as a change.
Measure the insulation, not the pipe. Where insulation thickness changes, such as at a flange cover or where two layers drop to one, the girth changes too. Where the insulation is bulging, out of round or short of thickness, the jacket will show it; report it rather than forcing a jacket over it.
Keeping a cut list
A cut list is the record that turns field measurements into pieces. For each run it gives the line, the pipe size and insulation thickness, the measured girth, the cut width, the number of full pieces, the length of any short pieces, and the fittings that the shop will make. Tomasz's cut lists also give the seam side, the starting end and the direction of the laps for each run, so whoever installs the pieces knows which way the water goes. A good cut list is clear enough that another crew could pick it up and finish the job.
Common mistakes
MistakeCutting jacket to the chart diameter without measuring.
InsteadMeasure the girth with a strip or tape, then add the lap.
MistakePulling the measuring tape so tight it sinks into soft insulation.
InsteadMeasure snug, not tight, and use the largest true reading on the run.
MistakeScribing cut lines on exposed aluminum or stainless.
InsteadMark with a marker or pencil; deep scratches can start corrosion.
MistakeClosing the snips fully at the end of each stroke.
InsteadKeep the stroke short of the tip to avoid notches.
MistakeLeaving burrs and slivers on edges and on the job.
InsteadDeburr edges and pick up offcuts as you work.
Summary and key terms
- Jacketing tools include aviation snips, tapes, hand seamers, crimpers, drills, riveters and banding tools; the shop adds a shear, brake, slip roll, beader and crimper.
- Cut width = measured girth + longitudinal lap; measure the girth, because real insulation is not exactly the chart size.
- Roll jacket is cut across the roll; each piece covers the roll width less the circumferential lap.
- Pieces = run length ÷ coverage, rounded up; roll length = pieces × cut width; add for waste and fittings.
- Cut square, deburr every edge and form beads and crimps without tearing the moisture barrier.
- Wear cut-resistant gloves and eye protection, and control sheets and offcuts, especially at height.
- Girth
- The measured distance around insulated pipe.
- Cut width
- The width of a jacket piece around the pipe: girth plus longitudinal lap.
- Coverage
- The length of pipe a piece covers: its length less one circumferential lap.
- Aviation snips
- Compound-leverage hand shears for sheet metal, made for straight, left and right cuts.
- Lap bead
- A bead rolled near the edge of a jacket piece to seat and stiffen a lap.
- Crimp
- Small corrugations pressed into the end of a piece so it slides inside the next.
- Slip roll
- A shop machine that curves sheet metal to a radius.
- Z-lock
- A factory-formed longitudinal seam on pipe jacket that locks the piece closed.
Practice problems
Work each problem on paper first, then reveal the answer to check.
Why measure the girth instead of using the chart diameter?
Show answer
Real insulation is rarely exactly the chart size; the measured girth is what the jacket must fit.
The girth is 600 mm and the lap is 50 mm. What is the cut width?
Show answer
650 mm.
A 914 mm roll with a 50 mm circumferential lap: what length of pipe does each piece cover?
Show answer
864 mm.
How many pieces cover 15 m at 864 mm each?
Show answer
15,000 ÷ 864 = 17.4, so 18 pieces.
Why mark exposed aluminum with a marker and not a scriber?
Show answer
A deep scratch can start corrosion or a crack.
Lesson quiz · 5 questions
Score 60% or more to complete this lesson.
Create a free account to save your progress, take quizzes and earn a certificate.