
INS-220 · Lesson 4 of 12 · 23 min
Laps, seams and weatherproofing
▶ Video coming soon A video version of this lesson is on the way.
Tomasz started the fourth jacketing night with a watering can. He had set up three short jacketed pipes on stands in the shop yard: one level, one sloping down to the left and one vertical. On each, two pieces of jacket were lapped the right way and two the wrong way. He poured water slowly along the top of each pipe while the apprentices watched. Where the laps were right, the water ran over them and dripped off the bottom. Where they were wrong, it disappeared into the joint, and a moment later a dark wet line showed on the brown paper of the insulation when Tomasz pulled the jacket back. "Water does not read the drawings," he said. "It goes downhill, and it goes in wherever you let it."
This lesson covers the rules that make a jacket shed water: how circumferential and longitudinal laps are arranged, where the longitudinal seam goes on horizontal pipe, how vertical and sloped lines are lapped, when laps are sealed, and how terminations and penetrations are made weathertight. These rules apply to every jacket in the rest of the course, from straight pipe to tank heads.
The shingle rule
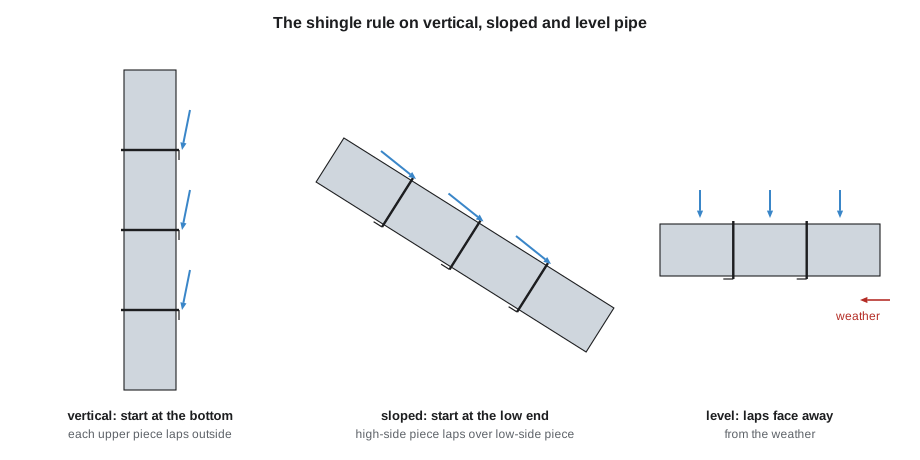
A jacket sheds water the same way roof shingles do. Every lap is made so that the piece upstream of the water flow lies on top of the piece downstream. Water running over the outside then crosses each lap from the outer piece onto the inner piece and keeps going. If the lap is reversed, so that the edge of the outer piece faces upstream, the water runs against the edge and is led straight into the joint.
On a jacket, water flows in two directions: down and around the pipe, from the top towards the bottom, and along the pipe wherever the pipe slopes or is vertical. So there are two sets of laps to get right: the longitudinal lap, which runs along the pipe where each piece overlaps itself, and the circumferential laps, which run around the pipe where one piece overlaps the next.
Longitudinal seams on horizontal pipe
On a horizontal pipe, rain falls on the top and runs around both sides to the bottom. The longitudinal lap must be placed so that water running around the pipe crosses it from the outer edge onto the inner piece, never into the edge. That means two things. First, the lap is placed below the horizontal centreline of the pipe, never on top, where water would sit on it. Second, the outer edge of the lap points down, so water running down the side of the pipe runs over it.
A common rule is to place the longitudinal seam at about the 4 o'clock or 8 o'clock position as you look along the pipe, roughly 30 to 60 degrees below the horizontal centreline. Which side depends on the weather and the view: outdoors, put the seam on the side away from the prevailing wind and driving rain; indoors, put it on the side away from the usual viewing angle so the line of the run looks clean. Keep all the seams on a run on the same side and in a straight line. Specifications sometimes state the position, and some plant standards ask for the seam at 3 or 9 o'clock with the edge down; follow the specification.
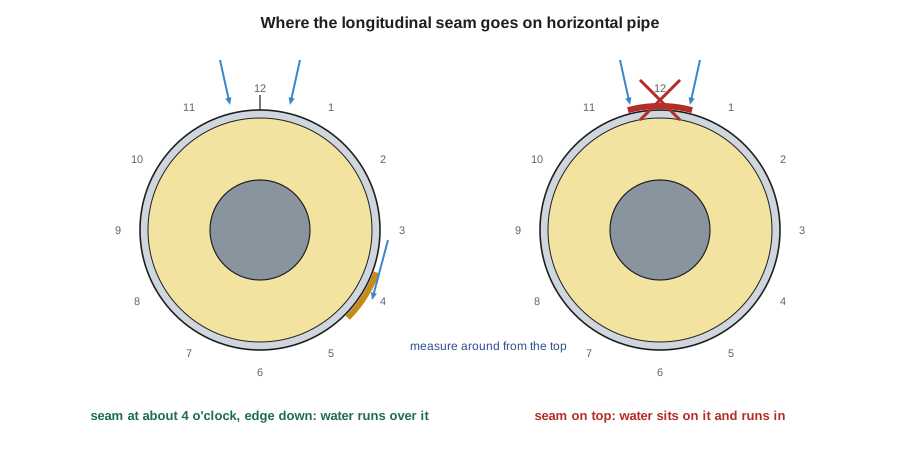
Placing the seam accurately is easier if you measure it around the pipe instead of guessing. The seam position can be found as a distance around the jacket from the top centre. Mark the top centre of the pipe at each end of a run with a level, then wrap a tape from that mark to the measured distance.
Worked problem
Marking the seam position
A jacketed NPS 6 line has an insulation outside diameter of 296.3 mm. The specification asks for the longitudinal seam 45 degrees below the horizontal centreline on the side away from the weather. How far around the jacket from the top centre should the seam be marked, and how far is that from the bottom centre?
Show solution
- From the top centre to the horizontal centreline is 90°; 45° further down makes 135° from the top.
- Circumference = π × 296.3 = 930.9 mm.
- Distance from the top = 135 ÷ 360 × 930.9 = 349.1 mm.
- From the bottom centre, the seam is 180° − 135° = 45° away: 45 ÷ 360 × 930.9 = 116.4 mm.
Answer: Mark the seam about 349 mm around from the top centre, which is about 116 mm from the bottom centre.
Circumferential laps
Circumferential laps join one piece to the next along the pipe. On a vertical pipe, each upper piece laps outside the piece below, so water running down the pipe crosses every lap from outside to inside. This means you start jacketing a vertical line at the bottom and work up. On a sloped pipe, the piece on the high side laps over the piece on the low side, so you start at the low end and work uphill. On a level pipe, water does not run along the pipe, but wind-driven rain and washdown water do; outdoors, face the exposed edges of circumferential laps away from the prevailing weather, and indoors, away from washdown hoses or the main viewing direction.
A level line on a drawing is rarely level on a rack. Lines are pitched for drainage, racks sag between supports, and a long line on a hot day can bow. Before jacketing a run outdoors, check its slope with a level at several points. A line that looks level but falls a few millimetres per metre towards one end should be lapped as a sloped line.
A typical circumferential lap is about 50 mm (2 in). Beaded laps fit tighter and line up better than plain laps: the bead on the outer piece sits over the inner piece and gives a positive stop. Every circumferential lap is held by a band, which presses the lap closed and keeps the two pieces from separating. Lesson 10 covers bands and their spacing.
Sealing laps
Should laps be sealed? It depends on the service, the location and the specification. Indoors on hot service, laps are usually lapped and banded without sealant, so that the jacket can move as it warms and cools. Outdoors, many specifications call for a bead of compatible sealant inside circumferential laps, and sometimes inside longitudinal laps, so that wind-driven rain cannot be forced in. On cold service, the vapour retarder under the jacket does the sealing; the jacket laps may also be sealed to keep water out, but nothing in the jacket may puncture or damage the vapour retarder.
Use only the sealant the specification or the jacket maker allows. Sealants for metal jacketing are usually non-hardening, weather-resistant types that stay flexible and do not attack aluminum; some sealants contain chemicals that corrode aluminum or stain stainless steel. Apply the bead inside the lap, near the outer edge of the inner piece, so it is squeezed when the lap is banded. A bead on the outside of the lap is an emergency repair, not a seal: it cracks and peels in the sun and becomes a dam that holds water against the lap.
Sealing never replaces correct lapping. A reversed lap with sealant in it will still leak when the sealant ages. A lap that is shingled correctly will shed most of the water even when its sealant has failed.
Worked problem
Sealant for a run of laps
The 24 m Mountview roof run from lesson 3 is jacketed in 28 pieces, each covering 864 mm, on insulation with a girth of 682 mm. The specification calls for a 6 mm round bead of sealant in every circumferential and longitudinal lap. A cartridge holds 300 mL. How many cartridges are needed?
Show solution
- Bead area = π × 3² = 28.3 mm². One cartridge = 300,000 mm³, so it lays 300,000 ÷ 28.3 ≈ 10,600 mm, about 10.6 m of bead.
- Circumferential laps: 28 × 0.682 m = 19.1 m.
- Longitudinal laps: 28 × 0.864 m = 24.2 m.
- Total bead = 19.1 + 24.2 = 43.3 m. Cartridges = 43.3 ÷ 10.6 = 4.1, so 5 cartridges, plus one for waste: order 6.
Answer: Six cartridges for the run.
Terminations and end caps
Wherever insulation stops, at a flange cutback, a valve, an equipment nozzle or the end of a run, the jacket must close the end. An open end lets water run straight into the insulation. Ends are closed with a metal end cap: a flat ring cut to fit between the pipe and the jacket, often with a turned-down lip, fitted over the bevelled insulation end and sealed to the pipe and to the jacket. On hot pipe, the seal to the pipe must take the pipe's temperature and movement; a high-temperature flexible sealant or a loose-fitting collar with a separate sealed flashing is common. On outdoor vertical lines, the top end of every jacket run needs a cap or a rain collar that sheds water outward.
Penetrations
Every place something comes through the jacket is a possible leak: hanger rods, pipe supports and shoes, branch lines, vents and drains, thermowells and pressure taps, tracer tubing and nameplates. The rules are the same as for laps. Make the opening as small and as neat as the item allows. Seal around it with a compatible sealant. On the top half of the pipe, add a collar, a sleeve or a cone-shaped rain hat around the item so water runs off the item and over the collar instead of down the item into the jacket. Shingle any flashing piece so that its upper edge goes under the jacket above it and its lower edge goes over the jacket below it.
Supports are the most common problem. A pipe resting on a shoe or saddle welded to the pipe needs the jacket cut around the shoe and sealed. A pipe resting on an insulation shield, as in INS-130, is jacketed over the shield with the jacket kept whole on top; the cut is underneath, where water drains away from it. Clamps and hanger rods that pass through the top of the jacket need a sealed collar. Branch lines need a fitted branch piece, as lesson 7 shows.
Letting water out
Even the best jacket lets some water in over the years. On hot lines, water that gets in must be able to get out. Many specifications call for small drain holes, often about 6 mm (1/4 in), drilled through the bottom of the jacket at low points of a run, at the bottom of vertical runs and at the bottom of equipment, so that water that gets in drains out instead of sitting in the insulation. Drain holes are not used on cold service, where any opening can let moist air reach the vapour retarder; there, the system must be sealed. Follow the specification on where drain holes go and how many.
Weatherproofing at shields and supports
On hot lines resting on insulation shields, as INS-130 described, the jacket runs over the shield and the shield takes the weight. The jacket stays whole on top, and any trimming needed to clear the support steel is done on the bottom, where it can be sealed and where water drains away from it. On lines resting on welded shoes or saddles, the shoe passes up through the bottom of the insulation and jacket. Cut the jacket around the shoe neatly from below, leave the smallest gap the movement allows, and close it with a sealed collar or a flexible boot so the pipe can slide on its support without tearing the seal. On guided supports and anchors, ask how far the pipe moves at that point; a collar that is too tight will be torn off the first time the line heats up.
Hanger rods are the opposite case: they come down from above and pass through the top of the jacket, where water runs straight down them. Where the hanger clamp is outside the insulation on a shield, the rod never reaches the jacket. Where the clamp is on the pipe, the rod enters through the top of the jacket and needs a sealed collar and a small cone or rain hat so that water running down the rod is turned outward onto the jacket instead of into it.
Checking laps as you go
Check every lap before the band goes on, because a band makes a bad lap look tidy. Look along the run: seams in line, laps facing the right way, beads seated, sealant visible as a thin squeeze line and not a smear. Run a gloved hand around each circumferential lap to feel for gaps. On an outdoor run, ask the question Tomasz asks at every inspection: if water landed here, where would it go next?
Common mistakes
MistakePutting the longitudinal seam on top of the pipe where it is easiest to reach.
InsteadPut it below the centreline, at about 4 or 8 o'clock, with the edge pointing down.
MistakeStarting a vertical line at the top and working down.
InsteadStart at the bottom so each upper piece laps outside the piece below.
MistakeTreating a pitched line as level.
InsteadCheck the slope and lap the high-side piece over the low-side piece.
MistakeRunning a bead of sealant over the outside of a lap.
InsteadPut the bead inside the lap so the band squeezes it closed.
MistakeCutting the jacket on top of the pipe to clear a support.
InsteadKeep the top whole and make cuts underneath, then seal them.
Summary and key terms
- Every lap follows the shingle rule: the upstream piece lies over the downstream piece.
- On horizontal pipe, the longitudinal seam goes below the centreline, at about 4 or 8 o'clock, edge down and away from weather or view.
- On vertical lines start at the bottom; on sloped lines start at the low end; on level lines face laps away from the weather.
- Seal laps where the specification calls for it, with a compatible sealant inside the lap; sealant never fixes a reversed lap.
- Close every termination with a sealed end cap and flash every penetration so water runs off it.
- On hot service, drain holes at low points let water out; on cold service, the system is sealed.
- Shingle rule
- The rule that the upstream piece of jacket always laps over the downstream piece.
- Seam position
- Where the longitudinal lap sits around a horizontal pipe, usually 4 or 8 o'clock.
- End cap
- A ring that closes the jacket where insulation stops.
- Rain collar
- A sleeve or cone around a penetration that sheds water outward.
- Penetration
- Any item that passes through the jacket, such as a hanger rod or branch.
- Drain hole
- A small hole at a low point of a hot-service jacket that lets water out.
- Prevailing weather
- The usual direction of wind and driving rain at a site.
- Sealant
- A flexible, non-hardening compound used inside laps and around penetrations.
Practice problems
Work each problem on paper first, then reveal the answer to check.
Which piece goes on the outside at a lap on a vertical pipe?
Show answer
The upper piece.
Why is the longitudinal seam never on top of a horizontal pipe?
Show answer
Water would sit on it and run into the lap.
Insulation OD is 190.9 mm. How far from the top centre is a seam placed 135° around?
Show answer
135 ÷ 360 × π × 190.9 ≈ 225 mm.
Where does sealant go in a lap?
Show answer
Inside the lap, near the outer edge of the inner piece.
Why are drain holes not used on cold service?
Show answer
They let moist air reach the vapour retarder; cold systems must be sealed.
Lesson quiz · 5 questions
Score 60% or more to complete this lesson.
Create a free account to save your progress, take quizzes and earn a certificate.