
HSE-312 · Lesson 9 of 12 · 25 min
Transferring and dispensing safely
A chemical sitting closed on a shelf rarely hurts anyone. The risk rises sharply the moment someone opens it and moves it: pouring from a drum into a pail, pumping from a tote, filling a spray bottle, decanting a solvent into a squeeze bottle, or carrying a jug across the shop. Spills, splashes, vapour releases, static sparks and mislabelled secondary containers all start with a transfer. This lesson covers how to transfer and dispense chemicals safely, with a focus on flammable liquids, corrosives and the static electricity hazard. Labelling of workplace containers is covered in HSE-102 and only summarized here.
Planning a transfer
Before transferring any chemical, answer a few questions. What is the product and what does the SDS say about handling (section 7), exposure controls and PPE (section 8) and stability and reactivity (section 10)? How much needs to be moved, and can the amount be reduced? Is the receiving container made of a compatible material, clean, and labelled? Where will the transfer happen, and is that area ventilated, free of ignition sources and fitted with spill containment? What could go wrong, and is a spill kit, eyewash and fire extinguisher at hand?
| Question | Where to find the answer | Typical decision |
|---|---|---|
| How hazardous is the product? | SDS sections 2, 9 and 10 | Flammable, corrosive, toxic or reactive controls needed |
| What PPE is required? | SDS section 8 and the workplace hazard assessment | Goggles, face shield, gloves of the right material, apron |
| Is the receiving container compatible? | SDS section 7 and container manufacturer | Polyethylene for most acids and bases, metal safety cans for flammables |
| Is the area suitable? | Fire code, site rules, walk-through | Ventilated, no ignition sources, containment, away from drains |
| Is emergency equipment ready? | Site inspection | Spill kit, eyewash, extinguisher and phone within reach |
| Who needs to know? | Site procedures | Supervisor, co-workers nearby, permit if required |
Methods and equipment
The safest transfer method is usually the one that keeps the chemical enclosed. Pouring by hand from a large container is the riskiest: it is hard to control, it creates splashes and vapour, and a heavy container can slip. Better options include drum pumps (hand-operated, electric or air-driven, made of materials compatible with the product), self-closing drum faucets with drip cans underneath, tote valves with hoses, and closed transfer systems that connect the source and receiving containers with a sealed line.
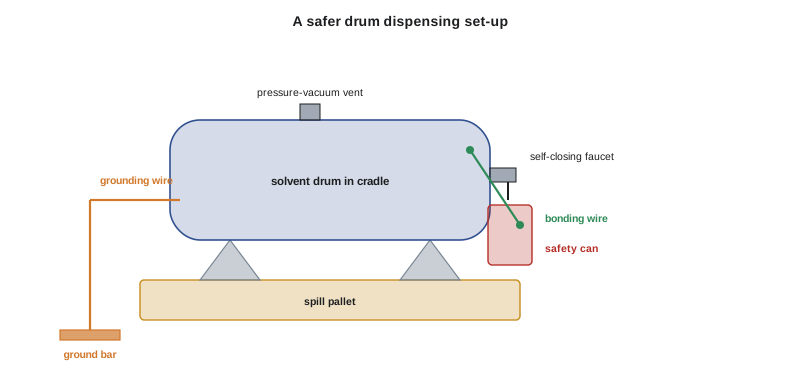
When dispensing from drums, place the drum on a spill pallet or drum cradle designed for the purpose. Fit a pressure-vacuum vent so the drum does not collapse as liquid is withdrawn or build up pressure from heating. Never pressurize a drum with compressed air to push the liquid out: drums are not pressure vessels, and an air-pressurized drum can rupture or spray. For flammable liquids, use pumps and faucets listed for flammable service, with flame arresters where required.
Static electricity, bonding and grounding
When a liquid flows through a pipe, a hose or a funnel, or splashes into a container, it can build up a static electric charge. Non-conductive liquids such as many hydrocarbon solvents, gasoline, diesel and toluene hold charge especially well. The charge can then discharge as a spark between the container, the nozzle and nearby metal objects. If the spark happens in a flammable vapour-air mixture, it can ignite it. Static sparks are a known cause of fires during drum filling, tank truck loading and even refuelling of portable gas cans.
Bonding and grounding prevent static sparks by keeping conductive objects at the same electrical potential and draining charge safely to earth. Bonding connects the source container and the receiving container with a conductive wire and clamps, so there is no voltage difference between them for a spark to jump. Grounding connects the system to earth, usually through a ground rod, a grounded building steel structure or a dedicated ground bus, so charge drains away. When transferring Class I flammable liquids, and Class II or III liquids heated above their flash points, both containers should be bonded together and the source container grounded.
In Canada, the National Fire Code and the provincial codes based on it require bonding and grounding during the transfer of flammable liquids in certain circumstances; the details are in Part 4 of the code that applies. NFPA 77, Recommended Practice on Static Electricity, is also widely used as technical guidance.
Practical rules for bonding and grounding are simple. Use clamps with sharp points or jaws that bite through paint, rust and coatings to bare metal. Connect the bonding wire before opening the container and remove it only after the container is closed. Check the clamps and wires regularly for damage, and test continuity periodically with a meter; many programs aim for a resistance of a few ohms or less across a bonding path, while a path to ground of up to about 1 megohm is usually enough to drain static charge, though specific programs may set tighter limits. Plastic containers cannot be bonded in the usual way, so do not use them for Class I flammable liquids except where specifically approved, and fill portable gas cans on the ground rather than in a vehicle bed or on a plastic truck-bed liner.
Other measures reduce static generation in the first place. Slow the flow rate when filling, especially at the start, because high velocity creates more charge. Fill from the bottom using a dip pipe or a fill tube that reaches near the bottom, rather than letting liquid free-fall and splash. Avoid filters and fine strainers in the line unless they are designed for flammable service, since they generate a lot of charge. Allow a short relaxation time before sampling or gauging a freshly filled tank. Wear static-dissipative footwear where the risk is high, and avoid synthetic outer clothing that builds up charge.
Vapour build-up during transfers
Every open transfer of a volatile liquid releases vapour. In a small, poorly ventilated room, that vapour can build up to concentrations that are harmful to breathe or flammable. A simple steady-state mass balance shows how ventilation affects the result. If vapour is released at a steady rate and the room is well mixed, the concentration rises until the rate at which the ventilation removes vapour equals the rate at which it is released. A safety factor is often applied for imperfect mixing, so the actual concentration near the source is higher than the room average.
# Steady-state solvent gas concentration from an open transfer in a ventilated room.
# C = G / (Q / K), with G = solvent release rate and Q = ventilation flow.
# K is a mixing factor (1 = perfect mixing; 3 to 10 is typical for real rooms).
MOLAR_VOL = 24.45     # L/mol at 25 C and 1 atm
mw = 58.08            # acetone, g/mol
lfl_ppm = 25000       # 2.5% by volume
release_g_per_min = 20.0       # illustrative evaporation rate during decanting
for q_m3_min, label_txt in [(2, "small room, poor ventilation"), (10, "general exhaust"), (40, "local exhaust at the bench")]:
    for K in (1, 5):
        q_eff = q_m3_min / K
        ppm = (release_g_per_min / mw) * MOLAR_VOL / (q_eff * 1000) * 1e6
print(f"Q={q_m3_min:>2} m3/min, K={K}: {ppm:7.0f} ppm = {100 * ppm / lfl_ppm:5.1f}% of LFL ({label_txt})")Q= 2 m3/min, K=1: 4210 ppm = 16.8% of LFL (small room, poor ventilation) Q= 2 m3/min, K=5: 21049 ppm = 84.2% of LFL (small room, poor ventilation) Q=10 m3/min, K=1: 842 ppm = 3.4% of LFL (general exhaust) Q=10 m3/min, K=5: 4210 ppm = 16.8% of LFL (general exhaust) Q=40 m3/min, K=1: 210 ppm = 0.8% of LFL (local exhaust at the bench) Q=40 m3/min, K=5: 1052 ppm = 4.2% of LFL (local exhaust at the bench)
The estimate shows that with only 2 m³/min (about 70 cfm) of ventilation and imperfect mixing, the average concentration from decanting acetone at 20 g/min could reach about 21,000 ppm, more than 80 per cent of the lower flammable limit and far above any exposure limit. Raising ventilation to 10 m³/min (about 350 cfm) of general exhaust drops the worst case to about 4,200 ppm, still too high to breathe for long. Local exhaust at the bench is the right control. These figures are illustrative and depend on the real release rate; use direct-reading instruments to confirm actual levels. Exposure limits and air monitoring are covered in HSE-251.
Transferring corrosives
Corrosive transfers need splash protection above all. Wear chemical splash goggles and a face shield, gloves made of a material rated for the specific chemical, and a chemical-resistant apron or suit. Use pumps or tilting stands rather than lifting and pouring heavy containers. When diluting concentrated acids, always add acid slowly to water, never water to acid, because the heat released can boil the water and spray acid. Keep the containers in trays during the transfer and have an eyewash and shower within reach, as described in lesson 10.
Secondary containers and labels
Many transfers end in a smaller container: a spray bottle, a squeeze bottle, a safety can or a pail. These secondary containers must be compatible with the product, closed when not in use, and labelled. A workplace label usually needs the product name, safe handling information and a reference to the SDS. An unlabelled spray bottle of clear liquid is one of the most common causes of mix-ups, poisonings and incompatible mixing. Never use food or drink containers for chemicals, even temporarily. Labelling rules are covered in HSE-102.
Worked problem
Filling safety cans from a solvent drum
A maintenance crew fills 4 L safety cans with mineral spirits from a 205 L drum in the corner of a warehouse. The drum sits upright on the floor, and a worker tips it with a hand pump and a plastic funnel. What should change?
Show solution
- Place the drum on a spill pallet, either upright with a listed drum pump or horizontal in a cradle with a self-closing faucet.
- Fit a pressure-vacuum vent so the drum is not damaged as liquid is withdrawn.
- Ground the drum to a tested ground point and bond the safety can to the drum during filling; remove the plastic funnel and fill through the safety can's own spout or a metal funnel that is bonded.
- Keep ignition sources away, ensure ventilation, and fill slowly.
- Label the safety cans with the product name and hazard information.
- Keep a spill kit and Class B extinguisher nearby.
Answer: Spill pallet, proper pump or faucet, vent, bonding and grounding, no plastic funnel, ventilation, labels and emergency equipment.
Carrying chemicals around the workplace
Many spills happen not at the dispensing point but on the way from one place to another. Carry glass bottles of chemicals in rubber or plastic bottle carriers, not by the neck or in a pocket. Use carts with raised edges for several containers, and keep incompatible products in separate trays on the cart. Plan the route to avoid stairs, crowded corridors and passenger elevators where possible. Close every container before moving it, and never carry open containers of flammable or corrosive liquids through occupied areas.
Common mistakes
MistakePushing liquid out of a drum with compressed air.
InsteadUse a listed drum pump or faucet and a pressure-vacuum vent.
MistakeFilling a gas can on a plastic truck-bed liner.
InsteadFill portable gas cans on the ground with the nozzle in contact with the can.
MistakeClamping bonding wires onto painted surfaces.
InsteadUse clamps that bite through to bare metal and test continuity.
MistakeAdding water to concentrated acid.
InsteadAdd acid slowly to water.
MistakePutting a chemical in an unlabelled spray bottle or drink bottle.
InsteadUse a compatible, labelled secondary container.
Summary and key terms
- Transfers are when most spills, splashes, vapour releases and static fires happen.
- Plan with the SDS, compatible containers, a suitable area and emergency equipment ready.
- Use enclosed methods such as pumps, faucets and closed systems instead of pouring by hand.
- Bond containers together and ground the source when transferring flammable liquids.
- Reduce static by slowing flow, bottom filling and avoiding plastic containers for flammables.
- A steady-state mass balance shows how ventilation controls vapour build-up; local exhaust is best.
- Add acid to water, protect against splashes and label every secondary container.
- Bonding
- Connecting two conductive objects so they have the same electrical potential.
- Grounding
- Connecting a conductive object to earth to drain static charge.
- Static electricity
- Electric charge that builds up on surfaces or liquids through friction or flow.
- Pressure-vacuum vent
- A drum vent that relieves pressure and prevents vacuum collapse.
- Drum cradle
- A stand that holds a drum horizontally for dispensing.
- Closed transfer system
- Equipment that moves a chemical between containers without open exposure.
- Dip pipe
- A pipe that delivers liquid near the bottom of a container to reduce splashing.
- Relaxation time
- The time for static charge in a liquid to dissipate after filling.
- Mixing factor
- A factor applied to ventilation to account for imperfect mixing.
- Secondary container
- A container that a chemical is transferred into from its original container.
Practice problems
Work each problem on paper first, then reveal the answer to check.
Name three SDS sections to check before a transfer.
Show answer
Sections 7 (handling), 8 (exposure controls and PPE) and 10 (stability and reactivity).
Why should a drum never be pressurized with compressed air?
Show answer
Drums are not pressure vessels and can rupture or spray.
What is the difference between bonding and grounding?
Show answer
Bonding links containers to equalize potential; grounding connects to earth to drain charge.
When should the bonding wire be connected?
Show answer
Before opening the container, and removed only after it is closed.
Why should portable gas cans be filled on the ground?
Show answer
So the can is grounded and static cannot build up as it can on an insulating truck-bed liner.
Give two ways to reduce static generation during filling.
Show answer
Slow the flow and fill from the bottom with a dip pipe.
In the mass balance, what does the mixing factor K represent?
Show answer
Imperfect mixing, which raises the concentration near the source.
What control does the vapour calculation point to?
Show answer
Local exhaust at the transfer point.
When diluting acid, which is added to which?
Show answer
Acid is added slowly to water.
What should a workplace label on a secondary container include?
Show answer
Product name, safe handling information and a reference to the SDS.
Lesson quiz · 5 questions
Score 60% or more to complete this lesson.
Create a free account to save your progress, take quizzes and earn a certificate.