
CINE-310 · Lesson 9 of 12 · 27 min
Grading for HDR and creating SDR trims
Most premium productions are now delivered in both high dynamic range (HDR) and standard dynamic range (SDR). CINE-202 Lesson 11 explained the technical standards: PQ and HLG transfer functions, peak luminance, mastering displays and metadata. This lesson is about the craft: how grading decisions change in HDR, how to use the extra range creatively rather than simply making images brighter, how to grade HDR and SDR versions efficiently, and how to use trim tools such as Dolby Vision analysis and trim passes so that the SDR version feels like the same film.
What HDR changes
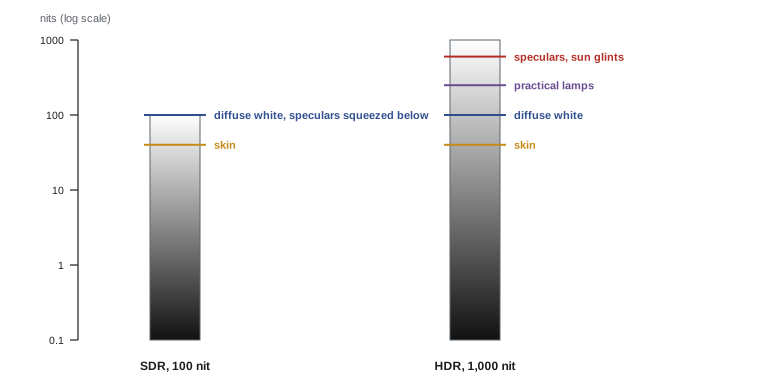
HDR gives the colourist far more highlight range and, usually, a larger colour volume. In SDR, diffuse white sits near 100 nits and speculars are compressed just above it; in HDR, diffuse white typically sits around 100 to 200 nits while speculars, sunlight, fire and practical lamps can reach several hundred or 1,000 nits and beyond. HDR also reveals detail that SDR hides: textures in clouds, the filament of a bulb, the ripples in sunlit water. This is liberating but demanding. Grades that look fine in SDR can feel harsh in HDR, with specular highlights that sting, noise and compression that become visible in bright areas, and makeup, wigs and set imperfections that are suddenly exposed.
| Aspect | SDR (Rec.709, 100 nits) | HDR (PQ, 1,000-nit master) |
|---|---|---|
| Diffuse white | About 100 nits (near 100 %) | Often about 100–200 nits |
| Specular highlights | Compressed just above white | Up to several hundred to 1,000 nits |
| Skin | Typically 30–70 nits for medium skin | Similar levels; little or no lift |
| Shadow detail | Limited by display and surround | Deeper blacks reveal more detail and noise |
| Colour volume | Rec.709 gamut at low luminance | P3 or wider at high luminance |
Where to put things
The most important principle in HDR grading is that most of the image should not be much brighter than in SDR. Faces, walls, interiors and most scene content sit at roughly the same absolute luminance in both; the extra range is reserved for highlights, light sources and moments of emphasis. A common guideline is to place diffuse white around 100 to 200 nits and skin roughly where it would sit in a well-graded SDR image viewed at 100 nits. Pushing midtones up "because HDR is bright" makes images look flat, unnatural and tiring. The creative use of HDR is in contrast and highlights: a sunset that glows, a lamp that feels like a light rather than a white patch, chrome and water that sparkle, and the drama of a dark room lit by one bright window.
PQ code values in practice
In PQ, code values are tied to absolute luminance. Colourists quickly learn landmarks on the waveform, often displayed in nits: about 0.51 (51 %) of the PQ signal corresponds to 100 nits, about 0.58 to 200 nits, about 0.65 to 400 nits and about 0.75 to 1,000 nits. These landmarks show how little of the code range is used by highlights above diffuse white, and how important it is to place midtones correctly. The PQ curve is defined in SMPTE ST 2084; a simplified form of the inverse EOTF, which converts luminance to signal, is:
with constants \(m_1 \approx 0.1593\), \(m_2 \approx 78.84\), \(c_1 \approx 0.8359\), \(c_2 \approx 18.85\) and \(c_3 \approx 18.69\). In practice colourists read nits directly from scopes set to a PQ or nit scale.
Worked problem
Reading PQ landmarks
On an HDR waveform in PQ, a face reads about 0.43 of full scale, and a lamp in the background reads 0.75. Using the landmarks above (100 nits ≈ 0.51, 1,000 nits ≈ 0.75) and knowing that 0.43 corresponds to roughly 45 nits, is the grade reasonable?
Show solution
- Face: about 45 nits, a normal level similar to a well-graded SDR face.
- Lamp: about 1,000 nits, at the peak of a 1,000-nit master, so it reads as a real light source.
- The difference between face and lamp is about log2(1000 ÷ 45) ≈ 4.5 stops, much more than SDR can show above a face.
Answer: Yes: the face sits at a natural level and the lamp uses the highlight range, giving about four and a half stops of separation.
Grading HDR first or SDR first
Facilities and streaming platforms differ in whether the HDR or SDR version is graded first. Grading HDR first, then deriving SDR with a trim pass, is common for premium streaming and features: the HDR master contains the most information, and the SDR version is a controlled adaptation. Grading SDR first, then expanding to HDR, can suit productions where SDR is the main deliverable, such as broadcast, but risks HDR that feels like a brightened SDR. Many colourists grade in HDR while periodically checking an SDR version on a second display, so that decisions work in both. Whatever the order, the creative intent should be defined once and adapted, not graded twice from scratch.
Trim passes
A trim pass adjusts the automatically derived SDR (or other target) version shot by shot. In Dolby Vision, the HDR master is analysed to produce metadata describing each shot's minimum, average and maximum luminance (Level 1). The Dolby Vision content mapping algorithm uses this to create target versions, such as 100-nit SDR; the colourist then adds trims for each target (Level 2 and Level 8 in current versions), adjusting lift, gamma, gain, saturation, chroma weight and sometimes mid-contrast and hue-specific values. Trims are stored as metadata, not separate renders, so one master can be displayed on many devices. HDR10+ uses a similar dynamic metadata approach; HDR10 uses only static metadata, and HLG is designed to display acceptably on SDR and HDR screens without trims.
| Trim control | Typical use |
|---|---|
| Lift | Restore shadow density after mapping |
| Gamma | Adjust midtone brightness, often skin |
| Gain | Recover highlights or brightness |
| Saturation gain | Compensate for lower colourfulness at lower brightness |
| Chroma weight | Balance saturation against brightness in mapped highlights |
| Mid-contrast | Restore local midtone contrast |
| Tone detail | Recover highlight texture after compression |
Making SDR feel like the same film
The SDR version must preserve the feeling of the HDR grade within a much smaller range. Because of the Hunt and Stevens effects (Lesson 2), SDR images look less colourful and less contrasty at the same settings, so trims often add a little saturation and midtone contrast. Highlights that were dazzling in HDR must be compressed, which is best done gently with a shoulder rather than a clip; the trim aims to keep texture in skies and windows. Skin and midtones should stay consistent, since viewers judge a film by its faces. Night scenes need special care: deep HDR blacks with bright practicals may become murky in SDR, so the trim may lift shadows slightly and reduce the brightness gap.
Worked problem
Highlight compression for SDR
In a scene, a face is at 45 nits and a lamp at 1,000 nits in HDR. The SDR target peaks at 100 nits, and the colourist keeps the face at about 45 nits. How many stops of separation remain between face and lamp in SDR, compared with HDR?
Show solution
- HDR separation: log2(1000 ÷ 45) ≈ 4.47 stops.
- SDR separation: log2(100 ÷ 45) ≈ 1.15 stops.
- Lost separation: about 3.3 stops, which must be suggested by contrast, colour and texture rather than brightness.
Answer: About 1.2 stops in SDR versus 4.5 in HDR, so the SDR trim relies on gentle roll-off, saturation and local contrast to keep the lamp feeling bright.
Displays and environment
HDR grading requires a reference HDR display, such as a dual-layer LCD or OLED mastering monitor, capable of the target peak luminance, typically 1,000 nits for most streaming masters, with accurate PQ tracking and P3 gamut. The grading suite's surround must be dim and controlled, around 5 nits for HDR in many facility guidelines, and the colourist must take care with eye fatigue, since bright HDR highlights in a dark room are tiring over long sessions. Colourists also check how grades look on consumer displays, which tone-map differently, and may review on a calibrated consumer OLED to see what most viewers will experience.
Common HDR problems
HDR exposes problems that SDR conceals. Noise and compression in bright areas become visible; visual effects composites may show edges and matte lines; old SDR material and graphics may look dull or need conversion; and practical lights and windows may clip in the camera originals, showing flat white areas that HDR makes obvious. Colourists manage these with selective highlight roll-off, denoising, softening highlights, and working with VFX to fix issues. Very large bright areas, such as a sky at 600 nits filling the frame, can be uncomfortable and may also trigger power limiting on consumer displays, which reduces brightness unexpectedly; most HDR grades keep large areas at moderate levels and reserve peak brightness for small highlights.
Grading night and dark scenes in HDR
Night scenes are some of the most difficult to grade in HDR. The deeper blacks of HDR displays reveal shadow detail, noise and compression that were invisible in SDR, while bright practicals and street lights can reach far above the scene's ambient level. A common approach is to keep the overall scene dark, with faces lower than in day scenes, and let practicals sit at a few hundred nits so they read as real light sources without overwhelming the eye. Shadows should be graded with care: if they are too dark, detail disappears on consumer displays with less capable blacks; if they are too lifted, the scene loses its night quality. Many colourists check dark scenes on a consumer OLED or LCD as well as the reference display, because tone mapping and black handling vary so much between televisions.
Grading bright exteriors in HDR
Daylight exteriors offer the opposite problem. Skies, sunlit buildings and water can occupy large parts of the frame, and if they are allowed to sit near peak luminance the image becomes uncomfortable and may trigger power limiting on consumer displays. Colourists usually keep broad bright areas such as skies at moderate levels, often a few hundred nits, and reserve the highest levels for small specular highlights such as sun glints and reflections. Sunlit skin should still sit near its SDR level, perhaps slightly brighter in direct sun. The result should feel bright and open without forcing viewers to squint.
A balanced HDR workflow
- Grade on the HDR reference display in a controlled, dim surround.
- Keep faces and midtones at levels similar to a good SDR grade.
- Use the extra range for highlights, practicals and moments of emphasis.
- Check the SDR derivation regularly on a second display.
- Run the analysis for dynamic metadata once the grade is stable.
- Trim each target shot by shot, starting with the scene hero.
- Review the SDR version in sequence, as a viewer would see it.
- Check the HDR grade on a typical consumer display before delivery.
Communicating HDR decisions
HDR is still new to many directors and producers, and reviewing it requires suitable displays. Colourists often explain HDR choices with side-by-side comparisons of HDR and SDR, show scopes in nits to make placement concrete, and caution against judging HDR on uncalibrated consumer screens or laptops, which may tone-map aggressively. Agreeing early how bright highlights should be, and how the SDR version should feel, avoids late disagreements when the director first sees the HDR on a different screen.
Graphics, titles and archival material
HDR projects often include material that was never designed for HDR: titles, graphics, archival footage, screen inserts and SDR stock shots. If these are mapped naively into PQ, white titles can appear at very high luminance and look harsh, while archive footage looks dull beside native HDR shots. Common practice is to place graphic white around 200 nits or lower, convert SDR material with an inverse tone mapping that places its diffuse white near HDR diffuse white, and grade archive footage so that it sits comfortably in the sequence without pretending to be native HDR. Streaming platforms often specify a maximum level for subtitles and graphics in their HDR delivery requirements.
Common mistakes
MistakeBrightening the whole image in HDR.
InsteadKeep midtones near SDR levels and use the range for highlights.
MistakeGrading HDR and SDR separately from scratch.
InsteadDefine intent once and trim the second version.
MistakeClipping highlights in the SDR trim.
InsteadUse gentle roll-off to keep texture.
MistakeLarge full-frame areas at peak luminance.
InsteadReserve peak brightness for small highlights.
MistakeIgnoring noise and VFX edges in HDR.
InsteadReview highlights closely and fix problems early.
Summary and key terms
- HDR adds highlight range and colour volume, and exposes imperfections.
- Midtones and faces stay near SDR levels; highlights use the extra range.
- PQ landmarks: about 0.51 for 100 nits and 0.75 for 1,000 nits.
- HDR-first with an SDR trim is common for premium delivery.
- Dynamic metadata trims adjust each target version shot by shot.
- SDR trims add saturation and contrast and roll off highlights gently.
- HDR needs reference displays, controlled surround and careful review.
- Diffuse white
- Brightness of a white surface, not a light source.
- Specular highlight
- Bright reflection or light source.
- Nit
- Candela per square metre.
- PQ
- Perceptual quantizer transfer function (ST 2084).
- Trim pass
- Adjustment of a derived target version.
- Dynamic metadata
- Shot-by-shot information for tone mapping.
- Level 1 metadata
- Dolby Vision analysis of min, average and max.
- Content mapping
- Algorithm converting HDR to target versions.
- Chroma weight
- Trim balancing saturation against brightness.
- Power limiting
- Display reducing brightness on large bright areas.
Practice problems
Work each problem on paper first, then reveal the answer to check.
Where should faces sit in HDR?
Show answer
Near their SDR levels.
What is the extra HDR range for?
Show answer
Highlights and light sources.
What PQ value is about 100 nits?
Show answer
About 0.51.
Stops between 50 and 800 nits?
Show answer
4 stops.
Why do SDR trims add saturation?
Show answer
Colours look less colourful at lower luminance.
What does Level 1 metadata describe?
Show answer
Min, average and max luminance per shot.
Which HDR format uses only static metadata?
Show answer
HDR10.
Why avoid large areas at peak?
Show answer
Discomfort and display power limiting.
Typical HDR surround luminance?
Show answer
About 5 nits.
Name one HDR problem SDR hides.
Show answer
Noise or compression in highlights.
Lesson quiz · 5 questions
Score 60% or more to complete this lesson.
Create a free account to save your progress, take quizzes and earn a certificate.