
CINE-310 · Lesson 4 of 12 · 29 min
Balancing and matching shots across a scene
A scene is usually assembled from many shots photographed at different times, from different angles, sometimes on different days or cameras. Even on a well-run set, exposure drifts as clouds pass, practical lamps are moved, a second camera has a slightly different filter, or the sun drops behind a building between the wide and the close-ups. Viewers do not consciously notice small inconsistencies, but they feel them: a cut that jumps in brightness or colour breaks the illusion that the action is continuous. Balancing and matching, sometimes called continuity grading, is the unglamorous core of the colourist's job. Before any look is built, every shot in a scene must sit comfortably next to its neighbours. This lesson covers choosing a hero shot, reading scope values to compare shots, matching exposure, contrast and colour, handling mismatched cameras, and working efficiently across long scenes.
Balance first, then match
Two related but distinct tasks happen in the first pass. Balancing makes each shot technically sound on its own: correct exposure for the key subject, neutral or intended white balance, sensible black and white levels. Matching makes shots consistent with one another. Balancing comes first because matching to a badly balanced shot only spreads the problem. In practice, the colourist balances a hero shot, matches the rest of the scene to it, and then fine-tunes the whole scene in context. A balanced shot is not necessarily neutral: a tungsten-lit interior might be intended to look warm. Balance means the image is where the cinematographer intended before the creative look is added, which is why colourists often begin from camera reports, the DP's notes, or the on-set LUT or CDL (CINE-202 Lesson 8).
Choosing a hero shot
The hero shot, sometimes called the reference or anchor shot, is the shot all others in the scene are matched to. A good hero shot is usually a wide or master shot that shows the main light sources, the set and the key characters together, so that it establishes the scene's overall brightness and colour; it is well exposed and representative, not the odd shot with a problem; and it is a shot the director and cinematographer have seen and approved, so that matching to it carries their intent. In dialogue scenes, colourists often grade the master first, then one close-up of each character, and then match the remaining coverage to those. Grading systems let colourists store the hero as a reference still and display it side by side or as a split-screen or wipe with the current shot.
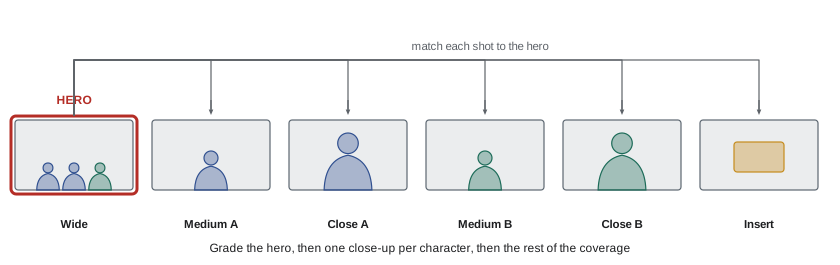
Reading scopes for matching
Eyes are excellent at seeing that two shots differ and poor at saying exactly how. Scopes turn the comparison into numbers. CINE-202 introduced the waveform, parade and vectorscope as exposure tools; for matching, colourists use them in a specific, comparative way:
- Waveform: compare where equivalent tones sit, especially faces, a neutral wall, black areas and highlights. If a face sits at 62 % in the hero and 55 % in the close-up, the close-up is roughly a third to half a stop darker in that region.
- RGB parade: compare the relative heights of red, green and blue on neutral objects. On a neutral grey the three traces line up; if blue sits higher than red in one shot and not the other, the shots differ in colour balance.
- Vectorscope: compare the angle and spread of the trace. Skin tones should sit along the same line in each shot; a background that leans further toward cyan in one shot will show as a trace rotated toward the cyan target.
- Picker or probe: sample the RGB values of a specific point, such as the same white shirt or wall, in both shots for an exact comparison.
The key is to compare like with like: the same object, or objects that should look the same, rather than the overall trace. A close-up has more face and less background than a wide, so its waveform will look different even when both are correctly matched.
| Scope | Compare | Tells you |
|---|---|---|
| Waveform (luma) | Face, neutral wall, blacks, highlights | Exposure and contrast differences |
| RGB parade | Neutral objects in each shot | Colour balance differences by tone |
| Vectorscope | Skin line, background hue angle | Hue and saturation differences |
| Pixel picker | One object present in both shots | Exact RGB difference |
| Histogram | Overall distribution | Rough density and clipping |
Matching exposure
Exposure is matched first because brightness differences affect perceived colour and contrast. The colourist identifies a tone common to both shots, usually skin on the same character or a neutral surface, and adjusts the shot being matched until that tone sits at the same level. In a log working space, the master offset is the cleanest exposure tool, because it shifts every tone equally, just as a change of stop would. The size of the needed change can be estimated from code values: in many log encodings one stop corresponds to a predictable step. For example, in ARRI LogC3 one stop is roughly 0.075 of the full 0–1 signal around middle grey, and in ACEScct one stop is about 0.057.
Worked problem
Matching exposure with log values
In an ACEScct working space, a probe on the actor's forehead reads 0.452 in the hero wide and 0.423 in the close-up. ACEScct is about 0.057 per stop in the midtones, and the system offers printer points at 12 per stop. How much should the close-up be brightened?
Show solution
- Difference: 0.452 − 0.423 = 0.029.
- In stops: 0.029 ÷ 0.057 ≈ 0.51 stop.
- In printer points: 0.51 × 12 ≈ 6 points.
Answer: About half a stop, or roughly 6 printer points on the master offset.
Matching contrast
Once the key tone matches, compare the extremes. If the close-up has deeper blacks or brighter highlights than the hero, its contrast differs. Adjust contrast with the pivot set at the key tone, so that matching contrast does not undo the exposure match. Differences in contrast often come from lighting changes, lens flare and veiling glare, diffusion filters, haze, or different camera settings. A shot with more flare will show lifted blacks on the waveform; bringing them down with contrast or lift matches the density, though it cannot restore detail lost to flare. Local contrast and sharpness can also differ between lenses; a shot from a sharper lens may need a slight softening, or the softer shot a little midtone detail, to sit comfortably.
Worked problem
Matching contrast around a pivot
In log space, the hero shot has its darkest shadow detail at 0.18 and a face at 0.45. The close-up, after exposure matching, has the face at 0.45 but its shadow detail at 0.22, because of lens flare. Using out = (in − p) × c + p with the pivot at the face value, what contrast factor brings the close-up shadow to 0.18?
Show solution
- Pivot p = 0.45. We want (0.22 − 0.45) × c + 0.45 = 0.18.
- −0.23 × c = −0.27, so c = 0.27 ÷ 0.23 ≈ 1.17.
- Check: (0.22 − 0.45) × 1.17 + 0.45 = −0.269 + 0.45 ≈ 0.181.
Answer: A contrast factor of about 1.17 with the pivot at 0.45 brings the shadow to 0.18 without moving the face.
Matching colour
With exposure and contrast matched, compare colour balance on neutral references, then on skin. In the RGB parade, a neutral object in the hero might read R 0.44, G 0.45, B 0.47, slightly cool; the same object in the close-up might read R 0.47, G 0.45, B 0.43, slightly warm. The colourist adjusts channel offsets (or printer points) until the close-up reads like the hero. Differences can be tonal: if shadows match but highlights do not, the difference is in gain or highlight balance rather than offset. Skin is checked last on the vectorscope, because viewers notice skin differences most; two shots can have matching neutrals and still have slightly different skin hue if, say, a bounce card added a green tint from foliage.
Worked problem
Matching colour with channel offsets
A white wall reads R 0.62, G 0.60, B 0.58 in the hero and R 0.60, G 0.61, B 0.63 in the reverse shot, in a log space where one printer point is about 0.0048 (0.057 per stop ÷ 12). What channel changes in printer points match the reverse to the hero?
Show solution
- Red: 0.62 − 0.60 = +0.02 → 0.02 ÷ 0.0048 ≈ +4 points.
- Green: 0.60 − 0.61 = −0.01 → about −2 points.
- Blue: 0.58 − 0.63 = −0.05 → about −10 points.
Answer: Roughly red +4, green −2, blue −10 points; then check skin on the vectorscope and fine-tune.
Mismatched cameras and lenses
Multi-camera productions, pickups and second-unit footage often combine cameras with different sensors, colour science and lenses. The first defence is correct input transforms: converting each camera's log encoding and gamut into a common working space removes most of the difference (CINE-202 Lesson 10). What remains, such as differences in how sensors render saturated colours, skin, or highlight roll-off, is matched with primaries and, if necessary, targeted secondaries or hue curves. Some colourists build a camera-match node or layer for each secondary camera, applied to all its shots, before any shot-specific grading. Colour charts photographed by every camera at the start of the shoot make this much easier: the chart patches give known references to match.
| Mismatch source | Typical symptom | Typical fix |
|---|---|---|
| Cloud or sun change | Brightness and colour temperature jump | Offset and channel balance |
| Different camera body | Skin and saturated colours differ | Input transform, camera-match node, hue curves |
| Lens flare or diffusion | Lifted blacks, lower contrast | Contrast around pivot, black level |
| Different filter (ND, IR) | Colour cast, especially in blacks | Channel offsets, shadow balance |
| Second-unit lighting | Different direction or ratio | Windows or gradients, accept some difference |
Working efficiently
Feature films can contain 1,500 to 3,000 shots, and a first pass must move quickly. Efficient matching uses the grading system's tools: copying a grade from the hero to similar shots and adjusting only what differs; grouping shots by scene, camera or setup so that shared corrections are applied once; using shot-matching features that suggest an initial match, which the colourist then refines; and keeping a gallery of reference stills. Colourists often work in passes: a quick balance of the entire scene, a match pass, then a review of the scene playing in real time. Watching the cuts in motion catches problems that stills do not, such as flicker, changes in grain or noise, and jumps in the brightness of the background.
When not to match
Perfect numerical matching is not always the goal. A shot looking toward a window naturally has brighter background and more contrast than the reverse looking into the room; a close-up lit with a softer source may have lower contrast than the wide. The aim is that the cut feels continuous and the subject looks consistent, not that every shot measures the same. Colourists match faces closely, match ambient colour and overall density closely, and allow backgrounds and highlights to vary as the geography of the scene dictates. Story changes within a scene, such as a light being switched on or clouds rolling in, should be graded as intentional transitions rather than corrected away.
Recording values for consistency
Experienced colourists keep a short record of key values for each scene: the face level of each main character on the waveform or in nits, the black level, the white or highlight level, and the RGB balance of a neutral reference. These numbers, noted in a spreadsheet or saved as annotated stills, make it easy to match new shots added in a re-edit, to keep characters consistent across scenes shot weeks apart, and to explain decisions to the cinematographer. They are not targets to force every shot toward, but a memory that does not adapt the way eyes do.
Shot-matching features in grading software, which compare a selected shot with a reference and suggest a correction, are useful starting points for large scenes. They work by analysing colour charts or overall image statistics, so their suggestions should always be checked against faces and neutrals and refined by hand.
Common mistakes
MistakeMatching to an unbalanced hero.
InsteadBalance the hero carefully first.
MistakeComparing whole-frame waveforms of a wide and a close-up.
InsteadCompare equivalent tones, such as the same face or wall.
MistakeMatching colour before exposure.
InsteadMatch exposure, then contrast, then colour.
MistakeSetting the contrast pivot away from the matched key tone.
InsteadPivot at the key tone so the exposure match holds.
MistakeForcing every shot to identical numbers.
InsteadMatch faces and ambience; let backgrounds follow geography.
Summary and key terms
- Balance each shot, then match the scene to a hero shot.
- A hero is usually an approved, representative wide.
- Scopes compare like with like: faces, neutrals, blacks and highlights.
- Match exposure first, using log code values and printer points.
- Match contrast around a pivot at the key tone.
- Match colour on neutrals with channel offsets, then check skin.
- Correct input transforms remove most camera differences.
- Balancing
- Making a shot technically correct on its own.
- Matching
- Making shots consistent with one another.
- Hero shot
- Reference shot others are matched to.
- Continuity grading
- Grading so cuts feel continuous.
- Split-screen
- Display comparing two shots side by side.
- Pixel picker
- Tool reading RGB values at a point.
- Camera-match node
- Correction applied to all shots from one camera.
- Shot grouping
- Linking shots to share corrections.
- Veiling glare
- Flare that lifts blacks and lowers contrast.
- Reference still
- Stored frame used for comparison.
Practice problems
Work each problem on paper first, then reveal the answer to check.
Why balance before matching?
Show answer
Matching to a bad shot spreads the problem.
What makes a good hero shot?
Show answer
Approved, representative, wide and well exposed.
What do you compare on the waveform?
Show answer
Equivalent tones such as faces and neutrals.
What does the RGB parade show on a neutral?
Show answer
Colour balance differences.
ACEScct difference of 0.114 is how many stops?
Show answer
About 2 stops.
Half a stop is how many printer points?
Show answer
About 6.
Where should the pivot sit when matching contrast?
Show answer
At the matched key tone.
What is checked last, and why?
Show answer
Skin, because viewers notice it most.
What helps match different cameras?
Show answer
Input transforms, charts and camera-match nodes.
Should backgrounds always match numerically?
Show answer
No; they follow the scene geography.
Lesson quiz · 5 questions
Score 60% or more to complete this lesson.
Create a free account to save your progress, take quizzes and earn a certificate.