
CINE-310 · Lesson 3 of 12 · 28 min
Primary correction tools: lift, gamma, gain, offset and curves
Primary corrections affect every pixel in a shot. They are the foundation of every grade: setting black and white levels, overall exposure and contrast, colour balance and saturation. Because primaries are applied to the whole image, they should be done first and well, so that secondaries are used only for what primaries cannot do. Grading systems offer several families of primary tools, each based on a different mathematical model and suited to different tasks. This lesson explains lift, gamma and gain; offset and printer points; contrast and pivot; log-style controls; curves; saturation and colour boost; and how these tools behave differently in display-referred and scene-referred working spaces.
Lift, gamma and gain
The classic primary controls, inherited from telecine and video colour correction, are lift, gamma and gain, each with a colour wheel or trackball for balance and a ring or slider for level. They divide the image into overlapping tonal regions:
- Lift primarily affects the shadows: it raises or lowers the black point while holding the white point fixed, with decreasing effect toward the highlights.
- Gain primarily affects the highlights: it scales the signal, holding black fixed and moving white, with decreasing effect toward the shadows.
- Gamma affects the midtones, bending the curve between black and white while leaving both endpoints in place.
A common mathematical description, used in many systems with variations, is:
Here input and output are normalized from 0 to 1, lift adds a proportion that is largest at black and zero at white, gain multiplies, and gamma raises the result to a power. Each control also has a colour component: pushing the lift wheel toward blue adds blue to the shadows; pushing the gain wheel toward orange warms the highlights. Lift, gamma and gain are intuitive for display-referred footage such as Rec.709, where black and white have fixed meaning, but they can behave oddly in log or scene-linear spaces, where "white" is not at 1.0.
Worked problem
Lift and gain on a grey ramp
An image has a black at 0.05, a midtone at 0.40 and a highlight at 0.90 (normalized display values). A colourist applies lift of −0.05 and gain of 1.10 with gamma 1.0. Using out = gain × (in + lift × (1 − in)), where do the three values end up?
Show solution
- Black: 1.10 × (0.05 − 0.05 × 0.95) = 1.10 × (0.05 − 0.0475) = 1.10 × 0.0025 ≈ 0.003.
- Midtone: 1.10 × (0.40 − 0.05 × 0.60) = 1.10 × 0.37 = 0.407.
- Highlight: 1.10 × (0.90 − 0.05 × 0.10) = 1.10 × 0.895 ≈ 0.985.
Answer: Black falls to about 0.003, the midtone stays near 0.41 and the highlight rises to about 0.985, so contrast increases while the midtone barely moves.
Offset and printer points
Offset adds the same value to every pixel in a channel, shifting the whole image up or down without changing its shape. In log space, where equal steps represent equal ratios of light, adding an offset to all three channels is equivalent to changing exposure, and adding offset to one channel is equivalent to changing the colour of the light, much as a lab timer changed printer lights. This is why many colourists working in log or scene-referred spaces use offset as their main balance tool: an offset in log space behaves like a filter on the camera or an exposure change on set, preserving the natural relationship between tones.
Printer points are a convenient unit for offset, inherited from film timing. In the traditional lab system, one printer point corresponded to about 0.025 log exposure, so 12 points equalled roughly one stop (0.30 log exposure). Many grading systems offer printer-point controls, for example with a keyboard or panel button that moves red, green, blue or all channels up or down one point at a time, letting colourists make precise, repeatable adjustments and communicate in a language cinematographers understand.
Worked problem
Warming a shot with printer points
A cinematographer asks for a shot to be "two points warmer and a half stop brighter". In a printer-point system with 12 points per stop, what changes should the colourist make?
Show solution
- Half a stop brighter: 6 points up on all three channels (master offset +6).
- Two points warmer: add red and remove blue, for example red +1 and blue −1, or red +2 with green and blue unchanged, depending on convention.
- Combined, a typical result is red +7, green +6, blue +5.
Answer: About red +7, green +6, blue +5 points: six points up overall for half a stop, with red raised and blue lowered for warmth.
Contrast and pivot
A contrast control stretches or compresses tones around a pivot point: values above the pivot move up, values below move down, and the pivot itself stays fixed. In log space, a contrast adjustment around the value of middle grey increases the separation between stops while keeping exposure anchored, similar to choosing a higher-contrast print stock. The pivot should usually be set near the most important tone, often middle grey or skin, so that contrast changes do not change the brightness of that tone. A simple model in log or display space is:
Here \(p\) is the pivot and \(c\) the contrast factor. Raising contrast with a pivot set too high darkens the midtones; setting it too low brightens them. Many systems also offer separate shadow and highlight contrast controls, or soft clipping to roll off highlights and shadows gently as contrast increases.
Log-style controls
Some systems offer log or film-style primary controls designed for scene-referred footage: shadow, midtone and highlight controls with adjustable ranges defined in log units, rather than fixed proportions of a 0–1 display range. DaVinci Resolve's log wheels and Baselight's film grade tools, for example, divide the tonal range at user-set boundaries and adjust each band with smooth transitions. These tools let colourists adjust the shadows of a log image without affecting skin, or warm the highlights without touching the midtones, in a way that respects the scene's exposure relationships. Many colourists combine offset for overall balance, contrast and pivot for overall shape, and log controls for regional adjustments.
| Tool | Main effect | Best working space | Typical use |
|---|---|---|---|
| Lift | Shadows, with black moving | Display-referred | Set black level, tint shadows |
| Gamma | Midtones | Display-referred | Adjust midtone brightness |
| Gain | Highlights, with white moving | Display-referred | Set white level, tint highlights |
| Offset | Everything equally | Log / scene-referred | Exposure and colour balance |
| Contrast and pivot | Separation around a pivot | Log or display | Overall shape |
| Log wheels / film grade | Defined log bands | Log / scene-referred | Regional tonal shaping |
| Curves | Any tonal mapping | Any | Precise shaping, hue vs hue |
Curves
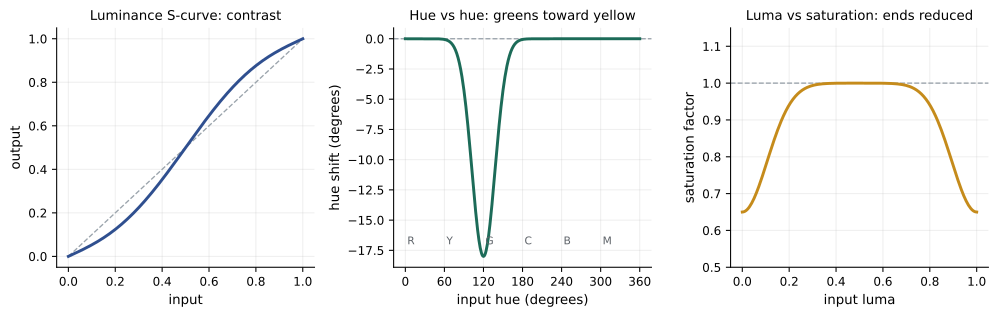
Curves give precise control over the tonal mapping. A luminance curve maps input to output brightness; red, green and blue curves adjust each channel; and specialized curves adjust one property as a function of another: hue versus hue (shift a hue range to another hue), hue versus saturation (change saturation of a hue range), hue versus luminance, luminance versus saturation (for example, desaturate shadows and highlights), and saturation versus saturation. Curves are powerful but can create abrupt transitions and artefacts, especially in 8-bit or heavily compressed footage, if points are placed close together or adjustments are large. They are often used after the main balance, for shaping contrast with a gentle S-curve, rolling off highlights, or making targeted colour adjustments that would otherwise need a secondary qualifier.
Saturation, colour boost and luma weighting
Saturation controls increase or decrease the distance of colours from neutral. A simple saturation adjustment interpolates each pixel between its own colour and a neutral grey of the same luma:
Here \(C\) is each of R', G' and B', \(Y'\) is luma and \(s\) is the saturation factor. Using correctly weighted luma keeps perceived brightness stable as saturation changes; using an unweighted average makes blues appear to darken and yellows brighten. Many systems also offer colour boost or vibrance, which increases the saturation of less saturated colours more than already saturated ones, protecting skin and avoiding clipped colours, and saturation controls limited to shadows, midtones or highlights. Desaturating shadows and highlights slightly, while keeping midtone saturation, gives a filmic feel, since film loses saturation at its extremes.
Worked problem
Saturation with luma weighting
A pixel has R' = 0.60, G' = 0.40, B' = 0.30. Its Rec.709 luma is 0.2126 × 0.60 + 0.7152 × 0.40 + 0.0722 × 0.30 ≈ 0.436. What are its values after a saturation factor of 1.5?
Show solution
- R': 0.436 + 1.5 × (0.60 − 0.436) = 0.436 + 0.246 = 0.682.
- G': 0.436 + 1.5 × (0.40 − 0.436) = 0.436 − 0.054 = 0.382.
- B': 0.436 + 1.5 × (0.30 − 0.436) = 0.436 − 0.204 = 0.232.
- Check: new luma ≈ 0.2126 × 0.682 + 0.7152 × 0.382 + 0.0722 × 0.232 ≈ 0.145 + 0.273 + 0.017 = 0.435, essentially unchanged.
Answer: About R' 0.68, G' 0.38, B' 0.23, with luma held at about 0.44, so the colour is stronger but not brighter or darker.
Working space matters
The same primary control behaves differently depending on the colour space and transfer function in which it is applied. In a display-referred Rec.709 space, gain at 1.1 brightens highlights and clips anything already near white. In a log space such as ACEScct or DaVinci Intermediate, offset changes exposure uniformly, gain behaves more like an exposure change in linear light, and highlights can be adjusted without clipping because they have room above the display range. In scene-linear space, multiplication by a constant is an exact exposure change, but additive lift and offset behave unexpectedly. Grading systems with colour management let colourists choose a log-encoded working space so that controls feel natural, while the output transform handles the display (CINE-202 Lessons 9 and 10). Understanding which space a node or layer operates in is essential for predictable results.
A primary workflow
A typical primary workflow on a shot might be:
- Check the input transform or LUT is correct, and look at the shot on the scopes and reference display.
- Set exposure with offset or a master control so that the key subject, usually a face, sits at the intended level.
- Balance colour with offset or channel controls so that neutrals are neutral or match the scene's intended colour.
- Shape contrast with contrast and pivot or a gentle curve, setting black and white levels.
- Fine-tune regions with log wheels or lift, gamma and gain.
- Adjust saturation and colour boost.
- Compare with the reference shot of the scene.
Choosing tools for the footage
The choice between display-referred and scene-referred primaries is not only technical but practical. Footage that arrives already in Rec.709, such as archival video, some documentary material and screen recordings, has no headroom above white; for it, lift, gamma and gain are the natural tools, and gentle curves can shape contrast. Camera log footage graded in a managed log working space responds best to offset, contrast and pivot, and log wheels, with lift, gamma and gain reserved for small display-level refinements near the end of the tree. Mixed projects, which are common in documentaries, may use both approaches on different shots. What matters is that the colourist knows which space each node operates in and chooses tools whose behaviour is predictable there.
A useful exercise is to grade the same log shot twice, once with lift, gamma and gain only and once with offset, contrast and log wheels only, then compare the results on the scopes. The differences in how highlights roll off and how colour balance holds across the tonal range make the behaviour of each tool family concrete.
Common mistakes
MistakeUsing lift, gamma and gain on log footage without a suitable working space.
InsteadUse offset and log controls in log, or grade in a managed log working space.
MistakeLeaving the contrast pivot at a default far from the key tone.
InsteadSet the pivot near middle grey or skin.
MistakeLarge curve points close together.
InsteadUse gentle curves to avoid breakup and banding.
MistakeSaturation that ignores luma weighting.
InsteadUse luminance-preserving saturation or vibrance.
MistakeJumping to secondaries before primaries are right.
InsteadFinish primaries first.
Summary and key terms
- Lift, gamma and gain divide display-referred images into shadows, midtones and highlights.
- Offset shifts all values; in log it behaves like exposure and filter changes.
- Twelve printer points equal roughly one stop.
- Contrast stretches tones around a pivot that should sit near the key tone.
- Log-style controls adjust bands defined in log units.
- Curves give precise tonal and colour-versus-colour control.
- Saturation should use weighted luma; working space changes how controls behave.
- Lift
- Control mainly affecting shadows and black level.
- Gamma
- Control mainly affecting midtones.
- Gain
- Control scaling the signal, mainly affecting highlights.
- Offset
- Adding the same value to all pixels in a channel.
- Printer points
- Units of offset from film timing, about 12 per stop.
- Pivot
- Fixed point of a contrast adjustment.
- Log wheels
- Primary controls with bands defined in log units.
- Hue versus hue curve
- Curve shifting a hue range to another hue.
- Colour boost
- Saturation increase favouring less saturated colours.
- Working space
- Colour space in which grading operations occur.
Practice problems
Work each problem on paper first, then reveal the answer to check.
Which control holds white and moves black?
Show answer
Lift.
Which control scales the signal from black?
Show answer
Gain.
What does offset do in log space?
Show answer
Acts like an exposure or filter change.
How many printer points make one stop?
Show answer
About 12.
How many points is a third of a stop?
Show answer
About 4.
Write the contrast-with-pivot formula.
Show answer
out = (in − p) × c + p.
Where should the pivot usually sit?
Show answer
Near middle grey or skin.
What does a luminance versus saturation curve do?
Show answer
Changes saturation by brightness, e.g. desaturate shadows.
Why use weighted luma in saturation?
Show answer
To keep perceived brightness stable.
Why choose a log working space?
Show answer
Controls behave naturally and highlights have room.
Lesson quiz · 5 questions
Score 60% or more to complete this lesson.
Create a free account to save your progress, take quizzes and earn a certificate.