
CINE-310 · Lesson 1 of 12 · 25 min
The colourist and the grading suite
Colour grading is the final creative pass on a film's images. After editing is locked and visual effects are delivered, a colourist works shot by shot through the film with the director and cinematographer, balancing exposure and colour so that scenes cut together seamlessly, shaping contrast and palette to support the story, guiding the audience's eye, and preparing masters for cinema, streaming and television. CINE-202 explained the technical pipeline: log encoding, LUTs, colour management, ACES and HDR delivery. This course builds on that foundation and focuses on the craft of grading itself: the tools, the techniques, the workflow and the collaboration that turn correctly managed footage into a finished film. This first lesson introduces the colourist's role, the history of the craft, the grading suite and its equipment, the stages of a grade, and the vocabulary used throughout the course.
From timing to grading
In the photochemical era, the equivalent of grading was called colour timing. A colour timer at the film laboratory viewed each shot of the cut negative and assigned printer lights, numerical values that controlled the intensity of red, green and blue light used to expose each shot onto the print stock. Timers could only change overall density and colour balance for an entire shot; there were no windows, no secondary corrections and no way to change contrast except by choosing different print stocks or development processes. Skilled timers nonetheless achieved remarkable results, and the cinematographer's choices on set, lighting, filtration, exposure and stock, did most of the creative work.
Television brought electronic colour correction. Telecine colourists adjusted the transfer of film to videotape in real time, using increasingly sophisticated systems from the 1980s onward that added secondary correction, the ability to isolate and adjust specific colours, and later shapes and tracking. The digital intermediate (DI), in which a film was scanned to digital files, graded on a computer and recorded back to film, appeared at the end of the 1990s. O Brother, Where Art Thou? (2000), photographed by Roger Deakins, is often cited as the first feature to be graded entirely as a digital intermediate, its golden, desaturated look created digitally rather than on set or in the lab. Within a decade, digital intermediates were standard, and with the shift to digital capture and digital cinema, the colourist became a central creative collaborator in almost every film and series.
What a colourist does
A colourist's work falls into several overlapping tasks:
- Technical correction: normalizing footage so that exposure, white balance and black and white levels are correct and consistent, fixing problems such as colour casts, flicker or mismatched cameras.
- Continuity: matching shots within a scene so that cuts are invisible, even though the shots may have been photographed hours or days apart under changing light.
- Creative look: shaping the palette, contrast and texture of the film to express its mood, period and themes, often building on a show LUT developed with the cinematographer.
- Directing attention: using light and colour to lead the viewer's eye to the important part of the frame, darkening distractions and enhancing faces.
- Repair and enhancement: removing small blemishes, adjusting skies, adding atmosphere or simulated light, in collaboration with visual effects where the work is extensive.
- Mastering: producing the final deliverables for each display format, including HDR and SDR versions, theatrical masters and archival files, and checking them for technical compliance.
Colourists work at the intersection of art and engineering. They need a deep understanding of colour science and the tools, but also visual taste, the ability to interpret a director's often vague requests, diplomacy in sessions where several people have opinions, and the stamina to sustain concentration over long days.
The grading suite
A grading suite, or grading theatre, is a room designed for accurate judgement of images. Its key elements include:
- A reference display: a calibrated monitor or projector that shows the image exactly as the mastering standard defines it, such as an HDR mastering monitor for PQ at 1,000 nits or more, a reference SDR monitor for Rec.709, or a digital cinema projector calibrated to DCI-P3 at 48 nits for theatrical grading.
- Controlled viewing conditions: neutral grey walls and surfaces, dim ambient light at a level specified for the mastering standard, bias lighting behind the monitor, and no coloured light or daylight entering the room.
- The grading system: software such as DaVinci Resolve, FilmLight Baselight, Autodesk Flame or others, running on powerful workstations with fast storage able to play high-resolution raw and log footage in real time.
- Control surfaces: hardware panels with trackballs, rings and knobs that let colourists adjust lift, gamma, gain and other parameters with both hands simultaneously, much faster and more intuitively than with a mouse.
- Scopes: waveform, parade and vectorscope displays, built into the software or on dedicated hardware (Lesson 10).
- Client seating: a comfortable area behind the colourist for the director, cinematographer and producers, with a view of the reference display, often supplemented by a large client monitor calibrated to match.
Increasingly, colourists also grade remotely, streaming the reference image to calibrated displays in clients' locations, or working from home suites, which became common during the COVID-19 pandemic and remain part of many workflows.
| Element | Purpose | Typical specification |
|---|---|---|
| Reference monitor | Accurate judgement | Calibrated to Rec.709 100 nits or PQ 1,000+ nits |
| Ambient light | Avoid adaptation errors | Dim, neutral; specified by standard |
| Surround and walls | Neutral adaptation | Mid-grey, matte |
| Control surface | Speed and feel | Trackballs, rings, knobs, buttons |
| Scopes | Objective measurement | Waveform, parade, vectorscope, CIE |
| Client display | Comfortable review | Matched to reference, larger |
Grading software today
Two systems dominate high-end grading. DaVinci Resolve, from Blackmagic Design, began as a dedicated grading system and has grown into a complete post-production application with editing, visual effects, audio and grading in one program; a free version and a paid Studio version have made it the most widely used grading tool, from student films to major features. Its colour page uses a node-based structure (Lesson 6). Version 20 was released in 2025; new versions appear regularly, so check the current release when you start. FilmLight's Baselight, used on many high-end features, commercials and streaming series, uses a layer-based structure, a sophisticated colour management system and specialist tools, and is available as dedicated systems and as plug-ins for editing software. Other tools include Autodesk Flame and Lustre, Assimilate Scratch, Colorfront for dailies and mastering, and the colour tools built into editing software. The principles in this course apply to all of them; examples use generic terms with notes on common implementations.
Stages of a grade
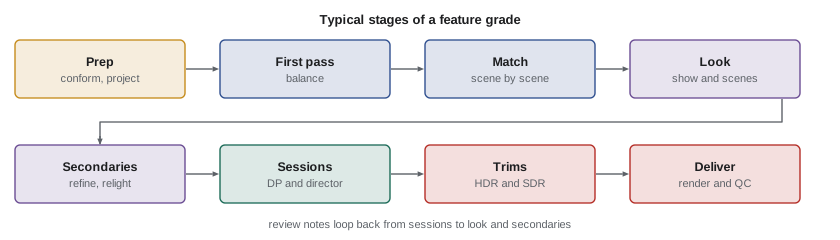
A typical feature or episodic grade moves through recognizable stages:
- Preparation: receiving the conformed timeline, checking that every shot links to the correct original media, setting up colour management, loading the show LUT or look, and importing reference stills and notes.
- First pass: the colourist works through the whole film alone or with the cinematographer, balancing every shot and roughing in the look, so that the director sees a consistent film at the first review.
- Supervised sessions: the director and cinematographer review scenes, request changes, and refine the look; the colourist adds secondary corrections, windows and detailed work.
- Visual effects integration: finished VFX shots are cut in and graded to match.
- Review screenings: watching the whole film in context, often in a theatre, to judge rhythm and consistency.
- Trims and versions: creating SDR versions from an HDR master, or vice versa, theatrical and home versions, and any versions for different territories.
- Quality control and delivery: checking technical compliance, rendering masters and archival files, and documenting the work.
A feature film might take two to four weeks of grading, a television episode two to five days, and a commercial one or two days, though schedules vary enormously.
Worked problem
Planning grading time
A 100-minute feature contains about 1,600 shots. The colourist plans a first pass at an average of 3 minutes per shot, followed by supervised sessions of 8 days of 10 hours each. How long is the first pass, and how much supervised time is available per shot?
Show solution
- First pass: 1,600 × 3 min = 4,800 min = 80 hours, about 8 working days of 10 hours.
- Supervised time: 8 × 10 h = 80 hours = 4,800 minutes.
- Per shot: 4,800 ÷ 1,600 = 3 minutes on average, though most time goes to key scenes and many shots need little attention.
Answer: About 8 days for the first pass and about 3 minutes of supervised time per shot on average, concentrated on key scenes.
The colourist and the cinematographer
The relationship between colourist and cinematographer is one of the most important in post-production. The cinematographer designs the image on set, through lighting, lenses, exposure and the show LUT, and the colourist completes it. Good collaboration begins before shooting, with camera tests graded by the colourist to develop the look (CINE-202 Lesson 12), continues through dailies, and culminates in the grade. Many cinematographers work repeatedly with the same colourist, building a shared language and trust. In television, cinematographers may be on other productions by the time an episode is graded, so the colourist often works from their notes, reference stills and the show LUT, and sends graded stills or remote sessions for approval. Directors, producers, studios and streaming services also have input, and part of the colourist's skill is navigating differing opinions while protecting the film's visual integrity.
In Canada, colourists and post-production staff may work as employees of post facilities, as freelancers, or under collective agreements in some facilities; organizations such as the Canadian Society of Cinematographers include colourists among their associate members, and trade organizations and festivals recognize colour work.
The language of grading
Grading has its own vocabulary, some inherited from the lab and telecine. Key terms used throughout the course include:
- Primary correction: adjustments that affect the whole image, such as lift, gamma, gain, offset, contrast, saturation and white balance.
- Secondary correction: adjustments limited to part of the image, selected by colour, brightness, shape or tracking.
- Balance: making an image technically neutral and correctly exposed before applying a look.
- Match: making shots in a sequence look consistent with each other.
- Look: the overall creative character of the image: palette, contrast, saturation, texture.
- Trim: adjustments to an existing grade for a different display, such as an SDR trim of an HDR grade.
- Power window or window: a shape used to limit a correction to an area, often tracked to follow movement.
- Qualifier or key: a selection based on hue, saturation or luminance.
- Node or layer: a unit of correction in the grading software's structure.
- Grade bin, still store or gallery: saved grades and reference stills used to copy and compare.
Developing as a colourist
Colourists typically start as assistants or in related roles such as dailies operators, DITs, online editors or assistant editors, learning the technical side of post-production before taking on creative grading. Building a reel of graded work, studying films closely, grading as much footage as possible, and learning to communicate with clients are essential. Free grading software and online resources have made it easier than ever to learn the tools, but taste and judgement come from practice and from watching how great films use colour. The capstone of this course asks you to grade a short sequence from balance to final look and deliverable.
A day in the suite
A typical feature grading day begins before the client arrives. The colourist warms up the reference display, checks white and a grey patch with a probe or a quick visual comparison against a known reference, reviews the notes from the previous session, and loads the reels or scenes planned for the day. During the session, the colourist works through scenes in order, playing each one in real time after adjustments so that continuity can be judged in motion. At the end of the day, the project is saved and backed up, stills of approved scenes are exported to the gallery, and a short note records what was approved, what is outstanding and which shots are waiting for VFX. This rhythm of preparation, supervised work and documentation is what lets a grade of thousands of shots stay coherent over several weeks.
Common mistakes
MistakeGrading in an uncontrolled room on an uncalibrated display.
InsteadGrade on a calibrated reference display in controlled light.
MistakeJumping to a look before balancing shots.
InsteadBalance and match first, then build the look.
MistakeTreating grading as only technical.
InsteadUse colour to tell the story and direct attention.
MistakeIgnoring the cinematographer's intent.
InsteadStart from the show LUT, references and conversations.
MistakeSpending equal time on every shot.
InsteadConcentrate effort on key scenes and problem shots.
Summary and key terms
- Colour grading evolved from photochemical timing through telecine to the digital intermediate.
- Colourists correct, match, create looks, direct attention and master deliverables.
- Grading suites combine calibrated displays, controlled rooms, software, panels and scopes.
- DaVinci Resolve and Baselight dominate high-end grading.
- Grades move from preparation and first pass to supervised sessions, trims and QC.
- The colourist–cinematographer relationship is central to the final image.
- A shared vocabulary of primaries, secondaries, balance, match and look structures the work.
- Colour timing
- Photochemical adjustment of printer lights per shot.
- Printer lights
- Numerical red, green and blue exposure values in film printing.
- Digital intermediate
- Scanning, digital grading and recording a film.
- Primary correction
- Adjustment affecting the whole image.
- Secondary correction
- Adjustment limited to part of the image.
- Balance
- Making an image technically neutral and correctly exposed.
- Match
- Making shots in a sequence consistent.
- Trim
- Adjustment of a grade for a different display.
- Control surface
- Hardware panel for grading.
- Reference display
- Calibrated monitor or projector for mastering.
Practice problems
Work each problem on paper first, then reveal the answer to check.
What were printer lights?
Show answer
RGB exposure values controlling film prints.
Which film is often cited as the first full DI?
Show answer
O Brother, Where Art Thou? (2000).
Name four colourist tasks.
Show answer
Correction, continuity, look, attention, repair, mastering.
Why is ambient light controlled in a suite?
Show answer
To avoid adaptation errors in judgement.
Why use a control surface?
Show answer
Faster, two-handed, intuitive adjustment.
Name two high-end grading systems.
Show answer
DaVinci Resolve and Baselight.
What happens in the first pass?
Show answer
Balancing every shot and roughing in the look.
First pass time for 1,200 shots at 4 minutes each?
Show answer
80 hours.
What is a trim?
Show answer
Adjusting an existing grade for another display.
What is a qualifier?
Show answer
A selection by hue, saturation or luminance.
Lesson quiz · 5 questions
Score 60% or more to complete this lesson.
Create a free account to save your progress, take quizzes and earn a certificate.