
BAS-210 · Lesson 6 of 12 · 23 min
Control panels: enclosures, terminals and labelling
▶ Video coming soon A video version of this lesson is on the way.
After lunch on Wednesday, October 21, Callie and Prakash turned from the back panel to the box it would live in. The RTU-1 panel was going on the podium roof at Ninefield, mounted on the side of the rooftop unit's curb, in sun, rain and snow. The enclosure Declan had ordered was a grey steel box with a gasketed door, and the cable entries had yet to be cut. Before cutting anything, Prakash put the enclosure's data sheet in front of Callie and asked what its rating meant. This lesson covers enclosures and their ratings, cable entries, heat, the certification of panels, and the labels and documents that make a panel serviceable.
Enclosure types
An enclosure protects the parts inside from the environment and protects people from the parts inside. Enclosures for electrical equipment in North America are rated by Type numbers that describe the conditions they are built for. The same Type numbers are used in Canada and the United States, defined in harmonized standards for enclosures, with the NEMA standard as a widely used reference. A technician needs to know a handful of them, because a panel in the wrong enclosure fails early, usually from water.
| Type | Intended for | Typical controls use |
|---|---|---|
| 1 | Indoor, general purpose; protects against contact and falling dirt | Mechanical rooms, electrical closets, ceiling spaces |
| 3R | Outdoor; protects against falling rain, sleet and snow | Outdoor panels where hose-directed water and dust are not a concern |
| 4 | Indoor or outdoor; protects against windblown dust, rain and hose-directed water | Rooftops, wash-down areas, wet mechanical rooms |
| 4X | As Type 4, plus corrosion resistance | Coastal sites, cooling tower areas, chemical exposure |
| 12 | Indoor; protects against dust, lint, dripping and light splashing | Dusty plant rooms and industrial spaces |
Declan had chosen a Type 4 steel enclosure for RTU-1. Type 3R would have kept out falling rain, but the podium roof was swept by wind off the tower above, and snow drifted against the units in winter. A Type 4 enclosure is gasketed and has no ventilation openings, so it keeps out windblown rain and the water from a technician's hose when the condenser coils are washed. Its weakness, as the heat section below explains, is that it cannot breathe.
Cable entries and glands
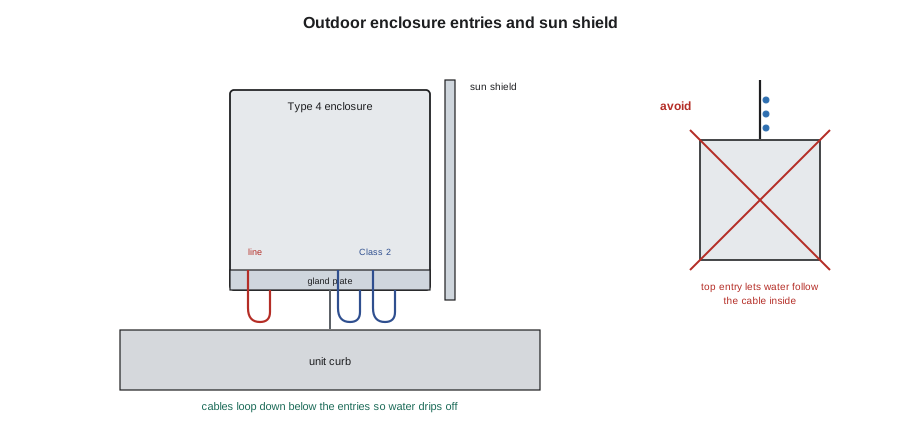
An enclosure's rating lasts only as long as its entries are sealed. Every hole cut for a cable or conduit must be fitted with a fitting that keeps the rating: a liquid-tight conduit connector, a sealed cable gland or a hub rated for the enclosure Type. Entries on outdoor enclosures should be in the bottom wherever possible, so that water running down a cable drips off before reaching the box, and cables should be formed into a drip loop below the entry. An entry in the top of an outdoor enclosure invites water to follow the cable or conduit inside, however good the fitting.
Many enclosures have a removable gland plate in the bottom, so that holes can be cut on the bench without metal filings falling into the panel. Callie marked the gland plate for three entries: one for the electrician's line-voltage conduit at the left, under the line-voltage section, and two for Class 2 cables at the right, under the field terminals: one for the sensors and unit wiring and one for the network trunk. She cut them with a step drill, deburred the holes and fitted a liquid-tight hub for the conduit and two sealed glands for the cables. Unused knockouts or holes must be closed with listed plugs rated for the enclosure, not tape.
Worked problem
Counting cable entries and gland sizes
The sensor and unit cables entering RTU-1's panel are: three 2-conductor sensor cables of 5 mm diameter, one 8-conductor cable of 7 mm to the unit's terminal strip and a 4-conductor actuator cable of 6 mm. A multi-hole gland insert has holes for cables of 4 to 7 mm. How many holes are needed, and is one 6-hole insert enough with a spare?
Show solution
- Cables: 3 + 1 + 1 = 5.
- All five diameters are within the insert's range.
- Holes needed: 5, leaving 1 spare in a 6-hole insert, closed with its plug until used.
Answer: Five holes in one 6-hole insert, with one spare plugged. The space and smoke detector cables come in later through the same insert's spare or a second gland if added.
Heat in a closed enclosure
Every part in a panel gives off some heat: the transformer, the controller, the power supplies, the relay coils. In a ventilated indoor enclosure, the heat escapes through openings. In a sealed Type 4 enclosure, it can escape only through the walls. On a roof in summer, the sun adds heat too, and the inside of a grey enclosure in direct sun can run well above the outdoor temperature. Controllers have a maximum operating temperature, often around 50 °C, and electronics age faster as they get hotter, so the designer checks that the panel will stay within the ratings.
A rough estimate divides the heat produced inside by the enclosure's surface area and a typical heat transfer coefficient for painted steel in still air. Enclosure makers publish more exact methods and calculators, and the sun's contribution needs its own allowance. Where a panel would run too hot, the designer can choose a larger enclosure, a lighter colour, a sun shield, a closed-loop cooler, or move heat-producing parts elsewhere. Where a panel could run too cold for its parts, a small thermostatically controlled heater is added, which also keeps condensation off the boards.
Worked problem
Estimating temperature rise inside an enclosure
The RTU-1 panel produces about 15 W of heat inside: transformer losses, controller and relays. The enclosure's exposed surface area is 1.0 m². Using a typical coefficient of 5.5 W per m² per kelvin for painted steel, what is the internal temperature rise above the surrounding air, before any sun?
Show solution
- Rise: 15 ÷ (5.5 × 1.0) = 2.7 K.
Answer: About 3 K from the parts alone, small enough that the sun is the bigger concern. A sun shield on the south face was added to the RTU-1 design.
Certified panels
A control panel that contains line-voltage parts is electrical equipment, and it is expected to be certified or listed before it is installed and energized. Industrial control panels are evaluated to CSA C22.2 No. 286. Many controls contractors run panel shops enrolled in a certification program with a recognized testing organization, which lets the shop build panels to the standard and apply the certification label itself, subject to the organization's inspections. A panel without a certification label may need a field evaluation by an approved body before the electrical inspector will accept it.
The standards cover things such as the ratings of every component, wire sizes and insulation, spacings, protection of line-voltage circuits, the short-circuit current rating of the panel, grounding and the markings on the nameplate. A panel containing only Class 2 circuits, supplied from a separate listed Class 2 transformer, falls under fewer of these requirements, but contractors usually build all panels to the same practices. Quillon's panel shop was enrolled in a program covering CSA C22.2 No. 286, and only staff trained in it were allowed to sign off a panel and apply the label. Callie was not yet one of them; Prakash was.
Labels on the outside
The outside of a panel should tell a stranger what it is and how to approach it safely. A nameplate or engraved label gives the panel's name as used on the drawings and front end, such as RTU-1 CONTROL PANEL, and the certification nameplate gives the maker, the supply voltage and the ratings. Where line voltage is present, a warning label on the door says so and names where the panel is fed from, so that a technician knows which breaker to lock out. Some owners also require a label with the controls contractor's name and service phone number, and a QR code or tag that links to the panel's documents.
| Label | Where | Says |
|---|---|---|
| Panel name | Outside of the door | The name used on drawings and the front end |
| Certification nameplate | Inside or outside, as the program requires | Maker, ratings, supply voltage, certification mark |
| Voltage warning | Door and line-voltage barrier | Line voltage present and the feeder or breaker that supplies it |
| Contractor and service contact | Inside the door | Who built it and who to call |
| Transformer load | On or next to the transformer | Rated and connected VA, date and initials, as in lesson 3 |
Labels on the inside
Inside, every device should carry a tag matching the drawings: the controller, each relay, each fuse holder and each terminal group. Terminal blocks are numbered with marker strips. Each relay is labelled with what it does, such as RO3 Y1 COMPRESSOR STAGE 1, not just its terminal number. Fuse holders are labelled with the fuse size. Group markers on the terminal rail say what each group is. A technician who opens the door should be able to point to any part and find it on the drawing without guessing.
Callie printed the labels on Quillon's label printer from the job's device list, then checked each one against the drawing before sticking it on. Prakash had her read three back to him at random. One relay was labelled for the wrong compressor stage because the device list had a typing error; the drawing was correct. She fixed the list, reprinted the label and noted the change so that Sophie's point names would not inherit the mistake.
Documents in the panel
A panel should carry its own documents. Most enclosures have a pocket on the inside of the door for the wiring diagram, the point list and the controller's essential settings, such as its network address and baud rate. These documents should be the as-built versions, updated after commissioning, not the drawings from before the job started. Printed documents in a panel on a roof fade and get wet, so they are laminated or kept in a sealed sleeve. Many contractors also keep electronic copies with the controller backup, as lesson 9 describes, and link to them from the panel label.
Callie made a list of what would go in RTU-1's door pocket: the wiring diagram, the point list with each point's configuration from lesson 4, a one-page sheet with the controller's model, firmware, network address, device instance and baud rate, and a copy of the checkout sheet once lesson 11's checkout was done. "A panel that explains itself," Prakash said. "That's the goal."
Inspection before it leaves the shop
Before a panel leaves the shop, it is inspected against a checklist. Quillon's list covered: every part matches the drawing and its rating; the layout keeps line voltage separated; every wire is marked, ferruled and tug-tested; ducts are covered and no more than half full; the transformer load is labelled; the enclosure rating is kept by every entry and plug; labels match the drawings; the door pocket holds the documents; and the panel passes a power-on test with the program loaded and every output commanded. Prakash went through the list with Callie, initialled it, applied the certification label and signed the shop record.
Mounting and access on site
Where a panel is mounted affects how long it lasts and how easily it can be serviced. It should be reachable without a ladder where possible, with enough clear space in front for the door to open fully and a technician to stand, and it should not block access to the equipment it controls. Outdoors, mounting on the shaded side reduces sun load, and mounting above the level of drifting snow and standing water keeps the entries dry. The fixings must suit the structure: a curb bracket, a stand or the equipment frame, never the equipment's removable service panels, which a mechanic will need to take off.
For RTU-1, Declan's drawing put the panel on a bracket fixed to the unit's curb on the north side, with its bottom about 600 mm above the roof membrane, clear of the drift line Ilona's maintenance staff had seen in past winters, and well away from the unit's access doors and the condenser coil's air path. The roofing contractor confirmed that the bracket fixings would not penetrate the membrane. Prakash added a note to the drawing that the door must swing clear of the gas piping to the unit, which ran along the same side.
Indoors, the same principles apply to mechanical rooms: keep panels out of the path of water from pipes and equipment above, away from steam and heat sources, and clear of the working space the electrical code requires in front of electrical equipment. A controls panel tucked behind a pump where no one can open its door is a panel that will not be serviced.
Common mistakes
MistakeUsing a Type 1 enclosure outdoors.
InsteadChoose an enclosure Type rated for the location, such as 3R or 4 on a roof.
MistakeCutting cable entries in the top of an outdoor enclosure.
InsteadEnter from the bottom where possible, with drip loops and rated fittings.
MistakeClosing unused holes with tape.
InsteadUse listed plugs rated for the enclosure Type.
MistakeIgnoring heat and sun in a sealed enclosure.
InsteadEstimate the temperature rise and add a sun shield, larger box or cooling as needed.
MistakeInstalling a line-voltage panel without certification.
InsteadBuild and label it under a recognized program, or arrange a field evaluation.
Summary and key terms
- Enclosure Types describe the conditions an enclosure is built for: 1 indoors, 3R outdoor rain, 4 and 4X windblown and hose-directed water, 12 indoor dust.
- Every entry must keep the enclosure's rating: bottom entries, drip loops, rated glands and plugs.
- Sealed enclosures shed heat only through their walls; estimate the rise and allow for sun.
- Panels with line-voltage parts are certified to CSA C22.2 No. 286.
- Outside labels name the panel, its ratings and its supply; inside labels tag every device and terminal group to match the drawings.
- As-built documents belong in the door pocket and with the controller backup.
- A shop inspection checklist catches problems before a panel reaches the site.
- Enclosure Type
- A rating describing the environmental conditions an enclosure is built for.
- Gland plate
- A removable plate in an enclosure wall where cable entries are cut.
- Cable gland
- A fitting that clamps and seals a cable where it enters an enclosure.
- Drip loop
- A downward loop in a cable below an entry so that water drips off before reaching the enclosure.
- Sun shield
- A cover that shades an outdoor enclosure from direct sun.
- Certified panel
- A panel built and labelled under a recognized certification program.
- Short-circuit current rating
- The maximum fault current a panel is rated to withstand safely.
- As-built drawing
- A drawing updated to show what was actually installed.
Practice problems
Work each problem on paper first, then reveal the answer to check.
Which enclosure Type would suit a panel exposed to windblown rain and hose spray?
Show answer
Type 4, or 4X where corrosion is a concern.
Why are outdoor cable entries made in the bottom?
Show answer
So water running down the cable drips off and does not follow it into the enclosure.
A sealed panel produces 22 W and has 1.6 m² of surface. Using 5.5 W/m²·K, what is the rise?
Show answer
22 ÷ (5.5 × 1.6) = 2.5 K.
Which standard covers industrial control panels?
Show answer
CSA C22.2 No. 286.
What should a voltage warning label on a panel door say?
Show answer
That line voltage is present and which feeder or breaker supplies it.
Lesson quiz · 5 questions
Score 60% or more to complete this lesson.
Create a free account to save your progress, take quizzes and earn a certificate.