
AUTO-420 · Lesson 9 of 12 · 20 min
Performing static and dynamic calibrations
The first calibration in Ridgeline's new area was the shop's own courtesy hybrid. Marty had replaced its front struts the week before, the alignment had been set, and the maker's procedure for that model listed both the strut replacement, because of the ride height change, and the alignment as events that required a forward camera calibration. It was the perfect first job: a shop vehicle, a static camera calibration with the maker's target, and no customer waiting. Kiran ran it with Marty watching, and it took her nearly two hours. Three weeks later, she did the same calibration on a customer's car in forty minutes.
This lesson walks through static and dynamic calibrations step by step: setting up the vehicle and the targets, running a forward camera static calibration, aiming and calibrating a radar, completing a dynamic calibration on the road, verifying the result and recording it. The procedure for each vehicle always comes from the maker; the steps here show the pattern most of them follow.
Before starting
Kiran's routine starts at the desk, not in the bay. She opens the maker's procedure for the vehicle, the sensor and the event, and confirms four things: which calibration is required, static, dynamic or both; which targets and tools it needs and where they go; the vehicle preparation it lists; and the acceptance result the module should report. She prints or saves the procedure page with the repair order, because the record must show which procedure was followed. Then she runs a pre-calibration scan of all modules, because a fault in the steering angle sensor, the yaw rate sensor, the wheel speed sensors or the network can prevent a calibration or spoil it. Codes in the driver assistance modules are expected after a windshield or bumper job, but codes in other modules must be fixed first.
Then the vehicle preparation. On the courtesy hybrid that meant setting tire pressures to the placard, checking that the fuel tank was full, emptying the cargo area of a box of floor mats, confirming the alignment printout showed the thrust angle within specification, checking the steering angle sensor read zero with the wheel straight, cleaning the windshield inside and out in the camera area, and connecting the battery support unit. She rolled the car onto the levelled area, centred it on the marks and set the parking brake.
Setting up a static camera target
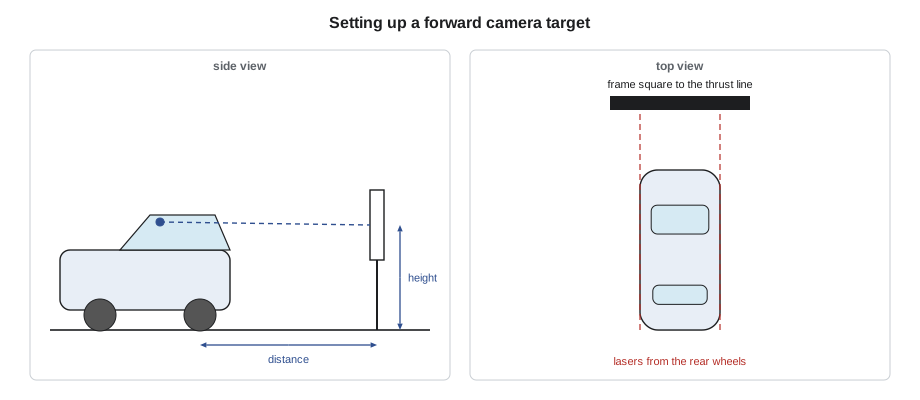
Most forward camera target procedures specify the target's distance from a reference point on the vehicle, usually the front wheel centres or the front of the bumper; its height from the floor to the target's centre or to a marked line; and that it be centred on the vehicle's centreline and square to the thrust line. Ridgeline's target frame uses a laser system: two laser units clamp to the rear wheels and project lines forward along the thrust line, and a third on the frame lets the technician centre the frame between those lines and turn it until it is square. The frame's height adjusts on a column, with a scale or a laser height gauge.
Kiran measured the centreline from the centre of the front and rear emblems, which the procedure allowed on this model, and confirmed it against the midpoint between the wheel centres. She set the frame at the specified distance from the front wheel centres, measured to the board's face, adjusted its height to the specified figure from the floor, centred it on the centreline and squared it to the thrust line until the two lasers from the rear wheels struck the frame's scales at equal readings. She checked the distances from each front wheel centre to the frame's two ends, which should be equal on a square frame.
# Is the target frame square to the vehicle? Compare the distances from each front hub to the frame's ends
import math
left = 2504       # left hub to left end of frame
right = 2498      # right hub to right end of frame
width = 1800      # distance between the two measuring points on the frame
diff = left - right
ang = math.degrees(math.atan(diff / width))
print(f"left {left} mm, right {right} mm: difference {diff:+.1f} mm, frame turned {ang:.2f} degrees")
print("square enough" if abs(ang) <= 0.1 else "turn the frame and measure again")left 2504 mm, right 2498 mm: difference +6.0 mm, frame turned 0.19 degrees turn the frame and measure again
Her first measurement showed the frame turned 0.19 degrees, outside the shop's 0.1 degree limit for camera targets, so she rotated it slightly and measured again until the two distances agreed within a couple of millimetres. Then she fitted the maker's target board for that model to the frame, checked it was clean and flat, and turned off the bright work light hanging near the rack.
Running the routine
With the target in place, the scan tool does the rest of the work, but the technician keeps the conditions right while it runs. Kiran selected the forward camera module, chose the static calibration routine and answered the tool's prompts: target type, the vehicle's equipment code, and confirmation that the vehicle preparation was done. Many routines ask for the camera's mounting height or the target distance as a check. The camera then viewed the target, the module calculated its pitch, yaw and roll from the target pattern's position in the image, and the tool reported the result: calibration complete, with the stored angles, or calibration failed with a reason.
Common reasons for a failed static calibration are the target not found, because of lighting, glare or a wrong or dirty board; angles outside the module's allowed range, which points to a camera or bracket that is physically misplaced, a wrong windshield or a vehicle at the wrong ride height; and conditions changing during the routine, such as a door being opened, the steering wheel being turned or voltage dropping. The routine on the courtesy hybrid passed with angles well inside the allowed range. Kiran printed the result.
Aiming and calibrating a radar
Radar procedures vary more than camera procedures. Some radars are aimed mechanically, then calibrated electronically with a reflector. Some need only an electronic calibration with a reflector or a radar target. Some are calibrated dynamically by driving. And some need a static vertical check with a level or a laser on the radar's face, plus a dynamic horizontal calibration. The maker's procedure says which.
Dr. Singh's car, back for the vertical aim check after the phantom braking complaint in the adaptive cruise lesson, used the common two-step method. First the mechanical vertical aim: with the vehicle prepared as for any calibration, Kiran fitted the maker's aiming tool, a small level and mirror that sits on the radar's face, read the vertical angle, and turned the radar's vertical adjusting screw until it read within the window. Then the electronic horizontal calibration: she placed the reflector, a metal corner reflector on a stand, at the specified distance and height on the thrust line in front of the radar, cleared the area of carts and metal shelves, and ran the scan tool routine. The radar found the reflector's echo, measured its angle, and stored its horizontal offset.
# Radar reflector placement: where to put the reflector on the thrust line (procedure values illustrative)
import math
dist = 2.5              # reflector distance from the radar face
height = 0.52            # reflector centre height above the floor
radar_h = 0.51          # radar centre height above the floor
vert = math.degrees(math.atan((height - radar_h) / dist))
print(f"reflector at {dist} m ahead, {height} m high; radar centre {radar_h} m high")
print(f"line of sight is {vert:+.2f} degrees from horizontal (procedure expects about 0)")
for lateral in (0.01, 0.02, 0.05):
    a = math.degrees(math.atan(lateral / dist))
print(f"reflector placed {lateral * 1000:.0f} mm off the thrust line gives {a:4.2f} degrees of horizontal error")reflector at 2.5 m ahead, 0.52 m high; radar centre 0.51 m high line of sight is +0.23 degrees from horizontal (procedure expects about 0) reflector placed 10 mm off the thrust line gives 0.23 degrees of horizontal error reflector placed 20 mm off the thrust line gives 0.46 degrees of horizontal error reflector placed 50 mm off the thrust line gives 1.15 degrees of horizontal error
Dynamic calibrations
Hal's gas courier vans used a dynamic forward camera calibration after windshield replacement and alignments. The maker's conditions for the vans were typical: drive at 40 to 100 km/h (25 to 62 mph) on a straight or gently curving road with clear, continuous lane markings on both sides, in daylight or with good street lighting, without heavy rain or snow, until the module reports the calibration complete, usually within 10 to 30 minutes. Some makes require traffic ahead, so the camera and radar can both see vehicles; some require guardrails or other roadside objects; some forbid towing or a heavy load.
Kiran's route for dynamic calibrations runs from Ridgeline onto a divided highway east of the shop (an interstate east of the shop) with fresh markings, chosen after she drove three candidates. The scan tool stays connected on a cable or a wireless link, with a second person, usually Theo, watching the progress while she drives. If the routine stalls, the usual causes are the conditions: faded lines, a long stretch of construction, rain, or speeds outside the window in heavy traffic. In winter, dynamic calibrations sometimes wait for a clear day, and Simone tells customers in advance.
# Dynamic calibration log check: did the drive meet the procedure's conditions? (illustrative log)
log = [  # (minute, speed, both lines detected, raining)
    (1, 35, True, False), (2, 62, True, False), (3, 80, False, False), (4, 95, True, False),
    (5, 98, True, False), (6, 105, True, False), (7, 90, True, True), (8, 88, True, False),
]
lo, hi = 40, 100
good = [m for m, v, lines, rain in log if lo <= v <= hi and lines and not rain]
print(f"minutes meeting the conditions: {len(good)} of {len(log)} -> {good}")
for m, v, lines, rain in log:
    why = []
    if not lo <= v <= hi: why.append("speed out of window")
    if not lines: why.append("lines not detected")
    if rain: why.append("rain")
if why: print(f"minute {m}: {', '.join(why)}")minutes meeting the conditions: 4 of 8 -> [2, 4, 5, 8] minute 1: speed out of window minute 3: lines not detected minute 6: speed out of window minute 7: rain
Verifying and recording
A module reporting calibration complete is necessary but not sufficient. Kiran's verification has three parts. A post-calibration scan of all modules, with no driver assistance codes remaining and the calibration status reading complete or calibrated. A road test that exercises the features: lane departure warning or lane keeping on a marked road, adaptive cruise following a vehicle, the forward collision display showing the vehicle ahead, and for radars, the blind spot lights with traffic alongside. And a check that the vehicle's own behaviour is right: steering wheel straight, no pull, no unexpected warnings.
The record goes on the repair order and in the shop's ADAS log: the trigger event, the procedure source, the floor and lighting check, the preparation readings, the target or reflector positions, the pre-scan and post-scan reports, the module's calibration result, the road test notes and the technician's name. Bev added one more item after a conversation with Ridgeline's insurer: a photograph of the vehicle on the calibration area with the target in place.
| Step | What is checked | Record |
|---|---|---|
| Procedure | Correct calibration for the vehicle, sensor and event | Procedure page saved |
| Pre-scan | No unrelated faults in steering, brakes, network | Scan report |
| Preparation | Tires, fuel, cargo, ride height, alignment, steering centre, battery support | Readings |
| Setup | Floor, lighting, target distance, height, centring, squareness | Measurements, photograph |
| Routine | Module result and stored angles | Result printout |
| Post-scan | No codes, status calibrated | Scan report |
| Road test | Features operate correctly | Notes |
Worked problem
Target height from the procedure
A procedure says the camera target's centre must be 1,250 mm (49.2 in) above the floor, measured with the vehicle on the levelled area. The frame's scale reads 1,262 mm (49.7 in) at the target centre, and a laser check shows the floor under the frame is 4 mm (0.16 in) higher than under the vehicle. What height should the scale read?
Show solution
- The target height is measured from the floor under the vehicle, which is lower than under the frame.
- Height above the vehicle's floor plane = scale reading + floor step under the frame.
- 1,262 + 4 = 1,266 mm (49.7 + 0.16 = 49.86 in), which is 16 mm (0.66 in) too high.
- Required scale reading: 1,250 − 4 = 1,246 mm (49.2 − 0.16 = 49.04 in).
Answer: Set the frame so its scale reads 1,246 mm (49.0 in), and note the floor step on the record.
Common mistakes
MistakeStarting a calibration before reading the procedure.
InsteadConfirm the calibration type, targets, positions, preparation and acceptance result first.
MistakeIgnoring unrelated codes in the pre-scan.
InsteadFix steering angle, yaw, wheel speed and network faults first.
MistakeMeasuring target distance to the wrong reference point.
InsteadUse the reference the procedure names, such as the wheel centres.
MistakeAccepting a dynamic calibration started in poor conditions.
InsteadWait for clear lines and weather within the procedure's limits.
MistakeTreating "calibration complete" as the end.
InsteadPost-scan, road test and record every calibration.
Summary and key terms
- Every calibration starts with the maker's procedure and a full pre-calibration scan.
- Static camera targets are set at a specified distance and height, centred and squared to the thrust line.
- The scan tool routine calculates and stores the sensor's angles and reports a result.
- Radars may need mechanical aim, a reflector calibration, a dynamic calibration or a combination.
- Dynamic calibrations need clear markings, the right speed window, good weather and time.
- Verification includes a post-scan and a road test of every affected feature.
- The record includes the procedure, measurements, scans, results, road test and a photograph.
- Target frame
- An adjustable stand that holds calibration targets at the specified distance and height.
- Corner reflector
- A metal reflector used as a radar target during calibration.
- Aiming tool
- A level or mirror device used to set a radar's mechanical vertical aim.
- Pre-calibration scan
- A scan of all modules before calibrating, to find faults that would prevent or spoil it.
- Post-calibration scan
- A scan after calibrating to confirm no codes remain and the status is calibrated.
- Acceptance result
- The result the module must report for the calibration to be complete.
Practice problems
Work each problem on paper first, then reveal the answer to check.
Why does Kiran run a full pre-scan before a calibration?
Show answer
Faults in steering angle, yaw, wheel speed or network modules can prevent or spoil it.
How did she square the target frame?
Show answer
With lasers from the rear wheels and equal distances from the front hubs to the frame ends.
What two steps did Dr. Singh's radar need?
Show answer
A mechanical vertical aim with the aiming tool, then an electronic reflector calibration.
Name three conditions for a dynamic camera calibration.
Show answer
Clear continuous lane markings, the speed window, and no heavy rain or snow.
Lesson quiz · 5 questions
Score 60% or more to complete this lesson.
Create a free account to save your progress, take quizzes and earn a certificate.