
ARCH-110 · Lesson 11 of 12 · 21 min
Physical model making
The model shop at Elmhurst smells of sawdust and glue. Wren has drawn the boathouse in every way the course has taught, but when she cuts the site contours out of chipboard, stacks them and sets a small balsa box on the bank, something surprises her: the roof she drew so carefully looks too heavy against the slope. She turns the model in her hands, puts her eye down at the level of the river and sees that the overhang blocks the view of the water from the path. No drawing had shown her this. Professor Visser watches her cut a new, thinner roof from basswood. 'A drawing is an argument,' Visser says. 'A model is evidence. It is very hard to lie to yourself with a model.'
Why architects make models
Models let you see a design in three dimensions from any angle, under real light, at a glance. They are the most intuitive form of architectural representation for clients and the public, and an essential design tool for architects. Even in an age of digital modelling, physical models remain central to architectural education and to many practices, because they reveal problems and possibilities of form, proportion, light and site that screens can hide. Picking up a model and turning it toward a window is still one of the fastest ways to test a design.
Models are made for different purposes, and each purpose suggests a material, a scale and a level of finish. Before you cut anything, decide what the model must show and who it is for.
Kinds of model
- Sketch or study models: quick and rough, made in minutes or hours from paper, card, foam or clay to test ideas. Make many and throw most away.
- Massing models: simple solid blocks at a small scale showing the volume of a building and its neighbours, often for urban studies.
- Site and contour models: the landform built up from layers, each layer one contour interval thick, with buildings, roads and trees added.
- Presentation models: carefully crafted models for reviews, clients and exhibitions, often with a consistent palette of one or two materials.
- Sectional and interior models: cut open, or with a removable roof, to show inside spaces and light.
- Detail models and mock-ups: large-scale models of a construction detail or a full-size mock-up of part of a building, used to test materials and assembly.
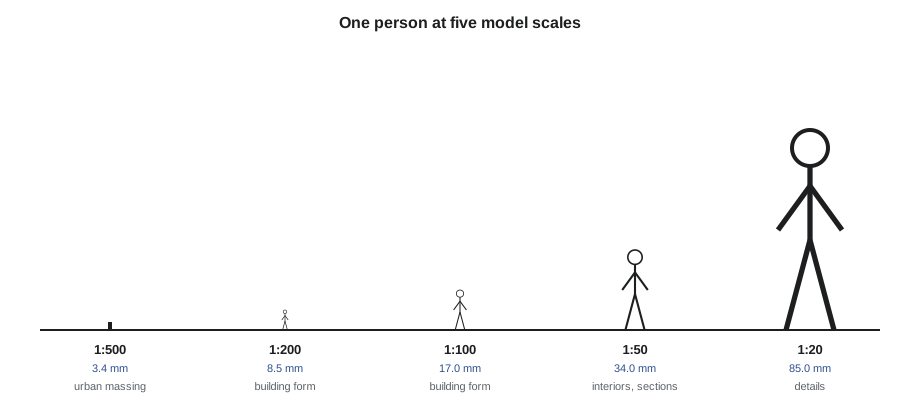
Each kind has its scale range. Massing and urban models are usually built at 1:500 or 1:1000 (1 in = 40 ft or 1 in = 100 ft). Building models at 1:200 or 1:100 (1/16 in or 1/8 in = 1 ft). Interior, sectional and detailed building models at 1:50 (1/4 in = 1 ft). Detail models at 1:20 or 1:10 (1/2 in or 1 in = 1 ft), or larger.
Materials
The traditional materials of the architecture model shop are sheet materials that cut cleanly and glue easily.
- Chipboard and boxboard: dense recycled card in several thicknesses, cheap and good for site contours, bases and study models.
- Museum board and mat board: smooth, dense card in white and other colours, cuts crisply, good for presentation models.
- Foam core: polystyrene foam sandwiched between paper, light and stiff, quick for large walls and study models, but its edges show unless they are covered.
- Basswood and balsa: light woods in sheets, strips and blocks. Basswood is fine-grained and strong; balsa is softer and easier to cut but dents easily.
- Acrylic: clear or coloured plastic sheet, used for glazing, water and bases; best cut by laser.
- Cork, plywood and MDF: for bases, contour models and large or robust models.
- Blue or pink extruded polystyrene foam: carved or hot-wire cut for massing and landform models.
A consistent palette makes a model read clearly. Many architects make presentation models in one material, such as all white board or all basswood, so that the form, rather than the materials, is what the viewer sees. Where materials are used to differentiate, keep the code simple: existing context in one material, the new building in another, landscape in a third.
Tools and technique
The essential tools are a sharp craft knife with plenty of spare blades, a self-healing cutting mat, a steel ruler, preferably with a cork back so it does not slip, a set square, a small cutting square or a mitre box for strips, sanding blocks, fine tweezers, pins and masking tape. Adhesives include white or yellow wood glue for wood and card, a fast-setting cyanoacrylate glue for small joints and spray adhesive for mounting drawings and paper.
Cut with several light strokes rather than one heavy one, keeping the knife vertical against the ruler. Change blades often; a dull blade tears card and wanders. Cut on the waste side of the line so the piece keeps its size, and cut thin strips from the edge of the sheet. Mark measurements with a sharp pencil or by pricking through a drawing taped to the sheet. When joining board at a corner, decide which piece overlaps the other, and account for the thickness of the material in your dimensions; alternatively, bevel both edges at 45 degrees for a clean corner, which is harder but looks better.
For site models, transfer each contour from the survey to a sheet of board whose thickness, at the model's scale, equals the contour interval. Cut each layer, stack and glue them, and the landform appears. At 1:200 (1/16 in = 1 ft), a 0.5 m (2 ft) contour interval needs board 2.5 mm (1/8 in) thick.
Digital fabrication: laser cutters and 3D printers
Laser cutters cut sheet materials directly from vector drawings, with great precision. Each line in the drawing is assigned a colour that tells the machine whether to cut through, score part way or engrave a surface. Prepare the drawing at full model size, with all lines on the right layers, closed outlines for cut parts and parts nested close together to save material. The laser removes a thin strip of material called the kerf, typically about 0.1 to 0.3 millimetres, so for parts that must fit tightly, offset the cut line by half the kerf.
3D printers build models layer by layer from a digital model. Fused-filament printers extrude melted plastic and are common and cheap; resin printers cure liquid resin with light and give finer detail. 3D printing is excellent for complex forms that are hard to cut by hand, such as curved roofs, terrain and repetitive components. Models must be watertight solids, with walls thick enough to print at the chosen scale.
# Model sizes, contour board thickness and laser kerf offset
scale = 100                                  # model is 1/scale of full size
real = {"boathouse length": 7.2, "ridge height": 4.2, "door height": 2.1, "person": 1.7}
for k, v in real.items():
    print(f"{k:17s} {v:>8} m -> model {v * 1000 / scale:6.1f} mm")
interval = 0.5                                  # contour interval at full size
print(f"contour board thickness: {interval * 1000 / scale:.2f} mm")
kerf = 0.2                                    # width removed by the laser beam
part = 20                                    # intended part width
print(f"draw the cut line {kerf / 2} mm outside: outline {part + kerf} mm wide gives a {part} mm part")boathouse length 7.2 m -> model 72.0 mm ridge height 4.2 m -> model 42.0 mm door height 2.1 m -> model 21.0 mm person 1.7 m -> model 17.0 mm contour board thickness: 5.00 mm draw the cut line 0.1 mm outside: outline 20.2 mm wide gives a 20 mm part
The script converts full-size dimensions to model dimensions at a chosen scale, finds the board thickness for a contour model and computes the kerf offset for a laser-cut part. Checking the size of a person in the model, as in the figure, is a good habit: at 1:100 a person is 17 mm tall, which tells you how much detail is worth making.
Safety in the model shop
Most model shop injuries are cuts from craft knives. Always cut away from your body and your other hand, keep your fingers behind the ruler, use a steel ruler that the blade cannot climb, and dispose of used blades in a closed container. Never leave a loose blade on the bench or try to catch a falling knife.
Power tools and digital fabrication need training before use. Laser cutters must never be left unattended while cutting, because materials can catch fire; keep the lid closed, the ventilation running and know where the extinguisher is. Never laser-cut materials that release toxic gases, especially PVC and vinyl, which release chlorine compounds, and check any unfamiliar material against the shop's approved list. Use spray adhesives and solvent glues only in a ventilated area or spray booth. Hot-wire foam cutters produce fumes too and should be used with ventilation. Wear eye protection with saws, sanders and rotary tools, tie back long hair and do not wear loose sleeves.
Photographing models
A photograph of a model often reaches more people than the model itself, and a good model photograph is a presentation drawing in its own right. Use a plain background, such as a sheet of white or black paper curved up behind the model so there is no horizon line. Light the model with one main light, a desk lamp or a window, placed to cast clear shadows, with a white card on the other side to soften them. Put the camera at the eye level of a person in the model to see it as people will, or above to show the layout. Use a small aperture for depth of field, or a phone in a mode that keeps the whole model sharp.
Worked problem
A contour model for the bank
Joon-ho is building a site model of the bank at Kestrel Point at 1:200 (1/16 in = 1 ft). The survey shows contours at 0.5 m (2 ft) intervals, from the path down to the river, a total drop of 3.0 m (12 ft). How many layers does he need, and how thick is each?
Show solution
- Number of intervals: 3.0 ÷ 0.5 = 6, so six layers of board above the base.
- Board thickness: 0.5 m ÷ 200 = 500 mm ÷ 200 = 2.5 mm.
- He traces each contour onto its own sheet, cuts along it, and stacks the layers from the river upward.
- The boathouse model at the same scale is 7.2 m ÷ 200 = 36 mm long.
Answer: Six layers of 2.5-mm (1/8-in) board build the bank, and the boathouse is a 36-mm long piece sitting on it.
Exercise 11: three models
This exercise takes about eight hours.
- Make five quick study models of the boathouse or your project from paper and card, each in less than thirty minutes, testing different roof forms or arrangements.
- Build a contour model of the site at 1:200 (1/16 in = 1 ft) with the chosen design as a simple massing block.
- Build a presentation model of the building at 1:50 (1/4 in = 1 ft) in a consistent palette, with a removable roof or a sectional cut.
- Photograph each model against a plain background with a single light source, from eye level and from above.
- Deliverable: the models and a sheet of photographs, with a short note on one thing each model revealed that the drawings did not.
Self-critique checklist
- Did I decide what each model must show before choosing material and scale?
- Are cuts clean and corners square, with material thickness accounted for?
- Is the palette consistent and the glue invisible?
- Is there a person at the correct scale?
- Did I follow every shop safety rule, including the approved laser materials list?
Models in the review
A model on the review table is the first thing a jury looks at and often the last thing it remembers. Place it so that it can be seen from the side where people will stand, oriented to match the site plan on the wall, with north marked on the base. Put a few scale figures on it, and if possible a light that can be moved to show the sun at different times. Callum brings a small desk lamp to the boathouse review and moves it slowly from the east to the south while he talks; the jury watches the shadow of the overhang slide across the bench, and the argument for the roof is made without a word.
Keep the study models too. A row of five rough models, from the first folded paper to the final form, tells the story of the design in a way that no single model can, and juries often find the sequence more interesting than the finished piece. Label each one with a date and a sentence on what it tested. After the review, photograph them all, because cardboard models do not last, and the photographs will be the pages of your portfolio in lesson 12.
Common mistakes
MistakeMaking a presentation model before any study models.
InsteadMake quick study models first to test ideas, then build the final model.
MistakeIgnoring material thickness at corners.
InsteadDecide which piece overlaps and adjust dimensions, or bevel the edges.
MistakeLaser-cutting an unknown plastic.
InsteadCheck every material against the approved list; never cut PVC or vinyl.
MistakeUsing many materials and colours with no logic.
InsteadUse a simple, consistent palette with a clear code.
Summary and key terms
- Models show a design in three dimensions under real light and reveal problems drawings can hide.
- Study, massing, site, presentation, sectional and detail models each have their purpose and scale.
- Chipboard, museum board, foam core, basswood, balsa, acrylic and foam each suit different models.
- Laser cutters and 3D printers fabricate parts from digital files; allow for kerf and printability.
- Safety comes first: cut away from the body, never leave a laser unattended and never laser-cut PVC.
- Study model
- A quick, rough model made to test an idea.
- Contour model
- A site model built from layers of material, each one contour interval thick.
- Kerf
- The width of material removed by a cutting tool such as a laser.
- Museum board
- Dense, smooth card used for crisp presentation models.
- Massing model
- A model of simple solid blocks showing building volumes.
Practice problems
Work each problem on paper first, then reveal the answer to check.
At 1:100 (1/8 in = 1 ft), how tall is a 1.7 m (5 ft 7 in) person in the model?
Show answer
17 mm.
Why offset laser cut lines by half the kerf?
Show answer
So the finished part is the intended size after the beam removes material.
Which material should never be laser-cut?
Show answer
PVC or vinyl, which release toxic chlorine compounds.
What thickness of board represents a 1 m (4 ft) contour interval at 1:200 (1/16 in = 1 ft)?
Show answer
5 mm.
Why make many study models?
Show answer
They test ideas quickly and cheaply before committing to a final design.
Lesson quiz · 5 questions
Score 60% or more to complete this lesson.
Create a free account to save your progress, take quizzes and earn a certificate.