
ROOF-130 · Lesson 9 of 12 · 27 min
Valleys
▶ Video coming soon A video version of this lesson is on the way.
On the second-last Linden Street house, number 33, the back wing met the main roof in two long valleys, and the ceiling of the back bedroom showed why the owner had called. A brown stain ran along the line of the left valley. When Crew 5 stripped it, the cause was plain: the old valley had been woven with organic three-tab shingles, and someone had nailed straight through the center of it years ago to hold down a curling shingle. Every heavy rain had sent a stream of water from two slopes straight down onto that nail.
A valley is the internal corner where two roof slopes meet. Water from both slopes flows into it, so a valley carries more water, faster, than any other part of the roof, and ice and debris collect there. Valleys leak more than any field area, and they are built with extra layers and special rules. This lesson covers valley linings, the three main valley types for asphalt shingles, how to build each one, and the mistakes that cause valley leaks.
Why valleys are different
A valley collects water from both slopes it joins. On a big roof, the lower end of a valley can carry the runoff from tens of square meters of roof. The water in a valley:
- Runs along the line where shingles from two directions meet, rather than across the face of the shingles.
- Can be pushed sideways under the shingle edges by its own speed, especially where a steep slope meets a shallow one.
- Freezes first and thaws last in winter, so ice dams often form at the lower end of a valley.
- Carries leaves, needles and granules, which build up and make dams.
That is why every valley gets a lining, why nails stay out of the center, and why the shingles are cut or overlapped in particular ways.
Valley length
A valley's true length comes from the valley factor in lesson 2. Where the two slopes have the same rise, the valley runs at 45 degrees across the plan.
Worked problem
Valleys at 33 Linden
At 33 Linden, the back wing roof (8 in 12) meets the main roof (also 8 in 12) in two valleys. Each valley has a common run of 10 ft. How long is each valley, and how much lining membrane is needed for both, allowing 6 in end laps and one lap per valley?
Show solution
- Valley factor for 8 in 12 = √(64 + 288) ÷ 12 = √352 ÷ 12 = 18.762 ÷ 12 = 1.5635.
- Each valley = 10 × 1.5635 = 15.64 ft.
- Membrane = 2 × (15.64 + 0.5) = 32.3 ft.
- One 65 ft roll of 36 in membrane is enough, with about 32 ft left for the eaves.
Answer: Each valley is 15.6 ft long; one roll lines both.
Valley linings
Every shingled valley is lined before the shingles go on. The lining is centered on the valley and runs from the eave to the ridge or top of the valley.
- The Residential Code of Ohio (R905.2.8.2) sets valley linings for shingle roofs. For an open valley, the lining is corrosion-resistant sheet metal at least 24 in wide, of at least the thickness the code lists for each metal, or two plies of mineral-surfaced roll roofing, the bottom ply 18 in wide and the top 36 in wide. For a closed valley (woven or closed-cut), the lining is at least one ply of roll roofing or another listed underlayment at least 36 in wide, or a self-adhering ice barrier membrane.
- Ridgecap's standard for every valley: one full-width 36 in strip of self-adhered membrane centered in the valley, installed before the rest of the underlayment. Open metal valleys get the metal on top of the membrane. This meets both codes and seals around every nail near the valley.
- The field underlayment laps over the edges of the valley membrane by at least 6 in, so water on the underlayment runs onto the membrane, not under it.
To lay valley membrane, start at the eave and work up. Fold the sheet lengthwise to find its center, set the fold in the valley without bridging (the membrane must touch the deck all the way into the corner), then peel and press one half at a time. Laps at the ends are upper sheet over lower by about 6 in.
Three kinds of shingle valley
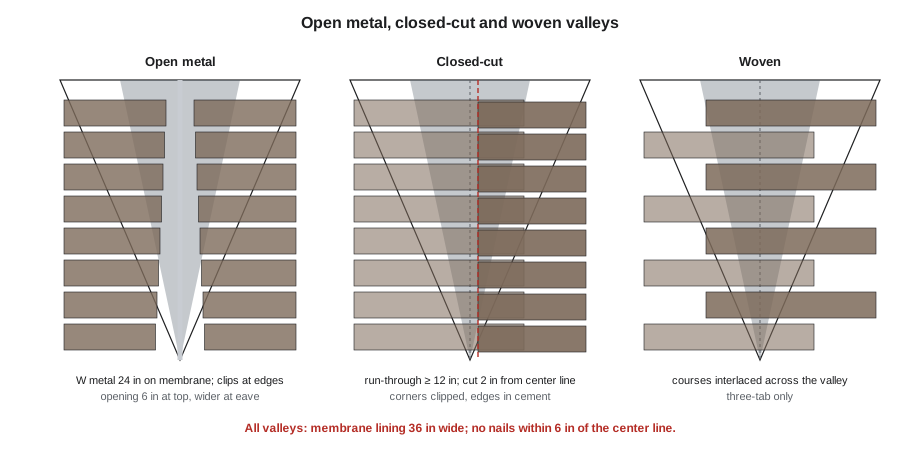
| Valley type | How it is made | Strengths | Weaknesses |
|---|---|---|---|
| Open metal | a metal channel left exposed between shingles cut back from both sides | carries the most water; easy to clean; durable | more labor; metal shows; needs correct metal and fastening |
| Closed-cut | one slope's shingles run through the valley, the other slope's are cut along a line | neat look; quick with laminated shingles; Ridgecap's usual valley | the cut side must be done carefully; debris catches at the cut line |
| Woven | courses from both slopes are interlaced across the valley | double thickness in the valley; no cutting | suits three-tab shingles only; most makers do not allow it with thick laminated shingles |
Closed-cut valleys
Most laminated shingle roofs Ridgecap installs have closed-cut valleys. The steps:
- Line the valley with membrane as above.
- Decide which slope runs through. Shingle makers say to shingle the slope that is lower in pitch or smaller in area first and run it through the valley; the cut side then laps over, and water from the bigger or steeper slope runs over the cut edges, not into them.
- Lay the run-through slope's courses across the valley so each course extends at least 12 in onto the other slope. Press each shingle into the valley so it lies tight to the lining without bridging. Do not put a joint between shingles within about 12 in of the centerline; plan the courses so a full shingle crosses the valley.
- Keep nails at least 6 in from the valley centerline. At the end of each shingle that crosses the valley, add one extra nail at the upper corner, still outside the 6 in zone.
- Snap a chalk line on the run-through shingles 2 in back from the valley centerline, on the side the cut shingles will come from.
- Lay the second slope's courses into the valley, letting them run over the chalk line. Cut them along the line with a hook blade, holding a scrap shingle underneath so the blade does not cut the run-through shingles.
- Clip the upper corner of each cut shingle at about 45 degrees, roughly 2 in back, so water running along the cut edge is turned into the valley instead of running sideways under the shingle.
- Set the cut edge of each shingle in a 3 in wide strip of asphalt roofing cement, as the maker's instructions show.
Worked problem
Where the cut line falls
On a closed-cut valley, the chalk line is 2 in back from the centerline. Nails must stay 6 in from the centerline. How far from the cut line must the nails on the cut shingles stay?
Show solution
- The cut line is 2 in from the center.
- The nails must be at least 6 in from the center, on the same side.
- Distance from the cut line = 6 − 2 = 4 in.
Answer: At least 4 in back from the cut edge. A nail closer than that is within reach of the water running down the valley.
Open metal valleys
Open valleys are used where a valley carries a great deal of water, on premium work, where the owner wants the look, or where the shingle maker requires it for a product. The metal is usually pre-painted galvanized steel, aluminum or copper, formed in a W profile: a center rib about 1 in high splits the flow from the two slopes so water from a steep slope does not shoot across and under the shingles on the other side.
- Line the valley with membrane first.
- Lay the metal in the valley, starting at the eave, with each upper piece lapping the one below by at least 6 in (more on low slopes). Trim the bottom end flush with the drip edge and form a small kick so water drips clear.
- Fasten the metal only at its outer edges, with clips (cleats) or with nails at the very edges where the clip method is not practical, so it can expand and contract. Never nail through the center of a valley.
- Snap two chalk lines for the edges of the open channel. A common rule is an opening about 6 in wide at the top of the valley, widening by about 1/8 in per foot toward the eave, because the lower end carries more water.
- Lay the shingles from both slopes over the metal, cut them along the chalk lines, clip the upper corners and set the cut edges in roofing cement, keeping nails at least 6 in from the center and never through the metal near the channel.
Worked problem
Opening at the bottom of the valley
An open valley at 33 Linden is 15.64 ft long. The opening is 6 in at the top and widens 1/8 in for every foot of valley length. How wide is it at the eave?
Show solution
- Extra width = 15.64 × 0.125 = 1.96 in.
- Width at the eave = 6 + 1.96 = 7.96 in, about 8 in.
Answer: About 8 in. The two chalk lines are snapped from 3 in each side of center at the top to 4 in each side at the eave.
Worked problem
Pieces of valley metal
Valley metal comes in 10 ft lengths and laps 6 in. How many pieces does each 15.64 ft valley need?
Show solution
- Each piece after the first adds 10 − 0.5 = 9.5 ft.
- One piece covers 10 ft; 15.64 − 10 = 5.64 ft remains.
- A second piece is needed (it adds up to 9.5 ft). Total: 2 pieces per valley, the top one trimmed.
Answer: Two pieces per valley, four for the house, with the top pieces trimmed to fit under the ridge.
Woven valleys
In a woven valley, courses from both slopes are laid across the valley at the same time, each course from one slope lapping the course from the other, so the valley is covered by interlaced shingles with no cuts at the center. Each shingle must reach at least 12 in past the centerline, and no nails go within 6 in of the center. Woven valleys work only with thin, flexible three-tab shingles. Thick laminated shingles cannot bend tightly into the valley, so they bridge across it and crack, and most laminated shingle makers do not allow weaving. Rory found that out at 33 Linden: the old woven valley was why someone had nailed it down in the first place.
Unequal slopes and other valley problems
- Unequal slopes: where a steep roof meets a shallow one, the valley line does not run at 45 degrees on the plan, and water from the steep slope rushes across the valley. Open W-valleys, or a closed-cut valley with the steep side cut, handle this best.
- Valleys that end on a roof: a dormer or a wing whose valleys end partway up the main roof leaves a place where two valleys' water lands on the field. The lining must extend well past the end, and the shingles below must not have a joint there.
- Valleys over a wall or chimney: water from a valley must never be aimed at a wall, chimney or skylight. Where it cannot be avoided, a cricket and extra flashing are needed (lesson 11).
- Debris: valleys under trees need cleaning, and the owner should know that. Open metal valleys shed debris best.
- Ice: at the eave, valley ice dams are common. The valley membrane and the eave membrane should overlap so there is no gap at their junction.
33 Linden, rebuilt
Crew 5 relined both valleys at 33 Linden with membrane, ran the main roof through, and cut the wing shingles 2 in back from the centerline with clipped corners and cement. Rory checked that no nail sat within 6 in of either valley center, and replaced a section of rotten deck at the bottom of the left valley where the old nail had been leaking. The next storm dropped 1.5 in of rain in an afternoon. The owner called to say the ceiling was dry.
Common mistakes
MistakeNailing within 6 in of the valley centerline.
InsteadKeep all nails out of that zone; add an extra nail at the upper corner of shingles crossing the valley outside it.
MistakeWeaving thick laminated shingles.
InsteadUse closed-cut or open valleys with laminated shingles; weaving suits three-tab only.
MistakeBridging the lining or shingles across the valley.
InsteadPress membrane and shingles tight into the valley so they touch the deck all the way.
MistakeRunning the cut side from the smaller or lower slope.
InsteadRun the smaller or lower-pitched slope through; cut the larger or steeper side so its water runs over the cut edges.
MistakeNailing through the middle of valley metal.
InsteadFasten valley metal only at its edges with clips so it can move.
Summary and key terms
- Valleys carry water from two slopes and need linings, special shingle details and no nails near the center.
- Valley length = common run × valley factor, √(R² + 288) ÷ 12.
- The Residential Code of Ohio (R905.2.8.2) sets valley linings; Ridgecap lines every valley with 36 in self-adhered membrane.
- Closed-cut valleys run one slope through and cut the other 2 in back from the centerline, with clipped corners and cement.
- Open metal valleys use W-profile metal fastened at the edges, with an opening widening toward the eave.
- Woven valleys suit only three-tab shingles.
- Valley
- The internal corner where two roof slopes meet and water collects.
- Valley lining
- The membrane, roll roofing or metal laid in a valley before the shingles.
- Closed-cut valley
- A valley where one slope's shingles run through and the other slope's are cut along a line near the center.
- Open valley
- A valley where the lining metal is left exposed between shingles cut back from both sides.
- Woven valley
- A valley where shingle courses from both slopes are interlaced.
- W-valley
- Valley metal with a raised center rib that separates the water from the two slopes.
- Clipping
- Cutting the upper corner of a valley shingle at an angle to turn water into the valley.
Practice problems
Work each problem on paper first, then reveal the answer to check.
A valley has a common run of 8 ft on a 6 in 12 roof. How long is it?
Show answer
8 × 1.5 = 12 ft.
How far onto the other slope must run-through shingles extend in a closed-cut valley?
Show answer
At least 12 in.
Why clip the upper corner of cut valley shingles?
Show answer
So water running along the cut edge is turned into the valley, not sideways under the shingle.
What is the purpose of the center rib on W-valley metal?
Show answer
It stops water from one slope shooting across and under the shingles on the other.
Why are woven valleys not used with laminated shingles?
Show answer
Thick laminates bridge the valley and crack, and most makers do not allow it.
Lesson quiz · 5 questions
Score 60% or more to complete this lesson.
Create a free account to save your progress, take quizzes and earn a certificate.