
ROOF-130 · Lesson 11 of 12 · 23 min
Chimney and wall flashing basics
▶ Video coming soon A video version of this lesson is on the way.
The owner of 41 Linden had had the same leak fixed three times by three different companies. Each time, someone had smeared another layer of black roofing cement around the chimney, and each time the stain on the bedroom ceiling came back by spring. When Crew 5 stripped the shingles, Rory saw why. There was no step flashing at all along the sides of the chimney: the shingles had been butted against the brick and caulked. "Sealant is a bandage," Wes said, scraping off a handful of it. "Flashing is the cure. Water has to be turned by metal that laps the right way, or it will find the gap."
Wherever a roof meets something that sticks up through it or rises above it, the shingles cannot shed water on their own. Walls, dormer cheeks, chimneys, skylights and pipes all need flashing: pieces of metal or membrane lapped with the shingles so water is carried around the obstacle and back onto the roof. This lesson covers the basic flashings on a shingle roof. ROOF-320 later goes into the full range of details.
The rule of flashing
Every flashing follows one rule: each piece laps over the piece below it and under the piece above it, so water running down the roof or down the wall always runs over a lap and never into one. Sealants and roofing cement can help hold a piece or close a small gap, but they are never the main defense. Cement dries, cracks and lets go in a few years of sun and frost; metal lapped correctly works for decades.
On a shingle roof, flashings work in two layers:
- Base flashing: pieces that are woven in with the shingles and turn up against the wall or chimney.
- Counterflashing: a cover over the top of the base flashing, attached to the wall or chimney, so water running down the wall is carried over the top edge of the base flashing. On a framed wall, the siding and the wall's weather barrier do this job; on a masonry chimney, metal counterflashing is set into the mortar joints.
The two are separate so the roof and the wall can move independently, and so the roof can be replaced without tearing out the wall cladding or chimney.
Step flashing at walls
Where a roof slope runs alongside a wall, such as the side of a dormer or a house wall above a lower roof, the joint is flashed with step flashing: separate L-shaped pieces of metal, one for each course of shingles.
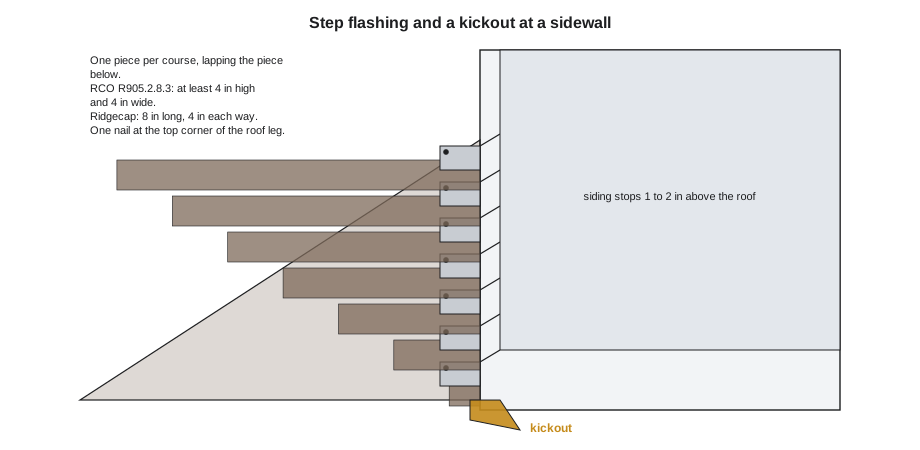
- Section R905.2.8.3 of the Residential Code of Ohio says the base flashing against a sidewall must be continuous or step flashing, at least 4 in high and 4 in wide, and must direct water away from the wall onto the roof or into the gutter.
- Ridgecap's standard piece is 8 in long and 8 in wide, bent to 4 in up the wall and 4 in on the roof, in pre-finished galvanized steel or aluminum matched to the roof.
- Each piece must be longer than the exposure by at least the required head lap, so it reaches under the next piece. With a 5-5/8 in exposure, an 8 in piece gives 8 − 5-5/8 = 2-3/8 in of head lap.
How to install step flashing, course by course:
- Turn the underlayment up the wall about 4 in first, and lay a strip of self-adhered membrane in the corner for extra protection.
- Lay a starter piece of step flashing at the bottom of the wall over the starter course.
- Lay the first course of shingles up to the wall. Set a step flashing piece on top of the shingle at the wall, with its bottom edge just above where the bottom edge of the next course will be, so the next shingle covers it completely.
- Nail the flashing with one nail at the top corner of its roof leg, well away from the wall. Never nail the wall leg to the wall: the roof and wall move differently, and the nail would tear the flashing or let water in.
- Lay the next course over the flashing, then the next piece of flashing, and so on up the wall. Each piece laps the one below.
- Keep shingle nails out of the flashing near the wall; the shingle nails nearest the wall go through the roof leg only at its outer edge, or not at all, as the maker shows.
- When the roofing is done, the wall's weather barrier and siding come down over the wall legs, stopping 1 to 2 in above the shingles so the siding can be painted and does not wick water. On a re-roof, the bottom course of siding is lifted or removed and refitted.
Worked problem
Step flashing for a dormer
The dormer at 19 Linden has cheeks 7 ft long along the roof slope on each side. The exposure is 5-5/8 in. How many step flashing pieces are needed for both cheeks?
Show solution
- Courses along each cheek = 84 ÷ 5.625 = 14.9, so 15 courses.
- Pieces per side = 15 courses + 1 starter piece = 16.
- Both sides = 2 × 16 = 32 pieces.
Answer: 32 pieces, plus a few spare. Ridgecap orders step flashing in packs of 100 and keeps the extras on the truck.
Kickout flashing
Where a roof eave ends against a wall that continues down past it, as where a garage or porch roof dies into the side of a two-story house, the water running down the step flashing reaches the bottom of the wall at the eave. If nothing turns it, it runs down behind the gutter and into the wall, where it rots the sheathing and framing, often without showing inside for years. A kickout (diverter) flashing is a one-piece formed flashing at the bottom of the step flashing that turns that water out into the gutter. Section R903.2.1 of the Residential Code of Ohio requires a diverter or kickout flashing where the eave of a sloped roof meets a sidewall, and Ridgecap installs one at every such corner.
Apron flashing at the front of a wall
Where the top of a roof slope runs into a wall, such as the face of a dormer below its window, or the low side of a chimney, the joint runs across the slope instead of along it. It is flashed with one continuous apron (or headwall) flashing: a long L-shaped piece laid over the top course of shingles, turned up the wall at least 4 in, and lapped on top of the shingles by at least about 4 in, with its ends wrapped around the corners and lapping the first step flashing pieces. The wall's weather barrier and siding come down over its wall leg. A final course of shingles or cut pieces is not laid over the apron; the apron itself is the top of the roof at that wall.
Chimneys
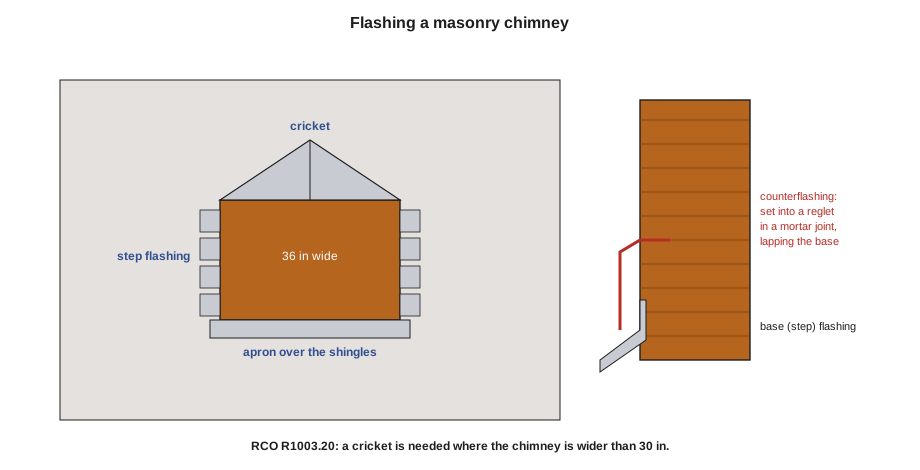
A masonry chimney needs flashing on all four sides, in this order, working up the roof:
- Front (low side): an apron flashing over the shingles, turned up the face of the chimney and wrapped around its front corners.
- Sides: step flashing, woven with each course of shingles, one piece per course, as at a wall.
- Back (high side): a back pan flashing, or, on a wide chimney, a cricket, that carries water around the chimney. The back flashing goes under the shingles above it, so water runs onto it and around.
- Counterflashing on all sides: metal set into the mortar joints of the chimney and bent down over the base flashings. On the sides it is cut in steps that follow the brick courses.
The Residential Code of Ohio (R1003.20) requires a cricket on the high side of a chimney that is more than 30 in wide parallel to the ridge, unless the chimney sits right on the ridge. The cricket is framed and covered with metal or the same roofing as the roof, and flashed and counterflashed at the chimney. For the other chimney flashings, R905.2.8.4 points to the shingle maker's instructions, which show the same apron, step, back flashing and counterflashing system.
Counterflashing is set into the masonry by cutting a slot (a reglet) about 1 in deep into a mortar joint with a grinder, bending the top edge of the counterflashing into it, wedging it in place and sealing the joint with a sealant made for masonry. Never cut into the brick face itself, and never just glue counterflashing to the face of the chimney: surface-mounted counterflashing fails within a few years.
Building a cricket
A cricket is a small gable roof on the high side of the chimney. Its ridge runs from the center of the back of the chimney up to the main roof, and its two slopes turn the water to each side. Ridgecap builds crickets from plywood on wood framing, matching the main roof slope where possible, covers them with self-adhered membrane, and finishes them in pre-finished sheet metal, which handles the concentrated water better than shingles cut into small triangles.
Worked problem
How tall is the cricket?
The Elmcrest bungalow chimney is 36 in wide across the slope. The roof is 5 in 12. The cricket's slopes will match the roof. How high must the cricket's ridge be where it meets the chimney, measured square to the roof?
Show solution
- Each slope of the cricket runs half the chimney width: 36 ÷ 2 = 18 in.
- At 5 in 12, the rise over that run = 18 × 5 ÷ 12 = 7.5 in.
- Is a cricket needed? The chimney is 36 in wide, more than 30 in, so yes.
Answer: About 7-1/2 in high at the chimney, sloping back to nothing where it meets the main roof. Lesson 12 builds it.
Pipes and small penetrations
Plumbing vents, exhaust fan ducts and other small round penetrations get a pre-formed pipe flashing: a flat metal or plastic base with a rubber (neoprene or EPDM) boot that grips the pipe, or a soft lead or copper sleeve that is turned down into the top of the pipe. The rule is the same as every other flashing: the upper part of the base goes under the shingles above the pipe, and the lower part sits on top of the shingles below it, so water runs onto the base and around the pipe.
- Cut the shingles to fit around the pipe, lay the base over the course below, then lay the next courses over its upper part.
- Nail the base only at its upper corners, where the shingles will cover the nails.
- Rubber boots crack in the sun after 10 to 20 years, often before the shingles wear out. Ridgecap replaces every pipe flashing on every re-roof.
- Exhaust fans get a roof cap with a damper and its own flashing base, installed the same way.
Walls of brick and stucco
Where a roof meets a brick or stone wall, as on many older houses, the step flashing is counterflashed with metal set into the mortar joints, just as on a chimney. Where it meets stucco, the counterflashing is set into a reglet cut in the stucco, or the stucco is cut back and refinished over a new flashing. Both are fussy and costly to do right, and both are often done wrong. If a re-roof will disturb a stucco or masonry wall, the owner is told before the job starts.
41 Linden, fixed for good
Crew 5 cut out the old cement, laid membrane in the corners, and flashed the chimney at 41 Linden properly: an apron at the front, a step flashing piece at every course up both sides, a back pan under the shingles above (the chimney was only 24 in wide, so no cricket was needed), and new counterflashing let into reglets ground into the mortar joints. Rory cut the reglets himself, with Wes watching every pass of the grinder. Not one tube of cement was opened. After two days of heavy rain at the end of October, the owner sent Ridgecap a photograph of a dry bedroom ceiling.
Common mistakes
MistakeSealing shingles to a wall or chimney with roofing cement instead of flashing.
InsteadUse step, apron and counterflashing lapped so water runs over each joint; sealant is not flashing.
MistakeNailing step flashing to the wall.
InsteadNail only the top corner of the roof leg, so the roof and wall can move independently.
MistakeLeaving out the kickout where a roof eave meets a wall.
InsteadInstall a kickout so water from the step flashing goes into the gutter, not the wall.
MistakeGluing counterflashing to the face of a chimney.
InsteadSet counterflashing into a reglet in a mortar joint and seal the joint.
MistakeFlashing a wide chimney without a cricket.
InsteadBuild a cricket on the high side where the chimney is wider than the code trigger.
Summary and key terms
- Every flashing piece laps over the one below and under the one above; sealant is never the main defense.
- Base flashings are woven with the shingles; counterflashings come down from the wall or chimney over them.
- At sidewalls, step flashing is at least 4 in high and 4 in wide (RCO R905.2.8.3).
- A kickout at the bottom of a roof-to-wall joint turns water into the gutter.
- Chimneys get an apron at the front, step flashing at the sides, a back pan or cricket at the back and counterflashing set into the mortar.
- A cricket is required on the high side of a chimney wider than 30 in (RCO R1003.20).
- Base flashing
- Flashing woven in with the roofing and turned up against a wall or chimney.
- Counterflashing
- Flashing fastened to a wall or chimney that laps down over the base flashing.
- Step flashing
- Separate L-shaped pieces of flashing, one per course, used where a roof slope meets a wall.
- Apron flashing
- A continuous flashing at the top of a roof slope where it meets a wall across the slope.
- Kickout flashing
- A formed flashing at the bottom of a roof-to-wall joint that turns water into the gutter.
- Reglet
- A slot cut into a mortar joint or other surface to receive the edge of a counterflashing.
- Cricket
- A small ridged roof on the high side of a chimney that turns water around it; also called a saddle.
Practice problems
Work each problem on paper first, then reveal the answer to check.
A wall is 10 ft long along the slope at 5-5/8 in exposure. How many step flashing pieces?
Show answer
120 ÷ 5.625 = 21.3, so 22 courses plus 1 starter piece: 23.
How much head lap does an 8 in step flashing piece give at a 5-5/8 in exposure?
Show answer
8 − 5.625 = 2.375 in.
A chimney is 28 in wide. Does it need a cricket under the Residential Code of Ohio?
Show answer
No; 28 in is not more than 30 in. It gets a back flashing instead.
Why is the wall leg of step flashing never nailed?
Show answer
The roof and wall move differently; a nail would tear the flashing or let water in.
How high is a cricket for a 48 in chimney on a 6 in 12 roof?
Show answer
24 × 6 ÷ 12 = 12 in.
Lesson quiz · 5 questions
Score 60% or more to complete this lesson.
Create a free account to save your progress, take quizzes and earn a certificate.