
ROOF-130 · Lesson 4 of 12 · 25 min
Deck preparation
▶ Video coming soon A video version of this lesson is on the way.
With the south slope of 27 Linden stripped to the rafters, Wes handed Rory a moisture meter and a chalk line. "Shingles don't make a roof flat," he said. "The deck does. If it's soft, wavy, wet or full of nails, the best shingles in the world will look bad and leak early. Get the deck right and the rest of the job is easy."
ROOF-120 introduced wood, steel and concrete decks and how they are built. On a house re-roof the deck is almost always wood, and the roofer is the person who sees it bare for the first time in twenty or thirty years. This lesson covers what a shingle roof needs from its deck, how to inspect a deck after tear-off, and how to repair, re-sheathe and prepare it so the new roof starts on a sound, flat, dry base.
What shingles need from a deck
Asphalt shingles are flexible and thin. They follow every bump in the surface below and rely completely on nails for their hold, so the deck must be:
- Solid: the Residential Code of Ohio says asphalt shingles must be fastened to solidly sheathed decks (R905.2.1). Spaced boards are not acceptable.
- Thick and stiff enough: panels and boards must meet the code minimum for the rafter or truss spacing, and the shingle maker's minimum, which is often stricter. Ridgecap's standard for new sheathing is 5/8 in panels.
- Able to hold nails: shingle nails must reach 3/4 in into the deck or pass right through it, as ROOF-120 explained. Rotten, brittle or delaminated wood will not hold them.
- Flat and smooth: no humps, dips, ridges at panel joints or projecting nails.
- Dry: wood at more than about 19 percent moisture content should not be covered. Wet panels swell, buckle and later shrink, and moisture trapped under underlayment can soak upward into the shingles or down into the attic.
- Well attached: every panel and board fastened to the framing, with no loose or bouncing areas.
Inspecting the deck after tear-off
Crew 5 inspects each slope as soon as it is stripped and swept, before any repair, and photographs anything it finds. The routine:
- Walk it: soft spots and bouncy areas show up underfoot. Mark them with spray paint or keel.
- Probe it: push a screwdriver or awl into suspect areas, especially at eaves, valleys, around chimneys and vents, and under old leaks. Sound wood resists; rot lets the point sink in.
- Look underneath: from the attic, look for daylight through gaps, staining, mold, frost marks and rusted nail tips. Darkened wood around a bathroom or kitchen fan points to moisture from inside.
- Sight along it: crouch at a rake or eave and look along the surface for waves, humps and sags between rafters.
- Meter it: take readings with a pin moisture meter in several places on each slope, and anywhere that looks or feels damp.
- Check the edges: fascia boards, sub-fascia, the first board or panel row at the eave, and the rake boards, which rot first because water runs off there.
- Check the framing: look for split, sagging or notched rafters, broken truss members and missing bracing. Report these; they are not the roofer's to fix.
| Finding | Likely cause | Repair |
|---|---|---|
| Soft, dark wood at the eave | ice dams, overflowing gutters, missing drip edge | cut out to sound wood and replace; add ice barrier and drip edge |
| Rot around a chimney or vent | failed flashing | replace the wood; re-flash properly (lesson 11) |
| Delaminated plywood | long-term wetting | replace the panel |
| Swollen OSB edges | panels left wet or chronic moisture | sand flat if minor; replace if soft |
| Sags between rafters | thin panels, wide spacing, no edge support | add blocking or clips, or overlay with new panels |
| Gaps and missing knots in boards | shrinkage and age | cover with new panels or replace boards |
| Mold and frost marks underneath | air leaks and poor ventilation | replace damaged wood; report the cause; fix ventilation (lesson 10) |
| Nails sticking up | old fasteners left from tear-off, or popped nails | pull or drive down; re-nail the panel |
Boards or panels?
Older houses such as those on Linden Street and Elmcrest Avenue have board decks: solid lumber boards, typically 1 in by 6 in nominal, laid tight across the rafters. A sound, solid board deck can take new shingles, but shingle makers limit what they accept. Most want boards no wider than about 6 in, with gaps of no more than about 1/8 in, and every board nailed at every rafter. Wider boards cup as they dry, and wide gaps let shingle nails miss the wood.
When a board deck has too many gaps, knotholes, cupped boards or soft areas, there are two choices:
- Overlay: nail new panels over the old boards, through into the rafters. This is quick and keeps the old boards as extra stiffness, but it raises the roof surface, which affects flashings at walls and chimneys and the drip edge at the fascia.
- Re-sheathe: strip the boards and install new panels directly on the rafters, as Crew 5 did at 27 Linden. This is more work but gives a known, flat deck and is the only option where the boards are spaced or rotten.
On the Elmcrest bungalow, as the case study in lesson 12 will show, the board deck was mostly sound, and Wes chose to replace only the damaged boards.
Installing new panels
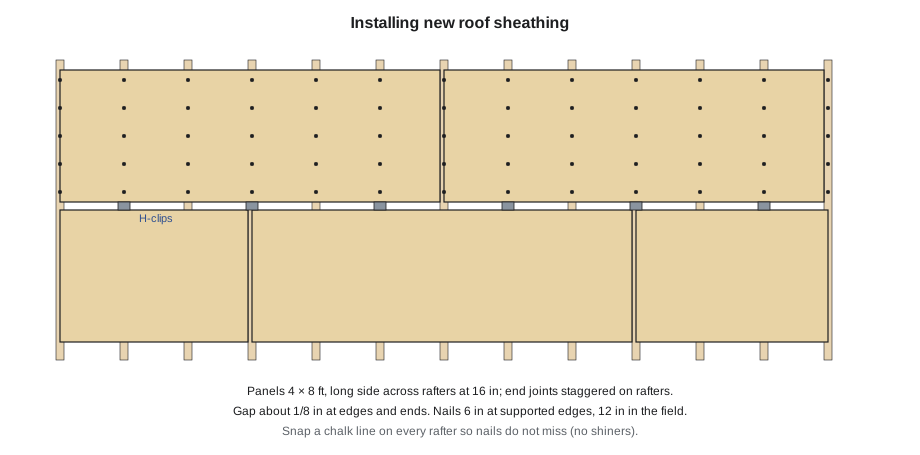
The rules from ROOF-120 apply to every panel Crew 5 installs:
- Long dimension across the rafters, with end joints staggered and landing on the center of a rafter.
- A gap of about 1/8 in at all edges and ends; a 10d nail or a gap tool sets it.
- Long edges between rafters supported with panel clips (H-clips) or blocking where the code or panel stamp calls for it.
- Nails about 6 in apart along supported ends and edges, about 3/8 in in from the edge, and about 12 in apart along intermediate rafters, using the nail size the code and designer require (Ridgecap uses 8d (2-1/2 in) ring-shank nails for 5/8 in panels).
- Panels stamped side up, and grade-stamped for roof use.
- Snap a chalk line on each rafter center before nailing, so nails do not miss the framing. A nail that misses a rafter (a shiner) holds nothing and can rust and drip condensation.
Worked problem
Nails per panel
A 4 ft by 8 ft panel runs across rafters at 16 in centers, with both ends landing on rafters. Edge nails are at 6 in, field nails at 12 in. How many nails does one panel need?
Show solution
- Rafter spaces along the panel = 96 ÷ 16 = 6, so the panel crosses 7 rafters: 2 at the ends and 5 in between.
- Each end: 48 ÷ 6 = 8 spaces, so 9 nails. Two ends: 18 nails.
- Each intermediate rafter: 48 ÷ 12 = 4 spaces, so 5 nails. Five rafters: 25 nails.
- Total = 18 + 25 = 43 nails.
Answer: About 43 nails per panel. For the 40 panels on 27 Linden, that is about 1,720 nails, so the crew loads two boxes of framing nail coils.
Repairing part of a deck
Most re-roofs need only spot repairs. The method for a rotten area on a panel or board deck:
- Mark out a rectangle around the damage, extending to sound wood, with its two sides along the centers of rafters so the new piece has something to nail to. If the damage stops between rafters, add 2x4 blocking or cleats nailed to the sides of the rafters to carry the edges.
- Set the saw depth to the deck thickness so the blade does not cut into the rafters, and cut out the piece.
- Fit the new piece with the usual gaps. It must match the thickness of the deck around it. Old plywood is often 1/2 in and old boards about 3/4 in, so use matching panels, or shim new panels flush. A step of even 1/8 in shows through new shingles.
- Nail the patch at the edge spacing on all supported sides.
Worked problem
Measuring a patch to the rafters
Rory finds a soft area at the eave of the south slope at 27 Linden. It starts 10 in from a rafter center and is 36 in wide along the eave. Rafters are at 16 in centers. How wide must the patch be to land on rafter centers on both sides?
Show solution
- The damage runs from 10 in to 10 + 36 = 46 in past the first rafter center.
- Rafter centers are at 0, 16, 32, 48 in, and so on.
- The patch must start at 0 (the first rafter) and end at the first center past 46 in, which is 48 in.
- Patch width = 48 in, spanning three rafter spaces.
Answer: A patch 48 in wide, three rafter spaces. Because it runs along the eave, Rory also checks the fascia and sub-fascia behind it before closing it in.
Fascia, rake boards and edges
The edges of the roof take the most water. Before drip edge goes on, Crew 5 checks:
- Fascia and sub-fascia: the boards along the rafter tails. Rot here lets the drip edge and gutter pull loose. Damaged lengths are replaced or, where there is metal or vinyl fascia cladding, the board behind it is checked by probing from above.
- Rake boards: the trim along the gable edges. On gable roofs, the rake is exposed to wind-driven rain and often rots behind loose drip edge.
- The deck edge: the first 1 to 2 ft at the eave is the most common place for rot, because ice dams and overflowing gutters wet it.
Wood that will be exposed to weather is primed or wrapped in metal or vinyl trim. Raw wood left at the edges of a new roof will be rotten again within a few years.
Moisture and timing
A deck must be dry when it is covered. Ridgecap's limits:
- Panels or boards above about 19 percent moisture content on the meter are left to dry, or replaced if they are soaked.
- New panels delivered wet are not installed until they dry, and are stored off the ground under cover.
- Frost, dew and rain are swept and allowed to dry before underlayment goes on. Self-adhered membranes will not stick to a wet or frosty deck.
- If rain comes during the day, the deck is dried in with whatever has been installed, and work stops until the deck is dry again.
Worked problem
Can the deck be covered?
Rory takes five readings on the north slope at 27 Linden the morning after a shower: 14, 16, 22, 15 and 13 percent. What should he do?
Show solution
- Four readings are below 19 percent, which is acceptable.
- The 22 percent reading is too wet. He re-checks that spot and the area around it.
- If it is a damp board, he waits for it to dry in the sun; if it stays wet or the wood is soft, it is replaced.
- The average, (14 + 16 + 22 + 15 + 13) ÷ 5 = 16 percent, does not matter: one wet area can still cause a problem.
Answer: Hold off on the wet area. Cover the dry parts of the slope, and deal with the wet spot before closing it in.
Other things to fix before roofing
- Plumbing vents: check that each vent stack is sound and rises far enough above the new roof surface; the plumbing code sets the minimum height. If the stack is too short after re-decking or overlaying, a plumber extends it.
- Exhaust fans: bathroom and kitchen fans must vent outdoors, not into the attic. Fans that end in the attic are reported to the owner, as Dana did on Linden Street in ROOF-120.
- Chimneys: loose bricks, missing mortar and a crumbling crown are reported; the roofer flashes the chimney but does not repair the masonry unless that is in the contract.
- Skylights: old skylights are often replaced at re-roof time, because their flashing is tied into the shingles. The owner decides before tear-off.
- Ventilation openings: cut ridge vent slots and new vent holes now, before the underlayment goes on (lesson 10).
27 Linden, ready for underlayment
By the end of the second day, both slopes at 27 Linden had new 5/8 in panels, H-clips at every long edge, chalk lines on every rafter, two sistered rafters near the chimney and a new sub-fascia along the front eave. Rory had found and replaced three shiners where his nails had missed the rafter. "That's three you found," Wes said. "Now go and look from the attic for the ones you didn't." There were two more.
Common mistakes
MistakeCovering a deck with wet spots because most of it is dry.
InsteadCheck the moisture over the whole slope; one wet area can rot or buckle.
MistakePatching with a panel thinner than the deck around it.
InsteadMatch the thickness or shim flush; steps show through shingles.
MistakeEnding a patch between rafters with nothing under its edges.
InsteadRun the patch to rafter centers or add blocking under the edges.
MistakeMissing rafters with sheathing nails.
InsteadSnap a chalk line on each rafter center and check from the attic for shiners.
MistakeLeaving bathroom fans venting into the attic.
InsteadReport it; new decking will rot the same way if the moisture source stays.
Summary and key terms
- Shingles need a solid, stiff, flat, dry deck that holds nails; spaced boards are not acceptable.
- Inspect every slope after tear-off by walking, probing, sighting, metering and looking from the attic.
- Board decks can be overlaid with panels or stripped and re-sheathed; spaced or rotten boards must be replaced.
- Install panels across the rafters with staggered joints, gaps, edge support and correct nailing along chalked rafter lines.
- Patches run to rafter centers or blocking and match the surrounding thickness.
- Check fascia, rake boards, vents, fans, chimneys and skylights before roofing, and cover only a dry deck.
- Re-sheathe
- Remove the old deck boards and install new sheathing panels.
- Overlay
- Nail new panels over an existing board deck.
- Shiner
- A nail that misses the framing and sticks out the underside of the deck.
- Sub-fascia
- The board fastened to the rafter tails behind the finished fascia.
- Moisture content
- The weight of water in wood as a percentage of the dry wood weight.
- Blocking
- Short lumber pieces fastened between rafters to support panel edges.
- H-clip
- A metal panel edge clip that supports adjacent panel edges between rafters.
Practice problems
Work each problem on paper first, then reveal the answer to check.
Why must a patch match the thickness of the deck around it?
Show answer
A step of even 1/8 in shows through and can wear the shingles.
What moisture content does Ridgecap treat as too wet to cover?
Show answer
Above about 19 percent.
How many nails go along one 48 in end of a panel at 6 in spacing?
Show answer
48 ÷ 6 = 8 spaces, so 9 nails.
What should you do if a rafter is split?
Show answer
Stop and report it; a carpenter or engineer decides the repair.
Why is the eave the most common place for deck rot?
Show answer
Ice dams and overflowing gutters wet it.
Lesson quiz · 5 questions
Score 60% or more to complete this lesson.
Create a free account to save your progress, take quizzes and earn a certificate.