
IRW-320 · Lesson 10 of 12 · 23 min
Anchoring to concrete and masonry
▶ Video coming soon A video version of this lesson is on the way.
On Thursday afternoon, November 12, Rhea set up at the concrete wall along Ashcroft's entrance ramp, where a steel guard would run along the top of the wall. The guard posts had base plates, each to be fastened with four adhesive anchors drilled into the top of the wall. The wall had been cast in August, before anyone had thought of the guard, so there were no embeds. Rhea laid out the plates, ran a rebar scanner along the wall to find the reinforcing, and then laid out her tools in order: a hammer drill with a dust extractor, a depth gauge, a wire brush, an air blower, the adhesive cartridges and their mixing nozzles, and a printed copy of the anchor maker's instructions. "An adhesive anchor is the most trusting piece of steel on the job," she told Shay. "It holds only if you did every step. Nobody can see whether you did."
This lesson explains the kinds of anchors used to fasten steel to concrete and masonry, how they carry load and how they fail, the evaluation reports and certifications that control them, how they are installed and checked, and how to work safely with the dust and tools involved.
Cast-in and post-installed anchors
Steel can be fastened to concrete in two ways. Cast-in anchors, such as embeds with headed studs, anchor rods and inserts, are placed before the concrete and are the strongest and most reliable, because the concrete forms around them. Post-installed anchors are installed in holes drilled in hardened concrete, when steel must be fastened to concrete that was not planned for it, when an embed was missed or moved, or simply because they are faster for light loads.
- Expansion anchors, such as wedge anchors and sleeve anchors, are pushed into the hole and tightened, which pulls a cone or wedge into an expanding clip that presses against the hole wall. They hold by friction and are loaded immediately.
- Screw anchors are hardened screws that cut their own thread into the concrete. They are quick, can be removed and are common for light and medium loads.
- Adhesive anchors are threaded rods or reinforcing bars set in a hole filled with an epoxy or other adhesive. They hold by bond along the whole embedment and are strong close to edges, but need careful hole cleaning and curing.
- Undercut anchors cut a cone-shaped undercut at the bottom of the hole and lock into it mechanically, for the highest loads and critical uses.
- Powder-actuated and other driven fasteners shoot pins into concrete or steel for light loads, such as fastening clips, tracks and deck.
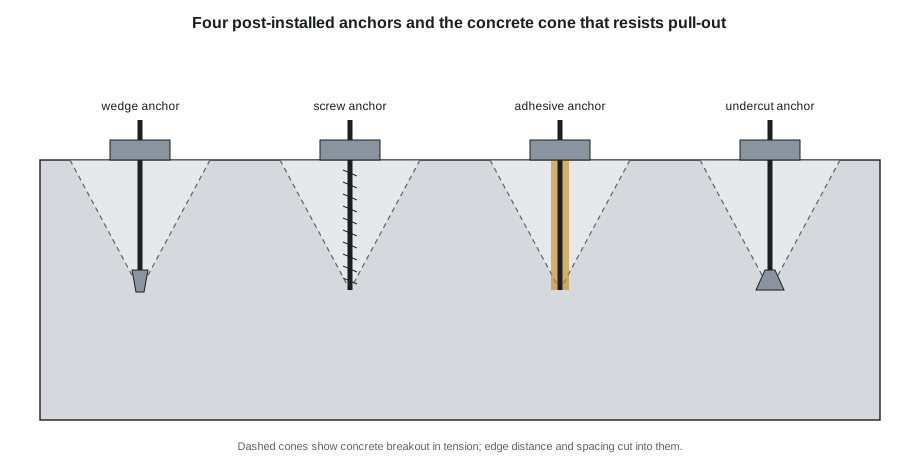
How anchors carry load and how they fail
An anchor carries tension along its axis and shear across it. It can fail in several ways, and the designer checks all of them.
- Steel failure: the rod or bolt itself breaks.
- Concrete breakout: a cone of concrete pulls out around the anchor in tension, or a wedge breaks off toward an edge in shear.
- Pull-out or bond failure: the anchor slides out of the hole without the concrete breaking, because the expansion or the bond did not hold.
- Splitting: the concrete cracks when anchors are too close to an edge or each other, especially expansion anchors.
Most of these depend on things the installer controls: how deep the anchor goes, how far it is from edges and other anchors, how clean the hole is, how the anchor is tightened, and whether the concrete is cracked. That is why anchors are installed exactly as the drawings and the maker's instructions require, and why an anchor that is a little shallow or a little close to the edge may have much less capacity than one installed correctly.
Evaluation reports, design and certification
Post-installed anchors are tested to qualification standards that check their performance in cracked and uncracked concrete, under repeated loads, in different temperatures and with installation errors. The results are published in evaluation reports, which give the design values, edge distances, spacings, embedment depths, hole sizes, installation torques and cure times for each anchor. The engineer designs with those values, and the installer installs to them.
In the US, anchors are designed under Chapter 17 of ACI 318, using values from ICC-ES evaluation reports, which are based on the ACI 355.2 qualification for mechanical anchors and ACI 355.4 for adhesive anchors. The anchor named on the drawing, with its size, embedment and edge distances, is the one to install; a substitute needs the engineer's written approval.
Adhesive anchors carry one special requirement. Under sustained tension, such as an anchor holding something up from the underside of a slab, some adhesives creep over time, and a badly installed adhesive anchor can fail long after installation. ACI 318 requires adhesive anchors installed horizontally or upwardly inclined to resist sustained tension to be installed by people certified under the ACI/CRSI Adhesive Anchor Installer Certification program or an equivalent, with written and hands-on testing. Many specifications, in both countries, go further and require certified installers for all adhesive anchors.
Ashcroft's specification for the ramp guard required all adhesive anchors to be installed by an ACI/CRSI certified installer, whatever their orientation, and required the special inspector to observe the first installations. Rhea held the ACI/CRSI certification, which she had earned in 2023, and her card was in the job file.
Edge distance, spacing and embedment
Every evaluation report gives minimum edge distances and spacings and the embedment depth for each anchor size. Below the minimums, the anchor may split the concrete or lose much of its capacity, and many reports give no values at all below them. The drawing gives the values the engineer used, which are often larger than the minimums.
Worked problem
Checking edge distance and spacing
The ramp guard base plates are 8 × 8 in, with four 1/2 in adhesive anchors at 4 3/4 in spacing, centered on a wall 10 in thick. For this lesson, use SAMPLE minimums from the anchor's report of six diameters to an edge and six diameters between anchors. Do the anchors meet the minimums?
Show solution
- Minimum edge distance = 6 × 0.5 = 3.0 in; minimum spacing = 3.0 in.
- Spacing provided = 4 3/4 in, which exceeds 3.0 in.
- Edge distance to the wall faces = (10 − 4.75) ÷ 2 = 2 5/8 in, which is less than 3.0 in.
Answer: The spacing is fine, but the edge distance to the wall faces is 2 5/8 in, below the SAMPLE minimum. The drawing turned out to show the plates offset to the ramp side, giving more room on one face and less on the other, and the engineer had designed for that with a reduced capacity that the report allowed. Rhea did not decide it herself: she checked the drawing, confirmed the engineer's note, and laid the plates out exactly as drawn.
Hitting reinforcing steel while drilling is a common problem. A drill that stops dead or throws sparks of steel has hit a bar. The installer stops, does not cut the bar, and asks: most drawings allow an anchor to move a short distance, and the engineer decides what to do if it cannot. That is why Rhea scanned the wall first and adjusted her layout within the allowance shown on the drawing before she drilled.
Installing an adhesive anchor
Adhesive anchors are installed in the order the maker's instructions give, and every step matters. The steps for a typical anchor in a hammer-drilled hole are these.
- Drill the hole to the diameter and depth in the instructions, with the drill bit size they specify, perpendicular to the surface, using dust extraction.
- Clean the hole: blow out the dust with clean, oil-free compressed air, brush it with the specified wire brush, and blow it out again, repeating as many times as the instructions say. Dust left in the hole can cut the bond strength dramatically.
- Check the concrete temperature and the adhesive's temperature against the instructions, because they set the working time and the cure time.
- Dispense and discard the first part of the adhesive from each new cartridge until it comes out a uniform color, which shows it is mixed.
- Fill the hole from the bottom, withdrawing the nozzle slowly so that no air is trapped, to about two-thirds full or as the instructions say.
- Insert the clean rod with a slow twisting motion to the marked embedment, so that adhesive comes to the surface around it.
- Do not disturb or load the anchor until the full cure time for the temperature has passed; then install the fixture and tighten to the specified torque.
Worked problem
Adhesive for the ramp guard anchors
Each ramp guard anchor is a 1/2 in rod in a 5/8 in hole drilled 4 in deep. Find the volume of the space around the rod, the volume of adhesive per anchor allowing 50 in 100 extra for waste and the adhesive that comes to the surface, and how many anchors one 10.1 fl oz cartridge (about 18.2 in³) will set.
Show solution
- Space around the rod = π ÷ 4 × (0.625² − 0.5²) × 4 = π ÷ 4 × 0.1406 × 4 ≈ 0.44 in³.
- With 50 in 100 extra: 0.44 × 1.5 ≈ 0.66 in³ per anchor.
- Anchors per cartridge = 18.2 ÷ 0.66 ≈ 27.5, so about 26 or 27 anchors after discarding the first part of each cartridge.
Answer: About 26 or 27 anchors per cartridge. The ramp guard had 11 posts with 4 anchors each, 44 anchors in all, so Rhea brought two cartridges and a spare. Running out of adhesive halfway through filling a hole is a bad day; the half-filled hole must be cleaned out and started again.
The November afternoon was cold, about 39 °F, and the concrete about 43 °F. The adhesive's table gave a cure time of 24 hours at that temperature, against a few hours in summer, so Rhea set all 44 anchors that afternoon and marked the area with tape and a sign: do not load until Friday 4:00 p.m. Benno installed the base plates on the anchors on Friday afternoon, after the cure, and torqued the nuts to the value in the instructions.
Mechanical anchors and masonry
Expansion and screw anchors are simpler to install, but they have their own rules. Wedge anchors must be set to their full embedment and tightened to the specified torque, because the torque is what sets the wedge; over-tightening can split the concrete, and under-tightening leaves the anchor loose. Screw anchors must be driven with the tool and torque the maker allows, and most cannot be reused. At Ashcroft, the door jamb base plates in lesson 8 and the roof ladder brackets in lesson 3 used wedge anchors, and Benno checked each with a torque wrench.
Masonry is weaker and more variable than concrete. Anchors in solid or fully grouted masonry can be similar to those in concrete, but anchors in hollow block need sleeves or screen tubes with adhesive, or must be placed in grouted cells, and their capacities are much lower. Anchors are never placed in mortar joints unless the maker allows it. Brick veneer is not a structural backing at all: nothing is anchored to it.
Dust, noise and powder-actuated tools
Drilling concrete makes fine dust containing crystalline silica, which causes lung disease. The rules require control of that dust.
OSHA 1926.1153, the silica standard for construction, gives a table of controls for tasks such as drilling into concrete with handheld drills: a drill with a dust collection system with a filter and the right airflow, or water, and specific respirator requirements for longer or enclosed work.
Rhea's drill had a shroud and a vacuum with a filter, which also kept the holes cleaner. Hearing protection was worn because hammer drilling is loud.
Powder-actuated tools, which shoot pins into concrete and steel, are used for light fastenings such as clips and tracks. OSHA 1926.302(e) allows only trained employees to operate them, requires the tool to be tested each day before use and forbids loading it until just before use or pointing it at anyone.
Pins must never be shot into brittle or very hard materials, too close to an edge, or into concrete that is too thin, because the pin can pass through or ricochet.
Proof loading and inspection
Some specifications require a sample of post-installed anchors to be proof loaded after installation: a tension load, usually a set fraction above the design load, is applied with a hydraulic tester, and the anchor must hold without movement. Others require an inspector to watch the installation of the first anchors and a sample of the rest. At Ashcroft, the specification required four of the ramp guard anchors to be proof loaded by Tallcorn's testing agency, and the test was booked for Monday, November 16, after the full cure. Until it passed, the guard rails would not be installed on the posts.
Common mistakes
MistakeSubstituting a different anchor because it was on the truck.
InsteadInstall the anchor on the drawing, or get the engineer's written approval for a substitute.
MistakeLeaving dust in an adhesive anchor hole.
InsteadBlow, brush and blow again as many times as the instructions require.
MistakeCutting a reinforcing bar that the drill hit.
InsteadStop and ask; move the anchor only within the drawing's allowance.
MistakeLoading an adhesive anchor before it has cured.
InsteadWait the full cure time for the actual concrete temperature.
MistakeAnchoring into hollow block or brick veneer as if it were concrete.
InsteadUse the anchors and methods approved for the masonry, or anchor to the structure behind.
Summary and key terms
- Cast-in anchors are placed before the concrete; post-installed anchors go into drilled holes in hardened concrete.
- Post-installed anchors include expansion, screw, adhesive and undercut anchors and powder-actuated fasteners.
- Anchors fail by steel failure, concrete breakout, pull-out or bond failure and splitting; installation controls most of these.
- Anchors are designed under ACI 318 Chapter 17 from ICC-ES evaluation reports; install the anchor on the drawing.
- Adhesive anchors under sustained tension, horizontal or overhead, need certified installers, and many specifications require certification for all adhesive anchors.
- Clean holes, correct embedment, edge distance, temperature and cure time decide whether an adhesive anchor holds.
- Post-installed anchor
- An anchor installed in a hole drilled in hardened concrete or masonry.
- Adhesive anchor
- A rod or bar set in a drilled hole with an epoxy or other adhesive.
- Wedge anchor
- An expansion anchor that holds when its torque pulls a cone into an expanding clip.
- Concrete breakout
- Failure in which a cone or wedge of concrete pulls out around an anchor.
- Evaluation report
- A document giving tested design values and installation requirements for an anchor.
- Edge distance
- The distance from an anchor to the nearest edge of the concrete.
Practice problems
Work each problem on paper first, then reveal the answer to check.
A 3/8 in rod sits in a 1/2 in hole 3 1/2 in deep. What volume surrounds the rod?
Show answer
π ÷ 4 × (0.25 − 0.1406) × 3.5 ≈ 0.30 in³.
A minimum edge distance is 8 diameters for a 5/8 in anchor. What is it?
Show answer
5 in.
Why is the first part of a new cartridge discarded?
Show answer
It may not be fully mixed; dispense until the color is uniform.
What sets the cure time of an adhesive anchor?
Show answer
The temperature of the concrete and adhesive, from the maker's table.
What does OSHA require before a powder-actuated tool is used each day?
Show answer
It must be tested, and only trained employees may operate it.
Lesson quiz · 5 questions
Score 60% or more to complete this lesson.
Create a free account to save your progress, take quizzes and earn a certificate.